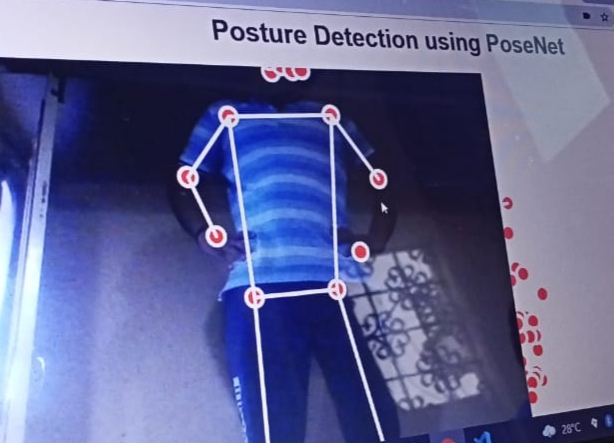
Posture Detection using PoseNet with Real-time Deep Learning project
This article was published as a part of the Data Science Blogathon
Introduction
Deep learning is a subset of Machine Learning and Artificial Intelligence that imitates the way humans gain certain types of knowledge. It is essentially a neural network with three or more layers. deep-learning helps to solve many artificial intelligence applications that help improving automation, performing analytical and physical tasks without human intervention, thus creates disruptive applications and techniques. One such application is Human Pose detection where deep learning takes its place.
What you’ll Learn
- What is PoseNet?
- How does PoseNet Works?
- Applications of Posture Detection in real-time
- Implementing Posture Detection using PoseNet
- Prerequisite points to remember
- Code complete Project from scratch
- Deploy on GitHub
- End Notes
What is PoseNet?
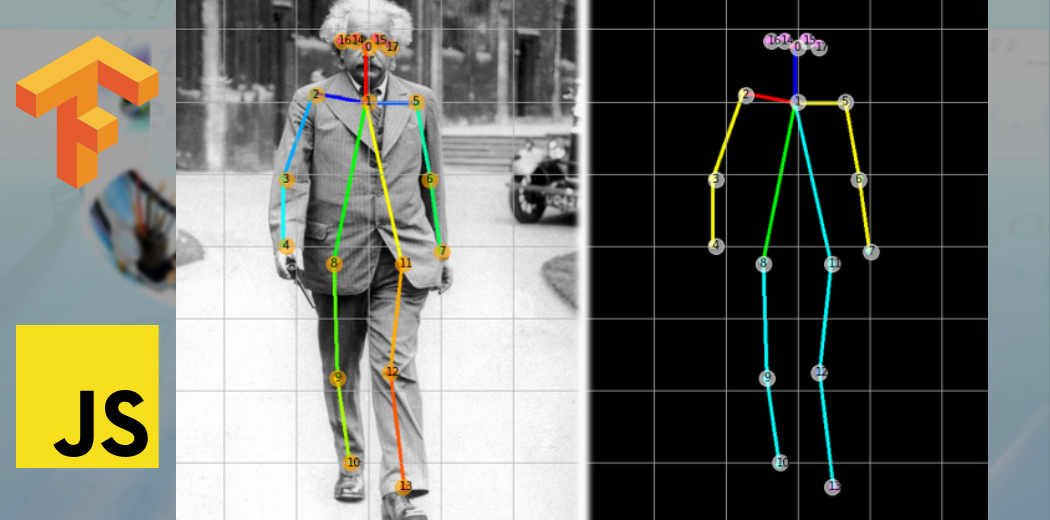
Posenet is a real-time pose detection technique with which you can detect human beings’ poses in Image or Video. It works in both cases as single-mode(single human pose detection) and multi-pose detection(Multiple humans pose detection). In simple words, Posenet is a deep learning TensorFlow model that allows you o estimate human pose by detecting body parts such as elbows, hips, wrists, knees, ankles, and form a skeleton structure of your pose by joining these points.
How does PoseNet work?
PoseNet is trained in MobileNet Architecture. MobileNet is a Convolutional neural network developed by google which is trained on the ImageNet dataset, majorly used for Image classification in categories and target estimation. It is a lightweight model which uses depthwise separable convolution to deepen the network and reduce parameters, computation cost, and increased accuracy. There are tons of articles related to MobileNet that you can find on google.
The pre-trained models run in our browsers, that is what differentiates posenet from other API-dependent libraries. Hence, anyone with a limited configuration in a laptop/desktop can easily make use of such models and built good projects.
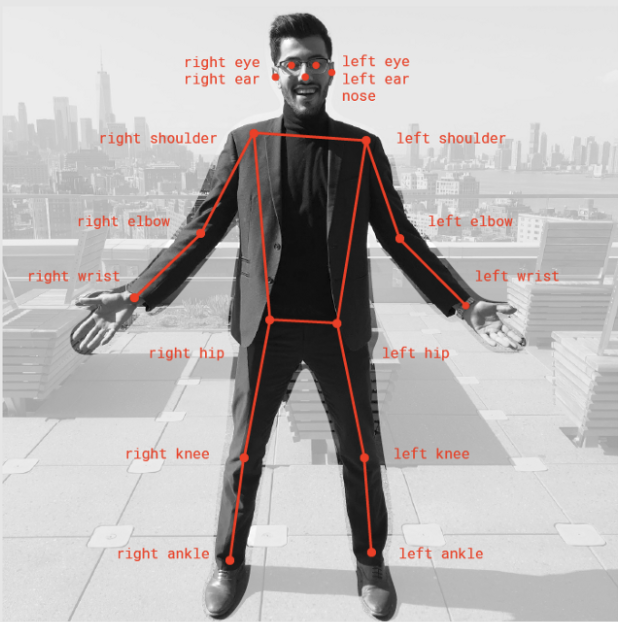
Posenet gives us a total of 17 key points which we can use, right from our eye to and ears to knees and ankles.
If the Image we give to Posenet is not clear the posenet displays a confidence score of how much it is confident in detecting a particular pose in form of JSON response.
Applications of PoseNet in the Real-world used by organizations
1) Used in Snapchat filters where you see the tongue, aspects, glimpse, dummy faces.
2) Fitness apps like a cult which uses to detect your exercise poses.
3) A very popular Instagram Reels uses posture detection to provide you different features to apply on your face and surrounding.
4) Virtual Games to analyze shots of players.
Implementing Posture Detection using PoseNet
Now we have a theoretical knowledge of the posenet and why it is used. let’s jump right into the coding environment and implement the Pose detection project.
How we will Implement Project
We will not be following the Python way of implementing this project rather we will be going with javascript because we have to do all this work in the browser, and implementing Python in the browser is nearly impossible. you can run Python on the server. Tensorflow is having a popular library name tensorflow.js that provides a feature of a running model on a client system.
If you haven’t read or know machine learning with javascript then no need to worry. It is too simple to follow and I will make sure everything is crystal clear to everyone. Indeed there is no much code to write in javascript, only a few lines of code.
let’s get started
You can use any IDE to implement the project like Visual studio code, sublime text, etc.
1) Boiler Template
Create a new folder and create one HTML file which will work as our website to users. here only we will import our javascript file, Machine learning, and deep learning libraries that we will use.
Posture Detection using PoseNet
2) p5.js
It is a javascript library used for creative coding. There is one software known as Processing on the top of which P5.js is based. The Processing was made in java, which helps creative coding in desktop apps but after that when there was a need for the same thing in websites then P5.js was implemented. Creative coding basically means that It helps you to draw various shapes and figures like lines, rectangles, squares, circles, points, etc on the browser in a creative manner(colored or animated) by just calling an inbuilt function, and provide height and width of shape you want.
Create one javascript file, and here we will try to learn P5.JS, and why we are using this library. before writing anything in the javascript file first import P5.js, add a link to a created javascript file in the HTML file.
There are basic 2 things in P5.js that you implement. write the below code in the javascript file.
a) setup – In this function, you write a code that is related to the basic configuration you need in your interface. one thing you create is canvas and specify its size here. And all the things you implement will appear in this canvas only. Its work is to set up all the things.
function setup() {  // this function runs only once while running
    createCanvas(800, 500);
 }
b) Draw – The second function is to draw where you draw all things you want like shapes, place images, play video. all the implementation code placed in this function. Understand it as a main function in compiled languages. Its work is to display things on the screen.
let us try drawing some shapes, and take the hands-on experience with the P5.Js library. The best thing is for each figure there is an inbuilt function, and you only need to call and pass some coordinates to draw a shape. to give background colour to canvas call background function and pass colour code.
i) Point – to draw a simple point use point function and pass x and y coordinates
ii) line – line is something which connects two points to only you have to call line function and pass coordinates of 2 points means 4 coordinates.
iii) rectangle – call rect function and pass height and width. If height and width are the same then it will be square.
some other functions used for creativity are.
i) stroke – It defines the outer boundary line of shape
ii) stroke-weight – It defines how much width the outer line should be.
iii) fill – the color you want to fill in the shape
Below is a code snippet as an example for each function we learned. Try this code once and observe changes and figures in a browser by running an HTML file as on a live server.
function draw() {
  background(200);
    //1.point
  point(200, 200);
    //2.line
  line(200, 200, 300, 300);
    //3.trialgle
  triangle(100, 200, 300, 400, 150, 250);
    //4.rectangle
  rect(250, 200, 200, 100);
    //5. circle
  ellipse(100, 200, 100, 100);
 // color circle using stroke and fill
 /*
    fill(127, 102, 34);
    stroke(255, 0, 0);
    ellipse(100, 200, 100, 100);
    stroke(0, 255, 0);
    ellipse(300, 320, 100, 100);
    stroke(0, 0, 255);
    ellipse(400, 400, 100, 100);
*/
}
An important feature of P5.js is that the setup function runs only one time for setting up the things but the draw function code runs in an infinite loop till the interface is open. You can check this out by printing anything using the console log command. And by using this you can create amazing designs. With P5js you can load images, capture images, video, etc.
function getRandomArbitrary(min, max) { // generate random num
    return Math.random() * (max - min) + min;
}
/*
    r = getRandomArbitrary(0, 255);
    g = getRandomArbitrary(0, 255);
    b = getRandomArbitrary(0, 255);
    fill(r,g,b);
    ellipse(mouseX, mouseY, 50, 50);
*/
Use this above-commented code in the draw function and new function above it and run code, and observe changes on the browser, and experience the magic of the P5.js library.
3) ML5.js
The best way to share code applications with others is the web. Only share URL and you can use other applications on your system. keeping this google implemented tensorflow.js, but working with tensorflow.js requires a deep understanding So, ML5.js build a wrapper around tensorflow.js and made the task simple by using some function so indirectly you will deal with TensorFlow.js through ml5.js. The same you can read on official documentation of Ml5.js
Hence, It is the main library that consists of various deep learning models on which you can build projects. In this project, we are using the PoseNet model which is also present in this library.
let’s import the library, and use it. In the HTML file paste the below script code to load the library.
Now let’s set up the Image capture and load the PoseNet model. the capture variable is a global variable, and all the variables we will be creating have global scope.
let capture;
function setup() {  // this function runs only once while running
    createCanvas(800, 500);
    //console.log("setup function");
    capture = createCapture(VIDEO);
    capture.hide();
    //load the PoseNet model
    posenet = ml5.poseNet(capture, modelLOADED);
    //detect pose
    posenet.on('pose', recievedPoses);
}
function recievedPoses(poses) {
    console.log(poses);
    if(poses.length > 0) {
        singlePose = poses[0].pose;
        skeleton = poses[0].skeleton;
    }
}
As we load and run the code, so Posenet will detect 17 body points(5 facial points, 12 body points) along with information that at what pixel the point is been detected in an Image. And if you print these poses then it will return an array(python list) that consists of a dictionary with 2 keys as pose and skeleton that we have assessed.
- pose – It is again a dictionary that consists of various keys and a list of values as key points, left eye, left ear, nose, etc.
- skeleton – In skeleton, each dictionary consists of two subdictionaries as zero and one that has a confidence score, part name, and position coordinate. so we can use this to make a line and construct a skeleton structure.
Now if you want to display any single point in front of the pose then you can do it by using these separate points in a pose.
How we will display all the points and connect them as skeletons?
we have a keypoints name dictionary which has X and y coordinate of each point. so we can traverse in keypoints dictionary and access position dictionary in that and use x and y coordinate in that.
Now to draw the line we can use the second dictionary as a skeleton that consists of all points information of coordinate to connect two body parts.
function draw() {
    // images and video(webcam)
    image(capture, 0, 0);
    fill(255, 0, 0);
    if(singlePose) { // if someone is captured then only
        // Capture all estimated points and draw a circle of 20 radius
        for(let i=0; i<singlePose.keypoints.length; i++) {
            ellipse(singlePose.keypoints[i].position.x, singlePose.keypoints[i].position.y, 20);
        }
        stroke(255, 255, 255);
        strokeWeight(5);
        // construct skeleton structure by joining 2 parts with line
        for(let j=0; j<skeleton.length; j++) {
            line(skeleton[j][0].position.x, skeleton[j][0].position.y, skeleton[j][1].position.x, skeleton[j][1].position.y);
        }
    }
}
Be in light, It sometimes does not capture exactly in blur or dark background.
How to impose Images?
Now we will learn how to impose images on the face, or at any other location that you see in different filters. It seems a little bit fuzzy and funny but this application is working as a booster for many social media.
Just load the images in the setup function, and adjust the images using the image function as a coordinate where you want to display that image in the draw function just after the end of the skeleton for a loop. suppose we are displaying specs and cigar images.
specs = loadImage('images/spects.png');
smoke = loadImage('images/cigar.png');
// Apply specs and cigar
image(specs, singlePose.nose.x-40, singlePose.nose.y-70, 125, 125);
image(smoke, singlePose.nose.x-35, singlePose.nose.y+28, 50, 50);
All the images are kept in a separate folder named images, and using the load image function we load each image. specs will be above the nose and cigar below the nose. The complete code link is given below, you can take its reference.
Deploy the Project
As the project is on a browser so you can simply deploy it on Github and make it available for others to use it. Just upload all the files and images to the new repository on Github as they are in your local system. After uploading visit the settings of the repository and visit Github pages. change none to main branch and click save. It will give you the URL of a project which will live after some time and you can share it with others.
Check live demo ~ Posture Detection using PoseNet
Access Code files for reference ~ GitHub
End Notes
Hurray! We have created a complete end-to-end Posture detection project using a pre-trained PoseNet model. I hope that it was easy to catch all the concepts because I can understand if you are seeing Machine learning with javascript first time it can feel a little bit hard. But believe me, it’s a simple thing, and goes through the article once more and try it yourself with different configurations, different designs.
We have worked on a single-person pose detection, I would like to encourage you to work for multiple-person pose detection. And you can try adding different glimpse options, adjust points that work on all cameras. There are many things you can advance on this project.
For more understanding in dipper please visit below references
Tensorflow Blog – Real-time human pose estimation
ML5.js documentation – Official Documentation
If you have any doubts please post them in the comment section below.
About the Author
Raghav Agrawal
I am pursuing my bachelor’s in computer science. I am very fond of Data science and big data. I love to work with data and learn new technologies. Please feel free to connect with me on Linkedin.
References
Image 1- https://medium.com/globant/posenet-your-gateway-to-gesture-detection-a15d0ed0ae40
I am a final year undergraduate who loves to learn and write about technology. I am a passionate learner, and a data science enthusiast. I am learning and working in data science field from past 2 years, and aspire to grow as Big data architect.


