COVID-19 Safety Protocol Tracker Using Deep Learning
INTRODUCTION
.png) Fig 1 – Source: Canva
Fig 1 – Source: Canva
The ongoing Coronavirus disease (COVID-19) outbreak has driven health to the top of the priority in our lives, bringing the entire world to a halt. Since its inception, our way of life has drastically changed. Life is slowly returning to normal after two years, but no one is fully immune to infection. Experts advise that masks and physical separation are necessary even after vaccination. While offices have begun to reopen, the necessity to ensure security in the complexes has become critical. In this scenario, our main attention should be on following the safety rules so that we can get back to our normal routine as quickly as possible.
Keeping this critical situation in mind, we have come up with a solution using deep learning to help in the prevention of this disease by keeping a check on some of the vital precautions. This article is focused on devising a monitoring system that includes three models: People Tracker, Social Distancing Detector, and Face Mask Detector; integrated with a Graphical User Interface. In this interface, there are specific buttons for each of the models and we can run any of the models at a time by pressing its corresponding button, and accordingly, the result will be generated. This system can be used for surveillance in busy areas where keeping track of protocol infractions is nearly impossible for humans.
DATASETS AND ALGORITHMS USED
A) COCO Dataset:
“Common Objects In Context”, a dataset specifically made for computer vision, is an object detection dataset along with captions. COCO has different features :
- Object segmentation
- Total 80 different object categories
- Total 330K images
- Total 1.5 million different object instances
- Recognition
We have extracted only the class names from the COCO dataset that we are intended to use and have stored them in a file. We will be using these names in our model for object class matching purposes only.
B) YOLO:
YOLO (‘You Only Look Once’) is known to be one of the fastest object detection algorithms with a nice balance between speed and accuracy, making it useful for real-time detection. YOLO v3 is used in our solution. The architecture of YOLO v3 :
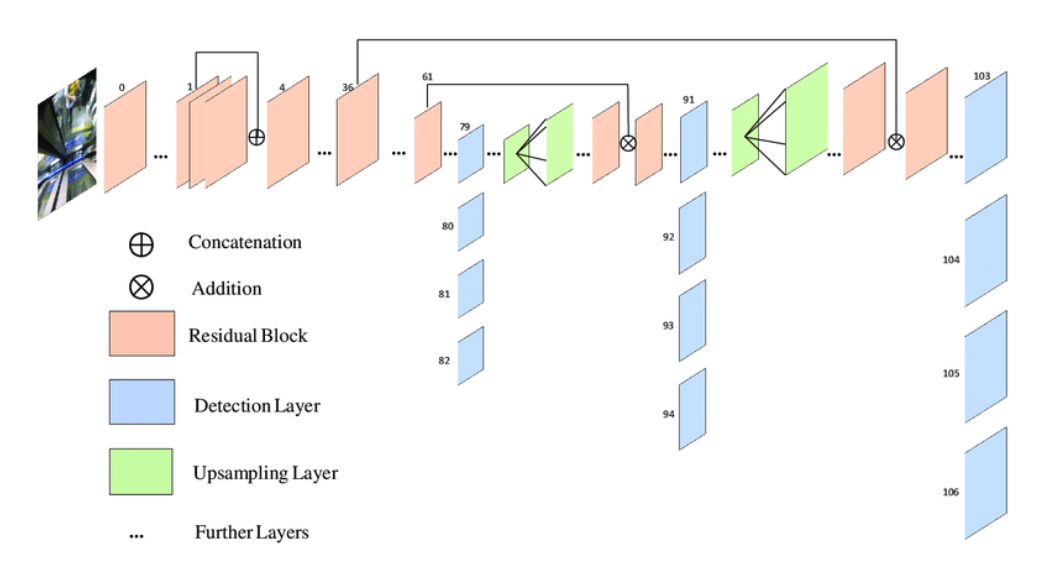
Fig 2 – Network Architecture of YOLO v3
Source: ResearchGate
C) Centroid Tracking Algorithm:
It is a step-by-step procedure:
Step 1: Analyse the frame and create bounding box coordinates and compute centroids of each frame.
Step 2: Calculate the Euclidean distance between new bounding boxes and existing objects.
Step 3: Update the object coordinates.
Step 4: Register newly found objects by assigning a new object ID.
Step 5: Deregister old objects when it is out of frame.
PEOPLE TRACKER MODEL
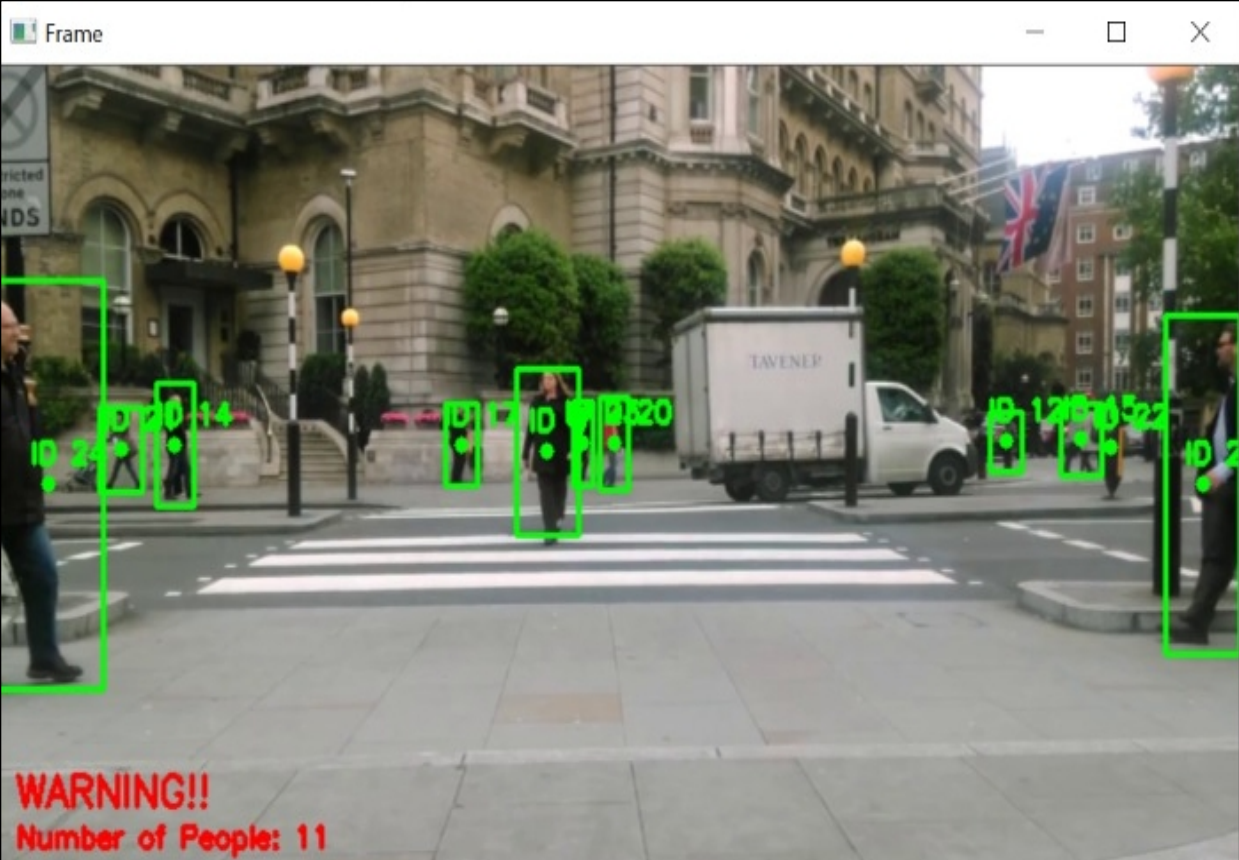
We start by detecting all ‘person’ objects in the first frame and assign each one a distinct ID. The ID of an individual is carried forward in subsequent frames. That ID is dropped if the individual has moved away from the frame or is obscured by another object. A new ID is allocated whenever a new object of the person class appears. Deep Learning enables us to achieve outstanding tracking results, and this performance continues to improve as time passes. This model aids in the tracking and counting of individuals. When the number of people in a confined space exceeds a predetermined limit, an alert is shown. For the sole purpose of showing the results and ease of implementation, we will keep the count threshold to 10 people for the time being. This threshold value (that is 10 people) can be changed.
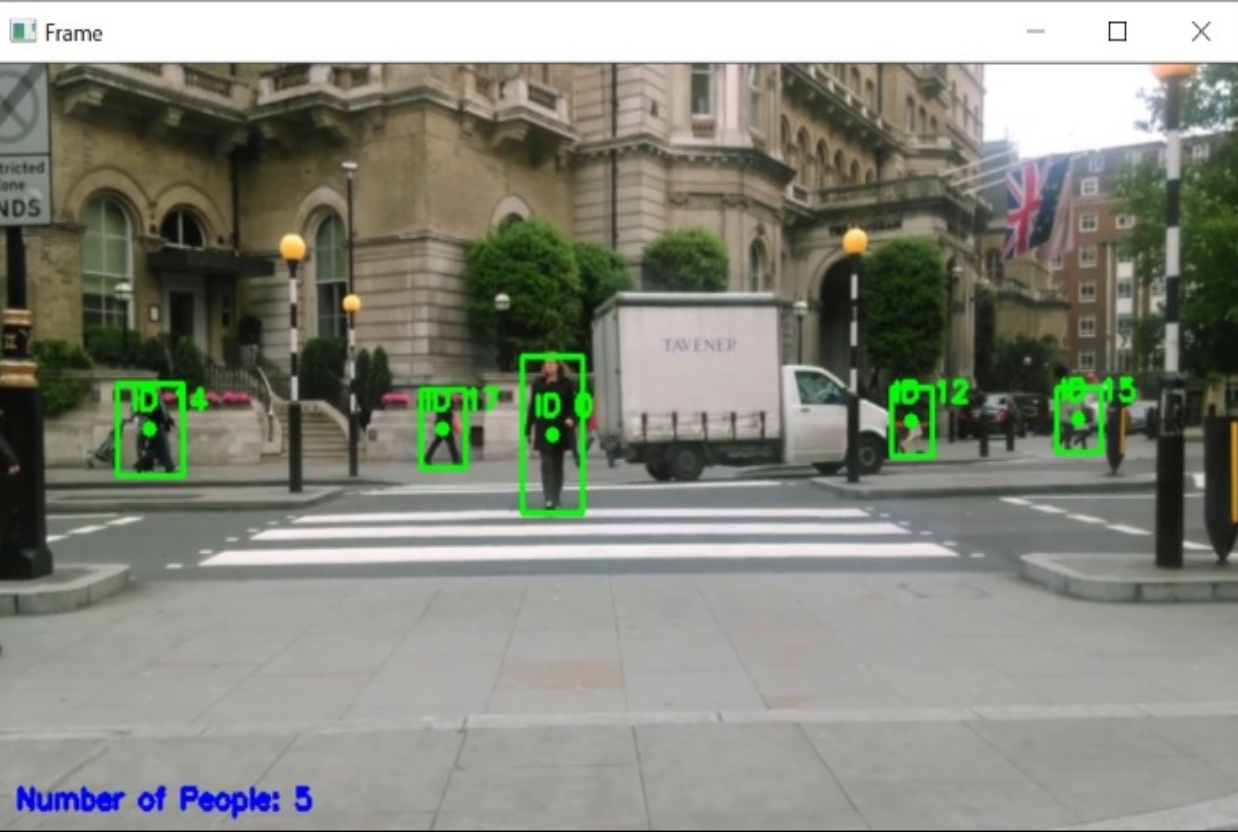
Figure 3 – Result before people count has been exceeded
Source: Output screenshot from my Jupyter Notebook
Source: Output screenshot from my Jupyter Notebook
SOCIAL DISTANCING DETECTION MODEL
What Is Social Distancing?
It is a method of avoiding the transmission of infectious diseases. People should physically distance themselves from one another and create a safe space between them to avoid close contact and thus reduce the dispersion of infectious diseases.
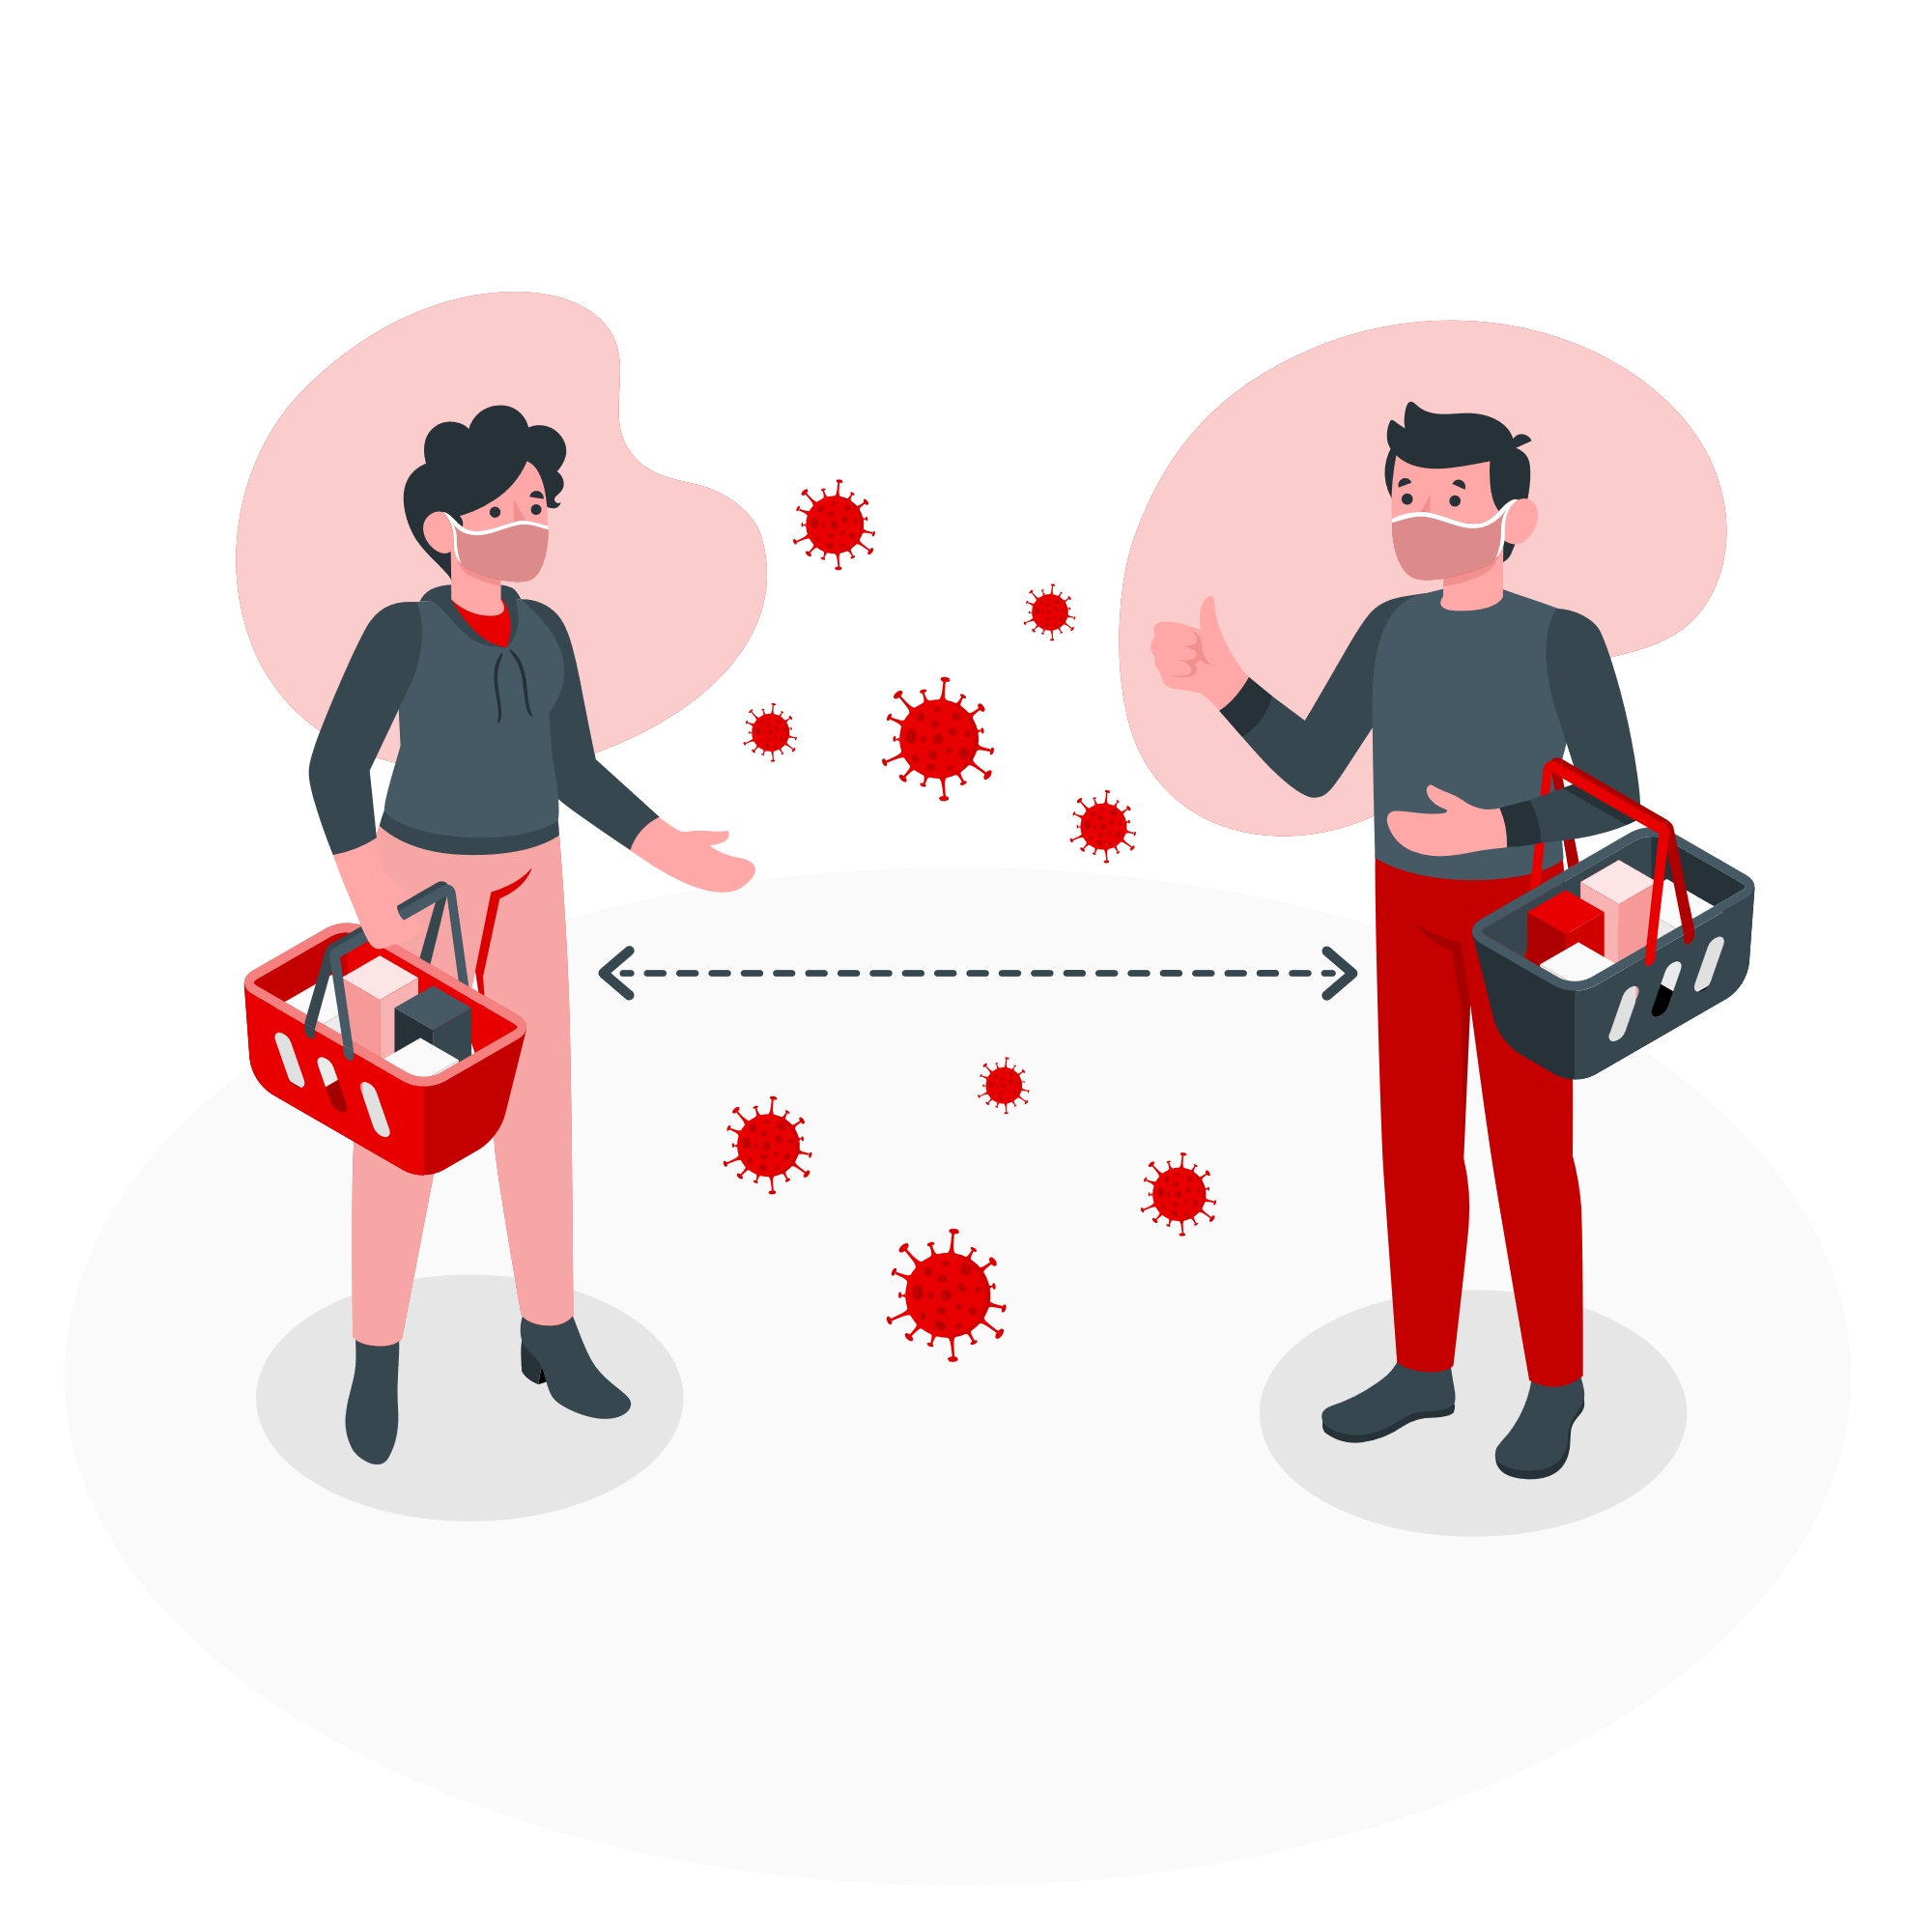
Figure 5 – Social Distancing
Source: Storyset
Developing the Model
We can apply deep learning to build the detector. The steps are as follows:
Step 1: Identifying every object of person class only in the video stream and computing pairwise distances between them using object detection. We use the detection and the centroid tracking algorithm for this.
Step 2: Based on these distances, we need to see if any two individuals are closer than N pixels apart. The value of N is set by us.
For more accurate results, we can calibrate our camera using intrinsic/extrinsic parameters to map pixels to measurable units. For the sake of simplicity, we have used pixel distances here.
The results are looped to:
1. Get the bounding box and the (x,y) coordinates of the centroid.
2. At the start, make the color of the bounding box green.
3. Check to see if our violate set contains the current index, and if so, change the color to red.
4. Draw the person’s bounding box and the object centroid. We will be able to tell which people are too close, as they are all color-coordinated.
5. Display information on the overall amount of social distancing breaches (we get this from the length of our violate Set).
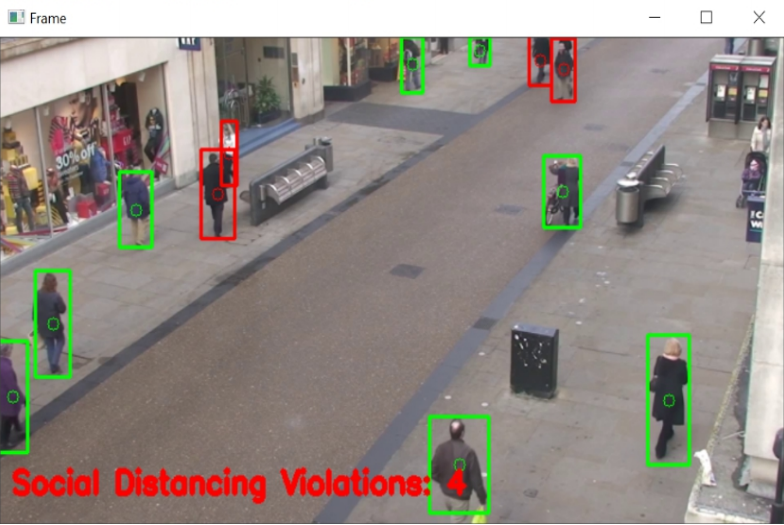
Source: Output screenshot from my Jupyter Notebook
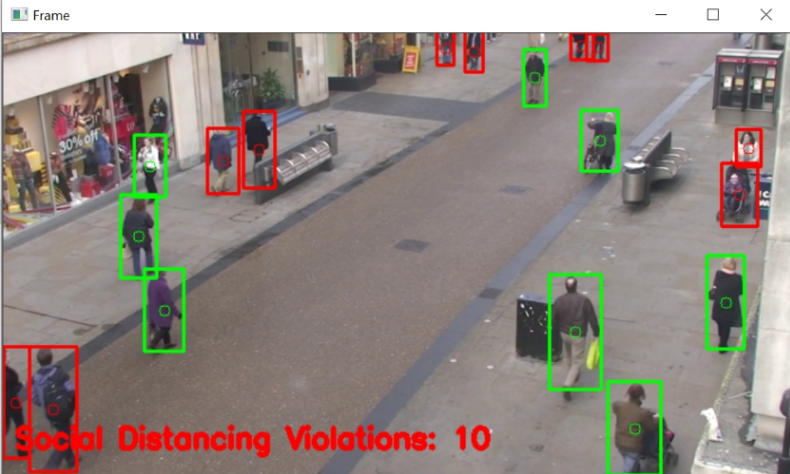
Source: Output screenshot from my Jupyter Notebook
FACE MASK DETECTION MODEL
Masks are an effective way of preventing respiratory droplets from touching others. People with COVID-19 who are asymptomatic or pre-symptomatic can still transmit the virus to others, according to several reports. Wearing a mask greatly reduces the risk of unnecessary transmission. With the aid of computer vision and deep learning algorithms, we developed a mask detection model that can detect people wearing face masks.
We have used a dataset that includes 853 images in the PASCAL VOC format that belong to the three groups: ‘With mask’, ‘without a mask’, and ‘improperly worn mask’.
The first step was to detect the faces from each of the frames present in the input video. Haar cascade classifier is used for this purpose. This is then used to recognize specific objects in other images. To detect the faces from the frames, we have particularly used the ‘Haarcascade_frontalface_default.xml’ classifier. Then we have taken the input from the webcam using cv2.VideoCapture(0), we can also provide pre-recorded videos as input by changing the command. Then in the next step, we have used face_cascade.detectMultiScale to detect the faces in the frame and draw bounding boxes around it. We have used the above-mentioned dataset to create a classifier. We applied transfer learning with InceptionV3 neural network architecture to build the classifier model. Then our trained model is applied to it to detect the face masks and predict the labels for the outputs. The outputs are displayed on the screen with the predicted labels and FPS is also displayed. Once the user is done detecting face masks they can close or exit the model by pressing the Escape key.
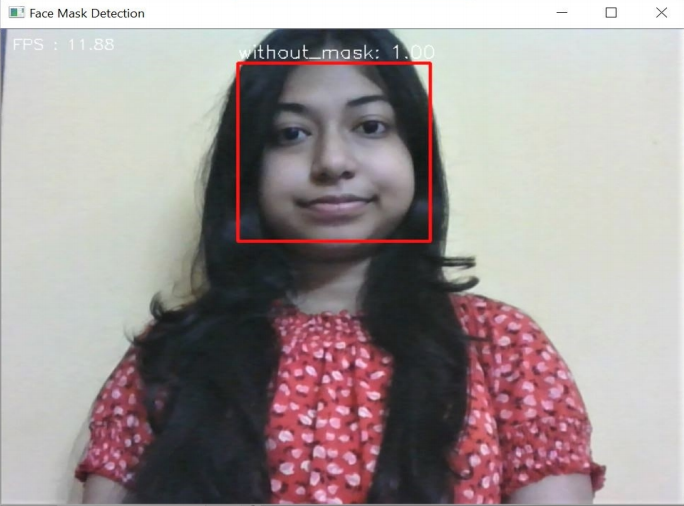
Figure 8 – Results without a face mask
Source: Output screenshot from my Jupyter Notebook
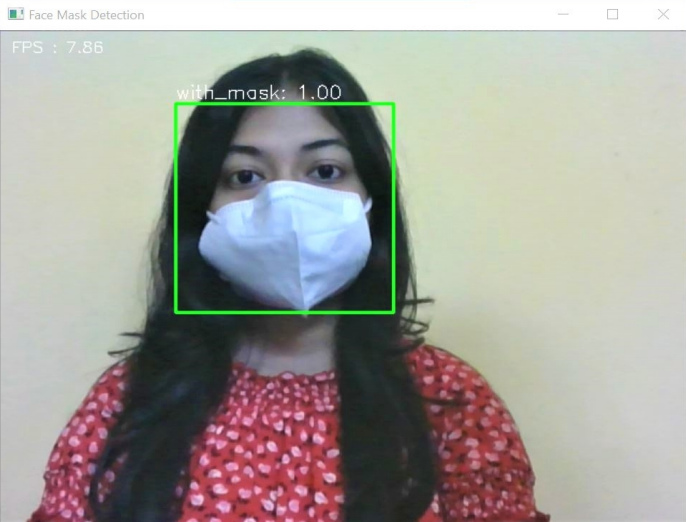
Source: Output screenshot from my Jupyter Notebook
INTEGRATION OF THE MODELS
Tkinter is a package in python to create a GUI to interact with the pre-made code. It allows users to execute different preset functions without using any Terminal or CLI system. As we are using Python 3.7, we would import the package named ‘Tkinter’ to start working with it.
Code for the interface of our solution:
import tkinter as tk
from tkinter import *
import tkinter.font as font
import pickle
from tensorflow.keras.models import load_model
from keras.preprocessing import image
from PIL import Image

class Frontend:
    def __init__(self):
        self.window = Toplevel()
        self.window.title("COVID-19 PRECAUTIONS")
        self.window.resizable(0, 0)
        window_height = 650
        window_width = 1270
        screen_width = self.window.winfo_screenwidth()
        screen_height = self.window.winfo_screenheight()
        x_cordinate = int((window_width / 2))
        y_cordinate = int((window_height / 2))
        self.window.geometry("{}x{}+{}+{}".format(window_width, window_height, x_cordinate, y_cordinate))
        self.window.configure(background='#ffffff')
        self.window.grid_rowconfigure(0, weight=1)
        self.window.grid_columnconfigure(0, weight=1)
        header = tk.Label(self.window, text="COVID-19 PRECAUTIONS MAINTENANCE SYSTEM", width=95, height=2, fg="white", bg="#6e070b",
                                  font=('tahoma', 18, 'bold'))
        header.place(x=-20, y=1)

        canvas1 =Canvas(self.window,width=350,height=380)
        canvas1.pack()
        image1 = Image.open("file location")
        image1 = image1.resize((350, 400))
        img1=ImageTk.PhotoImage(image1)
        canvas1.place(x=20, y=90)
        canvas1.create_image(175,175, anchor=tk.CENTER, image=img1)
        canvas2 =Canvas(self.window,width=440,height=380)
        canvas2.pack()
        image2 = Image.open("file location")
        image2 = image2.resize((540, 400))
        img2=ImageTk.PhotoImage(image2)
        canvas2.place(x=400, y=90)
        canvas2.create_image(210,180, anchor=tk.CENTER, image=img2)
        canvas3 =Canvas(self.window,width=390,height=380)
        canvas3.pack()
        image3 = Image.open("file location")
        image3 = image3.resize((420, 400))
        img3=ImageTk.PhotoImage(image3)
        canvas3.place(x=870, y=90)
        canvas3.create_image(210,200, anchor=tk.CENTER, image=img3)

        takeImg = tk.Button(self.window, text="FACE  MASK  DETECTOR",command=self.mask_detect, fg="black", bg="#fa7246", width=20,
                                    height=1,
                                    activebackground="#118ce1", font=('tahoma', 15, ' bold '))
        takeImg.place(x=50, y=510)
        trainImg = tk.Button(self.window, text="SOCIAL DISTANCING DETECTOR", command=self.SocialDist, fg="black", bg="#fa7246", width=30,
                                     height=1,
                                     activebackground="#118ce1", font=('tahoma', 15, ' bold '))
        trainImg.place(x=420,y=510)
        trackimg =tk.Button(self.window, text="PEOPLE TRACKER", command=self.peopletracker, fg="black", bg="#fa7246", width=25,height=1,
                    activebackground="#118ce1", font=('tahoma',15,'bold'))
trackimg.place(x=900,y=510)
        quitWindow = tk.Button(self.window, text="QUIT", command=self.close_window, fg="white", bg="#6e070b", width=10, height=1,
                                       activebackground="#118ce1", font=('tahoma', 12, 'bold'))
        quitWindow.place(x=1100, y=590)
        self.window.mainloop()
    def close_window(self):
        self.window.destroy()
    def mask_detect(self):
        #load trained mask detection model
    def SocialDist(self):
        #load trained social distancing detection model
   def peopletracker(self):
        #load trained social distancing detection model
Frontend()
Code Elaboration:
To begin, we must import and call the Tkinter package. After that, we must finish the initialization process, which includes adjusting the window size, background color, and other options. We’ve defined the number of columns and rows, and now it’s time to define each column component. We have titled it as ‘COVID-19 PRECAUTIONS MAINTENANCE SYSTEM’, placed three pictures by loading them from local storage corresponding to each button to execute our function. We can also set the font style, font weight, font color, height, and width of every column. As a result, we’ve created three new column widgets: ‘Face Mask Detector,’ ‘Social Distancing Detector,’ and ‘People Tracker.’ These buttons are then used to call the pre-defined functions that we created. Now while declaring each button widget we define the command property where we can mention the functions that need to be called.
The output of code:
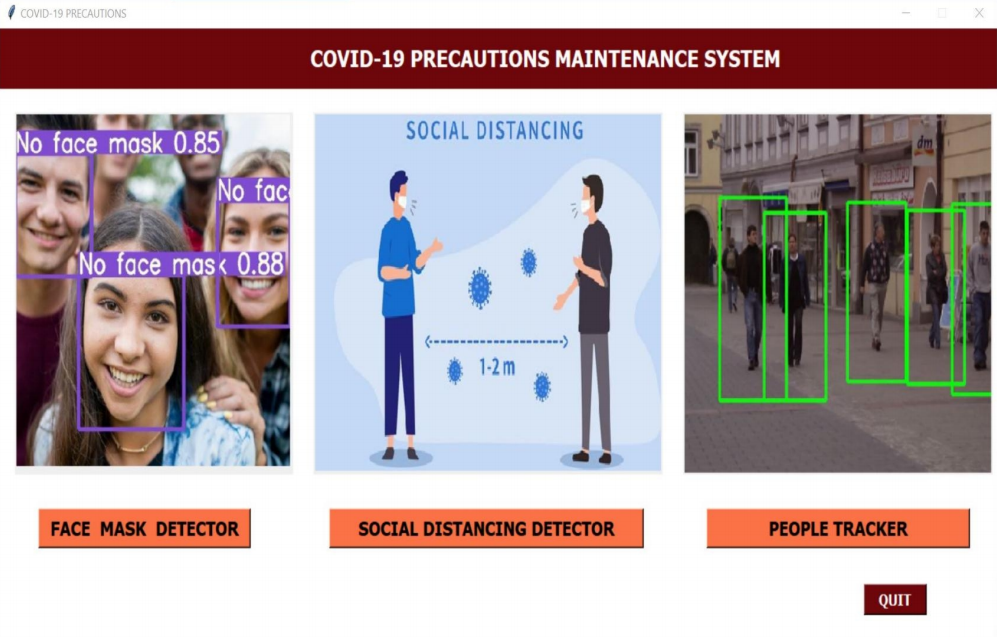
Figure 10 – Graphical User Interface of our solution
Source: Output screenshot from my Jupyter Notebook
Conclusion
Amid a global pandemic, this is an ideal time for us to develop a mechanism that would help us keep track of any breaches of the guidelines that we need to follow for the common welfare.
Improvements that can be made:
- Calibrate the camera correctly for more precise performance.
- We need to use a camera with a top and side view perspective so that people standing in front and behind each other can be seen separately.
- To speed it up, we can use an SSD (Single Shot Detector) approach.
Even when time passes and things return to normal, the guidelines developed for the prevention of this COVID-19 must be followed by the common people. It is impractical for a person to keep track of these manually. So if we can calibrate our system with a CCTV camera and we can manage to generate a warning on a computer screen which the security officials will be continuously monitoring, then they could themselves go and clear that area, in this way protocol violations can be minimized.
Want to read more about COVID-19? Head on to our blog.
The media shown in this article is not owned by Analytics Vidhya and are used at the Author’s discretion.


[…] Source link […]
[…] post COVID-19 Safety Protocol Tracker Using Deep Learning appeared first on Analytics […]
[…] COVID-19 Safety Protocol Tracker Using Deep Learning […]
Good article...asking for the full source code