

This blog post will present a simple “hello world” kind of example on how to get data that is stored in S3 indexed and served by an Apache Solr service hosted in a Data Discovery and Exploration cluster in CDP. For the curious: DDE is a pre-templeted Solr-optimized cluster deployment option in CDP, and recently released in tech preview. We will only cover AWS and S3 environments in this blog. Azure and ADLS deployment options are also available in tech preview, but will be covered in a future blog post.
We will depict the simplest scenario to make it easy to get started. There are of course more advanced data pipeline setups and more rich schemas possible, but this is a good starting point for a beginner.
Assumptions:
- You have a CDP account already and have power user or admin rights for the environment in which you plan to spin up this service.
If you do not have a CDP AWS account, please contact your favorite Cloudera representative, or sign up for a CDP trial here. - You have environments and identities mapped and configured. More explicitly, all you need is to have the mapping of the CDP User to an AWS Role which grants access to the specific s3 bucket you want to read from (and write to).
- You have a workload (FreeIPA) password already set.
- You have a DDE cluster running. You can also find more information about using templates in CDP Data Hub here.
- You have CLI access to that cluster.
- The SSH port is open on AWS as for your IP address. You can get the public IP address for one of the Solr nodes within the Datahub cluster details. Learn here how to SSH to an AWS cluster.
- You have a log file in an S3 bucket that is accessible for your user (<S3_BUCKET>/sample.log in this example). If you don’t have one, here is a link to the one we used.
Workflow
The following sections will walk you through the steps to get data indexed using the Crunch Indexer Tool that comes out of the box with DDE.
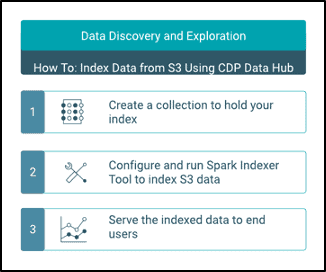
Create a collection to hold your index
In HUE there is an index designer; however, as long as DDE is in Tech Preview it will be somewhat under re-construction and is not recommended at this point. But please try it after DDE goes GA, and let us know what you think.
For now, you can create your Solr schema and configs using the CLI tool ‘solrctl’. Create a config called ‘my-own-logs-config’ and a collection called ‘my-own-logs’. This requires that you have CLI access.
1. SSH to any of the worker nodes in your cluster.
2. kinit as a user with permission to create the collection configuration:
kinit
3. Make sure that the SOLR_ZK_ENSEMBLE environment variable is set in /etc/solr/conf/solr-env.sh. Save its value as this will be required in further steps.
Press Enter and type your workload (FreeIPA) password.
For example:
cat /etc/solr/conf/solr-env.sh
Expected output:
export SOLR_ZK_ENSEMBLE=zk01.example.com:2181,zk02.example.com:2181,zk03.example.com:2181/solr
This is automatically set on hosts with a Solr Server or Gateway role in Cloudera Manager.
4. To generate configuration files for the collection, run the following command:
solrctl config --create my-own-logs-config schemalessTemplate -p immutable=false
schemalessTemplate is one of the default templates shipped with Solr in CDP but, being a template, it is immutable. For the purposes of this workflow, you need to copy it and thus make a new one that is mutable (this is what the immutable=false option does). This provides you with a flexible, schemaless configuration. Creating a well-designed schema is something worth investing design time into, but is not necessary for exploratory use. For this reason it is beyond the scope of this blog post. In an actual production environment though, we strongly recommend the use of well designed schemas – and we are happy to provide expert help if needed!
5. Create a new collection using the following command:
solrctl collection --create my-own-logs -s 1 -c my-own-logs-config
This creates the “my-own-logs” collection based on the “my-own-logs-config” collection configuration on one shard.
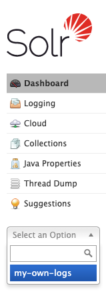
6. To validate the collection has been created, you can navigate to the Solr Admin UI. The collection for “my-own-logs” will be available via drop-down on the left navigation.
Index your Data
Here we describe using a simple example how to configure and run the built-in Crunch Indexer Tool to quickly index data in S3 and serve through Solr in DDE. Since securing the cluster may utilize CM Auto TLS, Knox, Kerberos, and Ranger, ‘Spark submit’ may be dependent on aspects not covered in this post.
Indexing data from S3 is just the same as indexing from HDFS.
Perform these steps on the Yarn worker node (referred to as “Yarnworker” on the Management Console webUI).
1. SSH to the dedicated Yarn worker node of the DDE cluster as a Solr admin user.
To find out the IP address of the Yarn worker node, click the Hardware tab on the cluster details page, then scroll to the “Yarnworker” node.

2. Go to your resource directory (or create one if you do not have it already:
cd <RESOURCE_DIR>
Use the admin user’s home folder as the resource directory (<RESOURCE_DIR>) for the Spark job. You will place resource files such as the morphline config (read-log-morphline.conf) and log4j properties there.
3. Kinit your user :
kinit
Press Enter and type your workload (FreeIPA) password.
4. Run the following curl command, replacing <SOLR_HOST>:<SOLR_PORT> with the IP address and port of the Solr host where you want to run the command:
curl --negotiate -u: "https://<SOLR_HOST>:<SOLR_PORT>/solr/admin?op=GETDELEGATIONTOKEN" --insecure > tokenFile.txt
5. Create a Morphline config file for the Crunch Indexer Tool, read-log-morphline.conf in this example. Replace <SOLR_ZK_ENSEMBLE> with the value of the SOLR_ZK_ENSEMBLE variable obtained earlier.
SOLR_LOCATOR : {
  # Name of solr collection
  collection : my-own-logs
  #zk ensemble
  zkHost : <SOLR_ZK_ENSEMBLE>
}
morphlines : [
  {
    id : loadLogs
    importCommands : ["org.kitesdk.**", "org.apache.solr.**"]
    commands : [
      {
        readMultiLine {
          regex : "(^.+Exception: .+)|(^\\s+at .+)|(^\\s+\\.\\.\\. \\d+ more)|(^\\s*Caused by:.+)"
          what : previous
          charset : UTF-8
        }
      }

      { logDebug { format : "output record: {}", args : ["@{}"] } }
      {
        loadSolr {
          solrLocator : ${SOLR_LOCATOR}
        }
      }
    ]
  }
]
This Morphline reads the stack traces from the given log file, then writes a debug entry log and loads it to the specified Solr.
6. Create a log4j.properties file for log configuration:
log4j.rootLogger=INFO, A1
# A1 is set to be a ConsoleAppender.
log4j.appender.A1=org.apache.log4j.ConsoleAppender
# A1 uses PatternLayout.
log4j.appender.A1.layout=org.apache.log4j.PatternLayout
log4j.appender.A1.layout.ConversionPattern=%-4r [%t] %-5p %c %x - %m%n
7. Check whether the file that you want to read exists on S3 (if you don’t have one, here is a link to the one we used for this simple example:
aws s3 ls s3://<S3_BUCKET>/sample.log
8. Run the spark-submit command:
Replace placeholders in <RESOURCE_DIR> and <S3_BUCKET> with the values you have set.
export myDriverJarDir=/opt/cloudera/parcels/CDH/lib/solr/contrib/crunch
export myDependencyJarDir=/opt/cloudera/parcels/CDH/lib/search/lib/search-crunch
export myDriverJar=$(find $myDriverJarDir -maxdepth 1 -name 'search-crunch-*.jar' ! -name '*-job.jar' ! -name '*-sources.jar')
export myDependencyJarFiles=$(find $myDependencyJarDir -name '*.jar' | sort | tr '\n' ',' | head -c -1)
export myDependencyJarPaths=$(find $myDependencyJarDir -name '*.jar' | sort | tr '\n' ':' | head -c -1)
export myJVMOptions="-DmaxConnectionsPerHost=10000 -DmaxConnections=10000 -Djava.io.tmpdir=/tmp/dir/ "
export myResourcesDir="<RESOURCE_DIR>"
export HADOOP_CONF_DIR="/etc/hadoop/conf"

spark-submit \
  --master yarn \
  --deploy-mode cluster \
  --jars $myDependencyJarFiles \
  --executor-memory 1024M \
  --conf "spark.executor.extraJavaOptions=$myJVMOptions" \
  --driver-java-options "$myJVMOptions" \
  --class org.apache.solr.crunch.CrunchIndexerTool \
  --files $(ls $myResourcesDir/log4j.properties),$(ls $myResourcesDir/read-log-morphline.conf),tokenFile.txt \
  $myDriverJar \
  -Dhadoop.tmp.dir=/tmp  \
  -DtokenFile=tokenFile.txt \
  --morphline-file read-log-morphline.conf   \
  --morphline-id loadLogs   \
  --pipeline-type spark   \
  --chatty   \
  --log4j log4j.properties \
  s3a://<S3_BUCKET>/sample.log
If you encounter a similar message, you may disregard it:
WARN metadata.Hive: Failed to register all functions.

org.apache.hadoop.hive.ql.metadata.HiveException: org.apache.thrift.transport.TTransportException
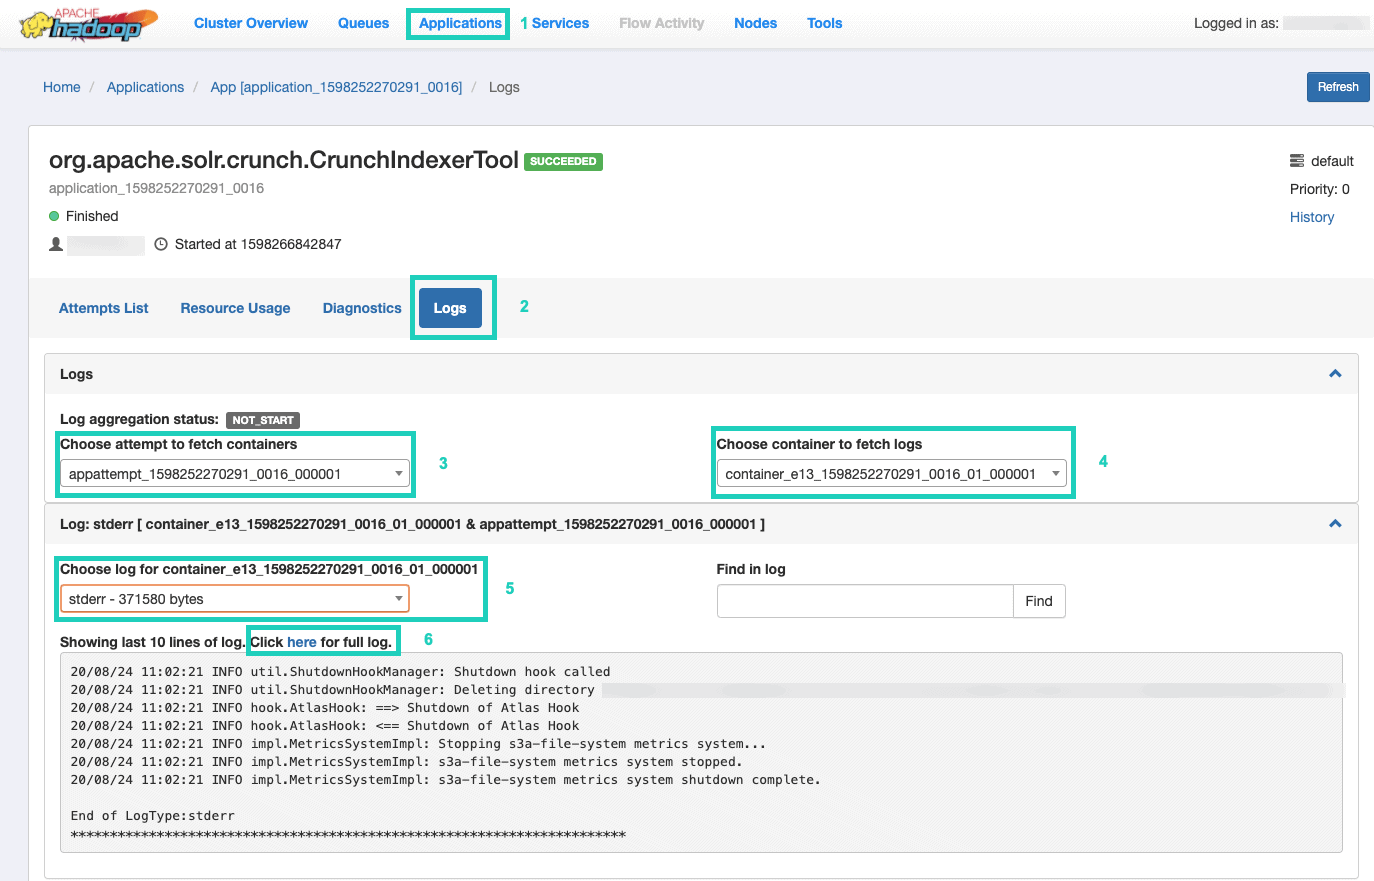
9. To monitor the execution of the command, go to Resource Manager.

Once there, select the Applications tab > Click the Application ID of the application attempt you want to monitor > Select Logs > Choose attempt to fetch containers > Choose container to fetch logs > Choose log for container > Select the stderr log > Click on Click here for full log.
Serve your Index
You have many options how to serve the searchable indexed data to end users. You can build your own rich application based on Solr’s rich APIs (very common). You can connect your favorite 3rd party tool, such as Qlik, Tableau etc over their certified Solr connections. You can use Hue’s simple solr dashboard to build prototype applications.
To do the latter:
1. Go to Hue.

2. In the dashboard view, navigate to the index file of choice (e.g. the one you just created).
3. Start dragging and dropping various dashboard elements and select the fields from the index to populate the data for the visual at hand.
A quick dashboard tutorial video from the past can be found here, for inspiration.
We will leave a deeper dive for a future blog post.
Summary
We hope you have learned a great deal from this blog post on how to get data in S3 indexed by Solr in a DDE using the Crunch Indexer Tool. Of course there are many other ways (Spark in the Data Engineering experience, Nifi in the Data Flow experience, Kafka in the Stream Management experience, and so on), but those will be covered in future blog posts. We hope that you are very successful in your continued journey on building powerful insight applications involving text and other unstructured data. If you decide to try DDE in CDP out, please let us know how it all went!
Editor's Choice