This article was published as a part of the Data Science Blogathon.
Introduction on AutoKeras
Automated Machine Learning (AutoML) is a computerised way of determining the best combination of data preparation, model, and hyperparameters for a predictive modelling task. The AutoML model aims to automate all actions which require more time, such as algorithm selection, code writing, pipeline creation, etc. In short, AutoML can help machine learning practitioners perform predictive modelling jobs quickly and efficiently with minimal input. Multiple open-source AutoML tools are readily available in the market that speeds up the
Machine Learning processes, and we will explore one such tool called ‘AutoKeras’ in this article.
AutoKeras
Most of the deep learning projects use Keras, which is a high-level deep learning API for TensorFlow. AutoKeras is a Keras-based open-source AutoML framework. It was designed by the DATA Lab at Texas A&M University to assist in building high-performance models quickly without ML expertise. There are other tools with similar goals, but AutoKeras specialises in Deep Learning. You can use this library to create Deep Learning models without developing the architecture yourself.
AutoKeras chooses the layout of the layers and the number of neurons. Additionally, it can even select the other hyperparameters, such as optimisation and loss functions. If a column in your data contains text, it will convert it into an embedding; if the column values are fixed categories, it will convert them into one-hot encoding for your task like prediction, detection, etc. We need to mention just the training data, and AutoKeras will do the rest.
AutoKeras is built around four key characteristics that make it simple to install and use:
- It provides a straightforward and user-friendly application programming interface (API) based on the Keras API. Users with little programming knowledge can quickly learn how to use it, but advanced users can modify lower-level system parameters.
- It can operate both locally and in the cloud.
- It is based on a dynamic configuration that adjusts the size of the neural architecture dependent on the amount of graphics processing unit (GPU) memory available on the local machine.
- The open-source community actively develops and maintains it.
This tutorial will explore how to use AutoKeras for classification and regression tasks. This tutorial uses Google Colab, and you’ll need to modify the import commands appropriately when using a different platform like Jupyter notebook.
We will install the AutoKeras library using the following code:
pip install autokeras
We will also import all the necessary packages and libraries:
import autokeras as ak
import pandas as pd
from sklearn.model_selection import train_test_split
AutoKeras for Classification
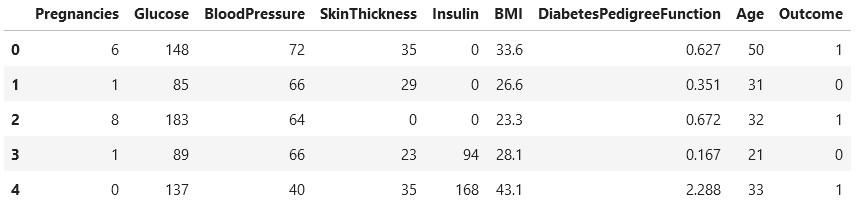
For the classification task of AutoKeras, we are using the Pima Indians Diabetes Dataset. We will predict whether a patient is likely to get diabetes. The dataset contains 768 rows with 9 different features related to a patient’s health. The dataset can be downloaded from
here.
Let us look at the features in this dataset and their description –
- Pregnancies = the number of pregnancies
- Glucose = amount of plasma glucose concentration
- Blood Pressure = level of diastolic blood pressure in mm/Hg
- Skin Thickness = value of triceps skinfold thickness in mm
- Insulin=insulin level in U/mL
- BMI= value of body mass index in kg/m2
- Diabetes Pedigree Function = function which scores the possibility of getting diabetes (based on family history)
- Age= person’s age in years
- Outcome: Diagnosis (target variable) whether patient had a diabetes or not (0 = no, 1 = yes)
Let us review the first few rows of the dataset using the following command.
df.head()
We split the dataset into train and test sets for the next step. We are using an 80:20 ratio for the same.

We’ll use the AutoKeras’ StructuredDataClassifier’ function to find the best classification model. This step will set max trials to 5, i.e., the maximum number of Keras models to attempt and the epochs parameter to 50. AutoKeras’ StructuredDataClassifier’ function takes different types of input formats. We can provide it with a pandas DataFrame and other formats like NumPy arrays and TensorFlow datasets. It also allows you to explicitly input a URL or file path, which the model will instantly download and utilise.
clf = ak.StructuredDataClassifier(max_trials=5)
clf.fit(X_train, y_train, epochs=50)
After running the code, we obtained a prediction accuracy of more than 80%. The search has been restricted to 50 epochs and five architectures, with max trials set at 5. Increasing these values will give us more accuracy, but it will also take longer to complete. Since these results are stochastic, the accuracies are likely to differ when running on different machines with the same settings.
The model can then be evaluated on the test dataset to determine its performance on test data.
loss, acc = clf.evaluate(X_test, y_test, verbose=0)
print('Accuracy: %.2f' % acc)
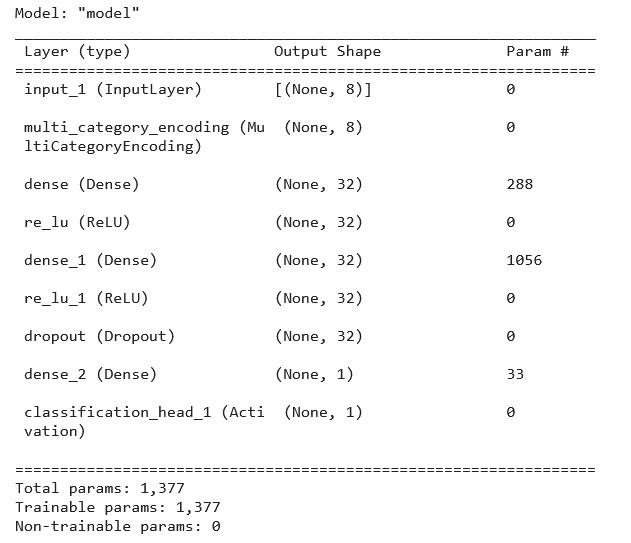
We can print the summary of its architecture using the following command:
model = clf.export_model()
model.summary()
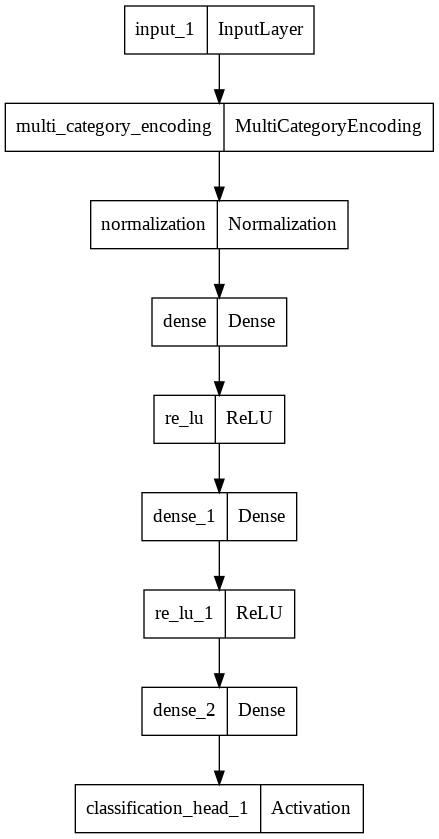
We can view the visual representation of the model using the following code:
from tensorflow.keras.utils import plot_model
plot_model(model)
We can improve the model performance with more epochs and trials. Once an acceptable accuracy is obtained, we can save the model using the following command.
model.save('/content/models/classification_model',save_format="tf")
We can now use this saved model to make predictions on unseen data. We use the load_model functionality of Keras to import the protected model.
from keras.models import load_model
new_model= load_model('/content/models/classification_model')
print(new_model)
This model can now directly be used to make predictions, but it is important to note that there is no need to re-train this model.
After this classification example, let us explore how well AutoKeras performs in a regression task.
AutoKeras for Regression
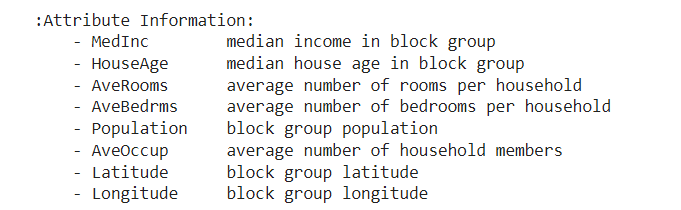
To demonstrate the application of AutoKeras to a regression task, we will use the California Housing Prices dataset available in the sklearn datasets. The median property price in a Californian suburb will be predicted. The dataset contains 20640 rows of data with 8 different features related to house prices in California.
Let us import the dataset from sklearn. Datasets first.
#importing the dataset
from sklearn.datasets import fetch_california_housing
housing = fetch_california_housing()
print(housing.DESCR)
We need to create a data frame from this imported dataset. This can be achieved using –
#create a dataframe from the dataset
df=pd.DataFrame(data=housing.data,columns=housing.feature_names)
df["MedHouseVal"] = housing.target
df.shape

We will now print the first five dataset rows using the following command.
df.head()

Next, we split the dataset into train and test sets using an 80:20 ratio. We will use the AutoKeras ‘structured data regressor’ function for this example since we want to predict a price. The ‘structured data regressor’ function generates a regression model that accepts x as a structured dataset and y as a label column, i.e., the target column. In this case, we’ll set max trials to 5 and epochs to 50. Let’s start the training process to find the best model.
# Initialize the StructuredDataRegressor
reg = ak.StructuredDataRegressor(max_trials=5,overwrite=True,metrics=['mae'])
# Search for the best model.
reg.fit(X_train.to_numpy(),y_train.to_numpy(), validation_split=0.2,epochs=50, verbose=0)
The model can then be evaluated on the test dataset to determine its performance on test data.
reg.evaluate(X_test, y_test)
The best model generated the following predictions.
predicted = reg.predict(X_test).flatten() * 100000
real = y_test.to_numpy() * 100000
for i in range(10):
    print('Predicted price:', predicted[i].round(3))
    print('Real price:', real[i].round(0))
    print('')
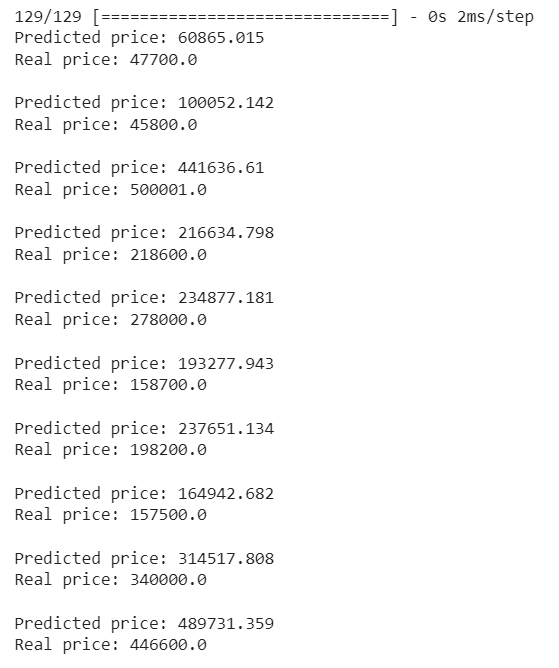
The above results are stochastic, and hence, it is likely to have different predicted values when running these models on other machines with the same settings. We will most definitely achieve better results if we run AutoKeras with more trials and epochs. Moreover, it is essential to remember that the best model selected by the AutoKeras model does not involve hyperparameter tuning. We use an already known and trained model to modify some parameters within a given range of possible values for hyperparameter tuning to improve performance.
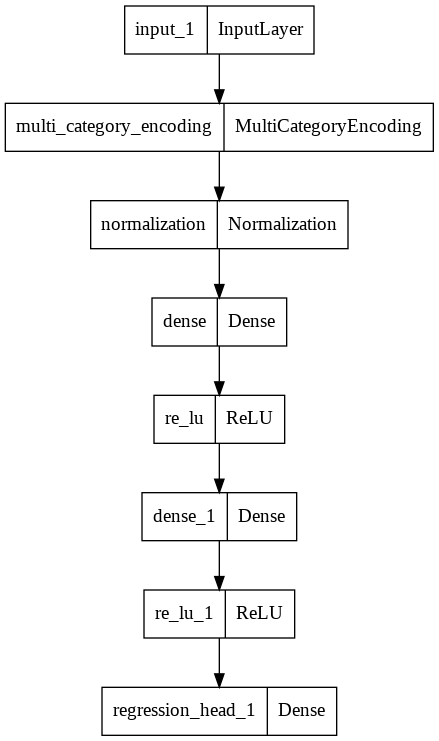
We can print the summary of its architecture using the following command:
keras_model = reg.export_model()
keras_model.summary()
We can view the visual representation of the model using the following code:
from tensorflow.keras.utils import plot_model
plot_model(keras_model)
And finally, we can save the model for making predictions on unseen data using –
model.save('/content/models/regression_model',save_format="tf")
Conclusion
AutoML is a good choice when we want to run multiple experiments and train several models faster. In one of my previous guides on
AutoML, I have shared some popular open-source Python packages for automating ML processes. Through this tutorial, we saw how to set up classification and regression problems using an AutoML package ‘Autokeras.’
Some of the key learnings from the article are as follows:
- AutoKeras, a Keras-based open-source AutoML framework, was developed to allow non-experts to quickly build high-performance models with minimal code.
- AutoKeras is especially useful in Deep Learning applications. It can select different parameters like the number of layers, the number of neurons, and other hyperparameters like the optimisation and loss functions.
- When using AutoKeras, we only need to specify the training data, and AutoKeras performs the data preprocessing independently. Suppose the input data contains text; in that case, Autokeras transforms it into an embedding. If the data have categorical variables, it will convert them into one-hot encoding depending on whether it is a classification or regression task. It will run multiple models and select the best model based on the specified metric.
- The syntax for AutoKeras is easy to use and similar to Keras.
- It is easy to save pre-trained models and reuse them for making predictions.
I hope you enjoyed following this AutoKeras tutorial. Next time you want to use Keras to train your deep learning model, try the AutoKeras library to speed up your Machine Learning project. The code for this tutorial is available on my
GitHub repository.
The media shown in this article is not owned by Analytics Vidhya and is used at the Author’s discretion.


