

Introduction
Python is used extensively among Data Engineers and Data Scientists to solve all sorts of problems from ETL/ELT pipelines to building machine learning models. Apache HBase is an effective data storage system for many workflows but accessing this data specifically through Python can be a struggle. For data professionals that want to make use of data stored in HBase the recent upstream project “hbase-connectors” can be used with PySpark for basic operations.
In this blog series, we will explain how to configure PySpark and HBase together for basic Spark use as well as for jobs maintained in CDSW. For those not familiar with CDSW, it’s a secure, self-service enterprise data science platform for data scientists to manage their own analytics pipelines, thus accelerating machine learning projects from exploration to production. For more information about CDSW visit the Cloudera Data Science Workbench product page.
In this post, several operations will be explained and demonstrated along with example output. For context, all example operations in this specific blog post are run with a CDSW deployment.
Prerequisites:
- Have a CDP cluster with HBase and Spark
- If you are going to follow examples via CDSW you will need it installed – Installing Cloudera Data Science Workbench
- Python 3 is installed on each node at the same path
Configuration:
First, HBase and Spark need to be configured together for Spark SQL queries to work properly. To do so there are two parts to it: first, configure the HBase Region Servers through Cloudera Manager; and second, make sure the Spark run-time has HBase bindings. One note to keep in mind, though, is that Cloudera Manager already sets up some configuration and environment variables to automatically point Spark at HBase for you. Nevertheless, the first step of configuring Spark SQL queries is common through all types of deployment on CDP clusters, but the second is slightly different depending on the type of deployment.
Configuring HBase Region Servers
- Go to Cloudera Manager and select the HBase service.
- Search for “regionserver environment”
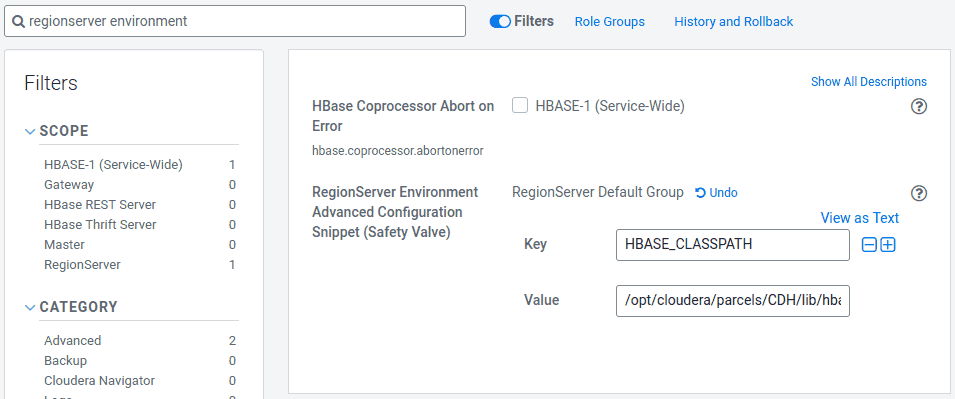
- Add a new environment variable using the RegionServer Environment Advanced Configuration Snippet (Safety Valve):
- Key: HBASE_CLASSPATH
- Value: /opt/cloudera/parcels/CDH/lib/hbase_connectors/lib/hbase-spark.jar:/opt/cloudera/parcels/CDH/lib/hbase_connectors/lib/hbase-spark-protocol-shaded.jar:/opt/cloudera/parcels/CDH/jars/scala-library-2.11.12.jar
Ensure you use the appropriate version numbers.
- Restart Region Servers.
Once you follow the above steps, follow the steps below depending if you want a CDSW or Non-CDSW deployment.
Adding HBase Bindings to Spark Runtime in Non-CDSW Deployments
To deploy the shell or use spark-submit correctly, use the following commands to ensure spark has the right HBase bindings.
pyspark –jars /opt/cloudera/parcels/CDH/lib/hbase_connectors/lib/hbase-spark.jar,/opt/cloudera/parcels/CDH/lib/hbase_connectors/lib/hbase-spark-protocol-shaded.jar
spark-submit –jars /opt/cloudera/parcels/CDH/lib/hbase_connectors/lib/hbase-spark.jar,/opt/cloudera/parcels/CDH/lib/hbase_connectors/lib/hbase-spark-protocol-shaded.jar
Adding HBase Bindings to Spark Runtime in CDSW Deployments
To configure CDSW with HBase and PySpark, there are a few steps you need to take.
1) Ensure Python 3 is installed on each cluster node and note the path to it
2) Make a new Project in CDSW and use a PySpark template
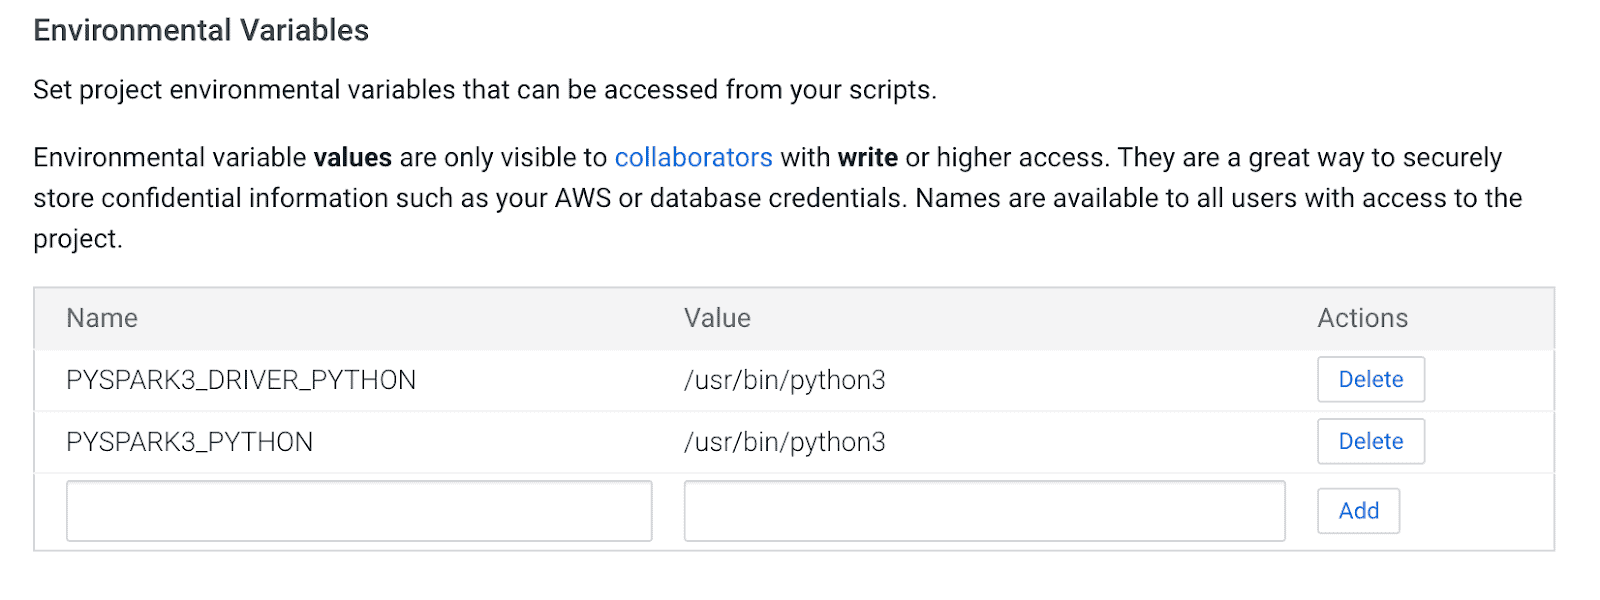
3) Open the Project, go to Settings -> Engine -> Environment Variables.
4) Set PYSPARK3_DRIVER_PYTHON and PYSPARK3_PYTHON to the path where Python is installed on your cluster nodes (Path noted in Step 1).
Below is a sample of how it should look.
5) In your Project, go to Files -> spark-defaults.conf and open it in the Workbench
6) Copy and paste the line below in that file and make sure it’s saved before starting a new session.
spark.jars=/opt/cloudera/parcels/CDH/lib/hbase_connectors/lib/hbase-spark.jar,/opt/cloudera/parcels/CDH/lib/hbase_connectors/lib/hbase-spark-protocol-shaded.jar

At this point, CDSW is now configured to run PySpark jobs on HBase! The rest of this blog post refers to some sample operations on a CDSW deployment.
Example Operations
Put Operations
There are two ways to insert and update rows into HBase. The first and most recommended method is to build a catalog, which is a schema that will map the columns of a HBase table to a PySpark dataframe while specifying the table-name and namespace. Building this user-defined JSON format is the most preferred method since it can be used with other operations as well. For more information about catalogs, refer to this documentation http://hbase.apache.org/book.html#_define_catalog. The second method is using a specific mapping parameter called “hbase.columns.mapping” which just takes a string of key-value pairs.
- Using Catalogs
from pyspark.sql import Row
from pyspark.sql import SparkSession

spark = SparkSession\
  .builder\
  .appName("SampleApplication")\
  .getOrCreate()

tableCatalog = ''.join("""{
               "table":{"namespace":"default", "name":"tblEmployee", "tableCoder":"PrimitiveType"},
               "rowkey":"key",
               "columns":{
                 "key":{"cf":"rowkey", "col":"key", "type":"int"},
                 "empId":{"cf":"personal","col":"empId","type":"string"},
                 "empName":{"cf":"personal", "col":"empName", "type":"string"},
                 "empState":{"cf":"personal", "col":"empWeight", "type":"string"}
               }
             }""".split())

employee = [(10, 'jonD', 'Jon Daniels', 'CA'), (6, 'billR', 'Bill Robert', 'FL')]
employeeRDD = spark.sparkContext.parallelize(employee)
employeeMap = employeeRDD.map(lambda x: Row(key=int(x[0]), empId=x[1], empName=x[2], empState=x[3]))
employeeDF = spark.createDataFrame(employeeMap)

employeeDF.write.format("org.apache.hadoop.hbase.spark") \
  .options(catalog=tableCatalog, newTable=5) \
  .option("hbase.spark.use.hbasecontext", False) \
  .save()
# newTable refers to the NumberOfRegions which has to be > 3
Verify that a new table called “tblEmployee” is created in HBase by simply opening the HBase shell and executing the following command:
scan ‘tblEmployee’, {‘LIMIT’ => 2}
 Using catalogs can also allow you to load HBase tables easily. This will be discussed in a future installment.
- Using hbase.columns.mapping
While writing the PySpark Dataframe, an option called “hbase.columns.mapping” can be added to include a string that maps the columns correctly. This option only allows you to insert rows to existing tables.
In the HBase shell, let’s first create a table create ‘tblEmployee2’, ‘personal’

Now in PySpark let’s insert 2 rows using “hbase.columns.mapping”
from pyspark.sql import Row
from pyspark.sql import SparkSession

spark = SparkSession\
  .builder\
  .appName("SampleApplication")\
  .getOrCreate()

employee = [(10, 'jonD', 'Jon Daniels', 170.7), (6, 'billR', 'Bill Robert', 200.1)]
employeeRDD = spark.sparkContext.parallelize(employee)
employeeMap = employeeRDD.map(lambda x: Row(key=int(x[0]), empId=x[1], empName=x[2], empWeight=float(x[3])))
employeeDF = spark.createDataFrame(employeeMap)


employeeDF.write.format("org.apache.hadoop.hbase.spark") \
       .option("hbase.columns.mapping", "key INTEGER :key, empId STRING personal:empId, empName STRING personal:empName, empWeight FLOAT personal:empWeight") \
       .option("hbase.table", "tblEmployee2") \
       .option("hbase.spark.use.hbasecontext", False) \
       .save()
Again, just verify that a new table called “tblEmployee2” has these new rows.
scan ‘tblEmployee2’, {‘LIMIT’ => 2}

That completes our examples for how to insert rows through PySpark into HBase tables. In the next installment, I’ll discuss Get and Scan Operations, PySpark SQL, and some troubleshooting. Until then you should get a CDP cluster and work your way through these examples.
Editor's Choice