An Approach towards Neural Network based Image Clustering
Introduction
Hi everyone, recently while participating in a Deep Learning competition, I came across an interesting problem, that is, to classify a given set of images into a given number of categories. But wait, you might say, isn’t it a simple Classification Problem? Use a Convolution Neural Network, and you are good to go. But here is the catch, No training data was provided.
Now you might say Don’t Be Lazy and mine the data you need, to which my reply would be Nah!! So, how do we tackle this problem? That is exactly what this article is all about, to apply Deep Learning directly on testing data (here images) without the hassles of creating a training data set and training a Neural Network on that data set.
This article was published as a part of the Data Science Blogathon.
Table of contents
A Convolution Neural Network as a Feature Extractor
Before I go any further, we first need to discuss why do we need a feature extractor? And how a Convolution Neural Network (C.N.N) can be made to act as one.
Need of a Feature Extractor for Image Data and how a CNN acts like one
Let’s say an algorithm needs two eyes, one nose, and a mouth, like features, to classify an image as a face, but in different images, these features are present at different pixel locations and hence simply flattening the image and giving it to an algorithm will not work. Here is where Convolution Layers of a C.N.N comes to play. These layers act as a feature extractor for us and break down the image into finer and finer details. Consider the example given below:
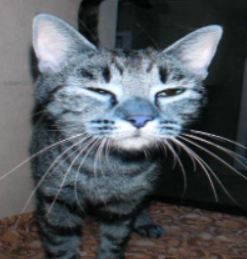
This is an image of a cat and here is how the first Convolution layer of Vgg16 sees it
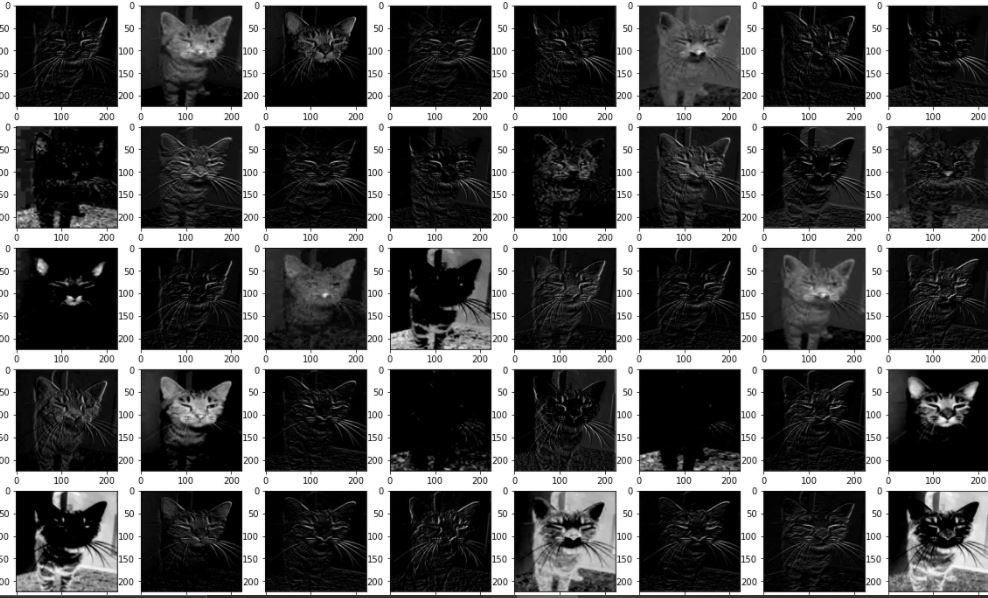
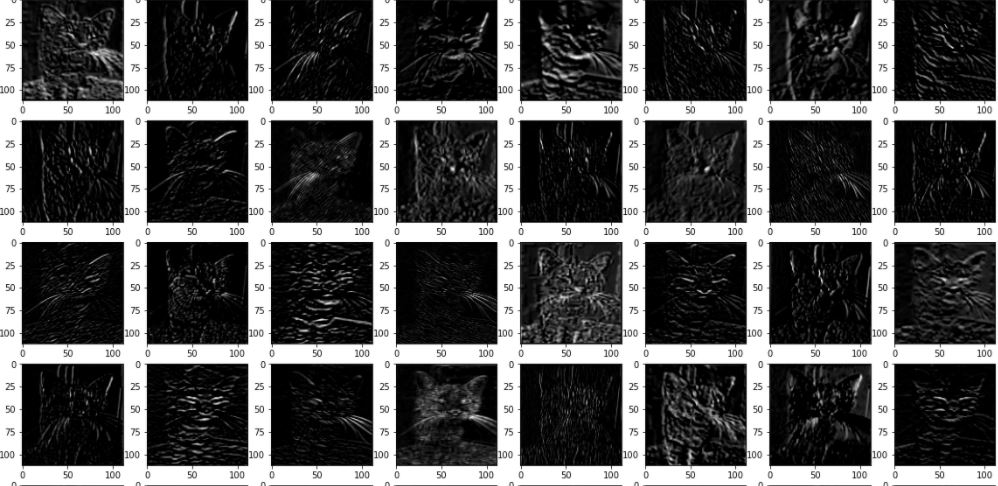
Notice the different images, these are the feature maps learned by our CNN, some feature maps focus on the outline, some on textures, while some on finer details like ears and mouth, convolution layers at the next stage breaks down these features even to finer details. Check what is learned by our C.N.N at the 9th layer. It seems here our CNN learned about textures.
Now that we have seen a Convolution layer can learn specific features of an image, the next part of this article will walk you through its coding.
Seeing what different Convolution layers of C.N.N see (Code):
The following code displays how you can achieve the above results using Vgg16 a pre-trained CNN:
MyModel = tf2.<a onclick="parent.postMessage({'referent':'.tensorflow.keras'}, '*')">keras.applications.VGG16(
    include_top=True, weights='imagenet', input_tensor=None, input_shape=None,
    pooling=None, classes=1000, classifier_activation='softmax'
)
MyModel.summary()
## lets Define a Function that can show Features learned by CNN's nth convolusion layer
def ShowMeWhatYouLearnt(<a onclick="parent.postMessage({'referent':'.kaggle.usercode.12234793.44545592.ShowMeWhatYouLearnt..Image'}, '*')">Image, <a onclick="parent.postMessage({'referent':'.kaggle.usercode.12234793.44545592.ShowMeWhatYouLearnt..layer'}, '*')">layer, <a onclick="parent.postMessage({'referent':'.kaggle.usercode.12234793.44545592.ShowMeWhatYouLearnt..MyModel'}, '*')">MyModel):
<a onclick="parent.postMessage({'referent':'.kaggle.usercode.12234793.44545592.ShowMeWhatYouLearnt..img'}, '*')">img = img_to_array(<a onclick="parent.postMessage({'referent':'.kaggle.usercode.12234793.44545592.ShowMeWhatYouLearnt..Image'}, '*')">Image)
<a onclick="parent.postMessage({'referent':'.kaggle.usercode.12234793.44545592.ShowMeWhatYouLearnt..img'}, '*')">img = np.<a onclick="parent.postMessage({'referent':'.numpy.expand_dims'}, '*')">expand_dims(<a onclick="parent.postMessage({'referent':'.kaggle.usercode.12234793.44545592.ShowMeWhatYouLearnt..img'}, '*')">img, 0)
### preprocessing for img for vgg16
<a onclick="parent.postMessage({'referent':'.kaggle.usercode.12234793.44545592.ShowMeWhatYouLearnt..img'}, '*')">img = tf2.<a onclick="parent.postMessage({'referent':'.tensorflow.keras'}, '*')">keras.applications.vgg16.preprocess_input(<a onclick="parent.postMessage({'referent':'.kaggle.usercode.12234793.44545592.ShowMeWhatYouLearnt..img'}, '*')">img)
## Now lets define a model which will help us
## see what vgg16 sees
<a onclick="parent.postMessage({'referent':'.kaggle.usercode.12234793.44545592.ShowMeWhatYouLearnt..inputs'}, '*')">inputs = <a onclick="parent.postMessage({'referent':'.kaggle.usercode.12234793.44545592.ShowMeWhatYouLearnt..MyModel'}, '*')">MyModel.inputs
<a onclick="parent.postMessage({'referent':'.kaggle.usercode.12234793.44545592.ShowMeWhatYouLearnt..outputs'}, '*')">outputs = <a onclick="parent.postMessage({'referent':'.kaggle.usercode.12234793.44545592.ShowMeWhatYouLearnt..MyModel'}, '*')">MyModel.layers[<a onclick="parent.postMessage({'referent':'.kaggle.usercode.12234793.44545592.ShowMeWhatYouLearnt..layer'}, '*')">layer].output
<a onclick="parent.postMessage({'referent':'.kaggle.usercode.12234793.44545592.ShowMeWhatYouLearnt..model'}, '*')">model = Model(inputs=<a onclick="parent.postMessage({'referent':'.kaggle.usercode.12234793.44545592.ShowMeWhatYouLearnt..inputs'}, '*')">inputs, outputs=<a onclick="parent.postMessage({'referent':'.kaggle.usercode.12234793.44545592.ShowMeWhatYouLearnt..outputs'}, '*')">outputs)
<a onclick="parent.postMessage({'referent':'.kaggle.usercode.12234793.44545592.ShowMeWhatYouLearnt..model'}, '*')">model.summary()
## let make predictions to see what the Cnn sees
<a onclick="parent.postMessage({'referent':'.kaggle.usercode.12234793.44545592.ShowMeWhatYouLearnt..featureMaps'}, '*')">featureMaps = <a onclick="parent.postMessage({'referent':'.kaggle.usercode.12234793.44545592.ShowMeWhatYouLearnt..model'}, '*')">model.predict(<a onclick="parent.postMessage({'referent':'.kaggle.usercode.12234793.44545592.ShowMeWhatYouLearnt..img'}, '*')">img)
## Plotting Features
for a onclick="parent.postMessage({'referent':'.kaggle.usercode.12234793.44545592.ShowMeWhatYouLearnt..maps'}, '*')">maps in <a onclick="parent.postMessage({'referent':'.kaggle.usercode.12234793.44545592.ShowMeWhatYouLearnt..featureMaps'}, '*')">featureMaps:
plt.<a onclick="parent.postMessage({'referent':'.matplotlib.pyplot.figure'}, '*')">figure(figsize=(20,20))
<a onclick="parent.postMessage({'referent':'.kaggle.usercode.12234793.44545592.ShowMeWhatYouLearnt..pltNum'}, '*')">pltNum = 1
for <a onclick="parent.postMessage({'referent':'.kaggle.usercode.12234793.44545592.ShowMeWhatYouLearnt..a'}, '*')">a in range(8):
for <a onclick="parent.postMessage({'referent':'.kaggle.usercode.12234793.44545592.ShowMeWhatYouLearnt..b'}, '*')">b in <a onclick="parent.postMessage({'referent':'.kaggle.usercode.12234793.44545592.ShowMeWhatYouLearnt..range'}, '*')">range(8):
plt.<a onclick="parent.postMessage({'referent':'.matplotlib.pyplot.subplot'}, '*')">subplot(8, 8, <a onclick="parent.postMessage({'referent':'.kaggle.usercode.12234793.44545592.ShowMeWhatYouLearnt..pltNum'}, '*')">pltNum)
plt.<a onclick="parent.postMessage({'referent':'.matplotlib.pyplot.imshow'}, '*')">imshow(<a onclick="parent.postMessage({'referent':'.kaggle.usercode.12234793.44545592.ShowMeWhatYouLearnt..maps'}, '*')">maps[: ,: ,<a onclick="parent.postMessage({'referent':'.kaggle.usercode.12234793.44545592.ShowMeWhatYouLearnt..pltNum'}, '*')">pltNum - 1], cmap='gray')
<a onclick="parent.postMessage({'referent':'.kaggle.usercode.12234793.44545592.ShowMeWhatYouLearnt..pltNum'}, '*')">pltNum += 1
plt.<a onclick="parent.postMessage({'referent':'.matplotlib.pyplot.show'}, '*')">show()If you have reached till here, in this article now you know what a CNN sees and how to visualize it. Back to the problem at hand, the next part of this article focuses on how you can make an efficient clustering algorithm using the above knowledge.
Designing an Image Clustering Algorithm
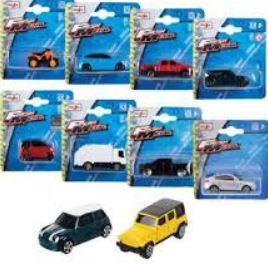
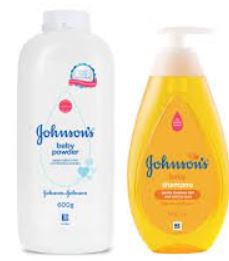
For this section I will be working with the keep-babies- safe data set on Kaggle. This was the challenge hosted by Hacker Earth where we were supposed to create an image clustering model to classify the given images into two categories, namely toys or consumer products, and read the text written on the consumer products. The following are a few images from this data set.
The following code will walk you through my solution for this problem:
##################### Making Essential Imports ############################
import sklearn
import os
import sys
import matplotlib.pyplot as plt
import cv2
import pytesseract
import numpy as np
import pandas as pd
import tensorflow as tf
conf = r'-- oem 2'

#####################################
# Defining a skeleton for our       #
# DataFrame                         #
#####################################
DataFrame = {
    'photo_name' : [],
    'flattenPhoto' : [],
    'text' : [],
    }

#######################################################################################
#      The Approach is to apply transfer learning hence using Resnet50 as my          #
#      pretrained model                                                               #
#######################################################################################
MyModel = tf.keras.models.Sequential()
MyModel.add(tf.keras.applications.ResNet50(
    include_top = False, weights='imagenet',    pooling='avg',
))

# freezing weights for 1st layer
MyModel.layers[0].trainable = False

### Now defining dataloading Function
def LoadDataAndDoEssentials(path, h, w):
    img = cv2.imread(path)
    DataFrame['text'].append(pytesseract.image_to_string(img, config = conf))
    img = cv2.resize(img, (h, w))
    ## Expanding image dims so this represents 1 sample
    img = img = np.expand_dims(img, 0)
    img = tf.keras.applications.resnet50.preprocess_input(img)
    extractedFeatures = MyModel.predict(img)
    extractedFeatures = np.array(extractedFeatures)
    DataFrame['flattenPhoto'].append(extractedFeatures.flatten())

### with this all done lets write the iterrrative loop
def ReadAndStoreMyImages(path):
    list_ = os.listdir(path)
    for mem in list_:
        DataFrame['photo_name'].append(mem)
        imagePath = path + '/' + mem
        LoadDataAndDoEssentials(imagePath, 224, 224)

### lets give the address of our Parent directory and start
path = 'enter your data's path here'
ReadAndStoreMyImages(path)

######################################################
#        lets now do clustering                      #
######################################################
Training_Feature_vector = np.array(DataFrame['flattenPhoto'], dtype = 'float64')
from sklearn.cluster import AgglomerativeClustering
kmeans = AgglomerativeClustering(n_clusters = 2)
kmeans.fit(Training_Feature_vector)
A little explanation for the above code:
The above code uses Resnet50, a pre-trained C.N.N, for feature extraction, we just remove its head or the final layer of neurons used for prediction of classes, we then feed our image to the CNN and gets a feature vector as an output, which essentially is a flattened array of all the feature maps learned by our CNN at the second last layer of Resnet50. This output vector can be given to any clustering algorithm (say kmeans(n_cluster = 2) or agglomerative clustering) which classify our images into the desired number of classes. Let me show you the clusters that were made by this approach.
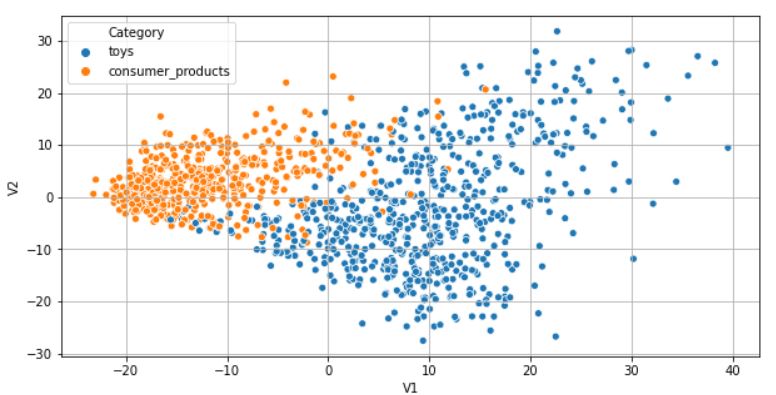
The code for this visualization is as follows
## lets make this a dataFrame
import seaborn as sb
import matplotlib.pyplot as plt
dimReducedDataFrame = pd.DataFrame(Training_Feature_vector)
dimReducedDataFrame = dimReducedDataFrame.rename(columns = { 0: 'V1', 1 : 'V2'})
dimReducedDataFrame['Category'] = list (df['Class_of_image'])
plt.figure(figsize = (10, 5))
sb.scatterplot(data = dimReducedDataFrame, x = 'V1', y = 'V2',hue = 'Category')
plt.grid(True)
plt.show()
Conclusion
This article describes image clustering by explaining how you can cluster visually similar images together using deep learning and clustering. It is entirely possible to cluster similar images together without even the need to create a data set and training a CNN on it.
Also, here are a few links to my notebooks that you might find useful:
Thanks for reading!!
Frequently Asked Questions
Image segmentation is like dividing a cake into slices, each representing a different object or region in the image. Image clustering is like grouping similar candies together without knowing what the candies are. In other words, image segmentation is about identifying known objects, while image clustering is about discovering unknown patterns
Clustering is like grouping similar pixels together in an image, which helps computers understand and analyze the image.
Image segmentation is like giving machines the ability to see the world like humans do. It allows them to identify and understand objects in images, which is essential for many computer vision tasks, such as object detection, medical image analysis, and autonomous vehicles.


Hey, Thanks heaps for posting this example. I'm sure it's going to be helpful once I get it working for my application. A couple of things that might improve your article: 1) Use of pytesseract might be a bit tangential and complicate the nice bare minimum example, especially as the result is never really used. Perhaps remove "text" from DataFrame and remove this line: `DataFrame['text'].append(pytesseract.image_to_string(img, config = conf))` 2) What is df in this line: `dimReducedDataFrame['Category'] = list (df['Class_of_image'])` should it be: `dimReducedDataFrame['Category'] = list (dimReducedDataFrame['Class_of_image'])` but I don't think that makes sense either.