Face Key-point Recognition Using CNN
This article was published as a part of the Data Science Blogathon
Overview of the project:
The goal of this project is to forecast the locations of key points on facial pictures. This may be used as a component in a variety of applications, including:
Face recognition in pictures and video.
The study of facial expressions.
For medical diagnosis, identifying dysmorphic facial symptoms.
Recognizing facial key points is a difficult topic to solve. Facial characteristics differ significantly from one person to the next, and even within a single person, there is a lot of variances owing to 3D posture, size, location, viewing angle, and lighting circumstances. While computer vision research has come a long way in tackling these issues, there are still many areas where it may be improved.
TABLE OF CONTENT:
- Introduction
- Prerequisites
- Procedure and programming
- Useful applications of Facial keypoint detection
- About Myself
- Conclusion
Introduction:
The marking of important areas of the face, such as the eyes, corners of the mouth, and nose, that are relevant for a variety of tasks, such as face filters, emotion recognition, and pose recognition, using convolutional neural network and computer vision techniques to perform facial Keypoint detection.
It entails forecasting the Facial Key points coordinates for a particular face, such as nose tip, the center of eyes, and so on. To recognize facial key points, we use a Convolutional Neural Network-based model using Autoencoders. Convolutional Neural Networks (CNN) has a deep structure that allows them to extract high-level information and provide better precision when identifying each important point. Convolutional networks are designed to anticipate all points at the same time.
Source: https://developer.qualcomm.com/sites/default/files/attachments/facial_expression_detection-08_0.png
Prerequisites :
Because neural networks frequently require standardized pictures, they should have a constant size, with a normalized range for color ranges and coordinates, and transformed from NumPy lists and arrays to Tensors and Keras(for PyTorch). As a result, some pre-processing will be required.
Procedure and programming:
I am taking the Kaggle dataset to train the model, You can download it by running the API command
kaggle competitions download -c facial-keypoints-detection
Import the NumPy and pandas library :
import numpy as np # linear algebra
import pandas as pd # data processing
import os
for directoryname, _, filenames in os.walk('/kaggle/input'):
    for filename in filenames:
        print(os.path.join(directoryname, filename))
Any output that you write to the current directory is stored.
The next step is to set the path for each file of training and testing data,
train_zip_path = "../input/facial-keypoints-detection/training.zip"
test_zip_path = "../input/facial-keypoints-detection/test.zip"
id_lookup_table = "../input/facial-keypoints-detection/IdLookupTable.csv"
sample_Submission = "../input/facial-keypoints-detection/SampleSubmission.csv"
Let’s use a zip file to unzip the zip files and then load the datasets.
import zipfile
with zipfile.ZipFile(train_zip_path,'r') as zip_ref:
zip_ref.extractall('')
with zipfile.ZipFile(test_zip_path,'r') as zip_ref:
zip_ref.extractall('')
train_df = pd.read_csv('training.csv')
test_df = pd.read_csv('test.csv')
idLookupTable = pd.read_csv(id_lookup_table)
sampleSumission = pd.read_csv(sample_Submission)
After loading the data sets, we can view the data frames by using the pandas’ library and list the head of the data set.
train_df.info()
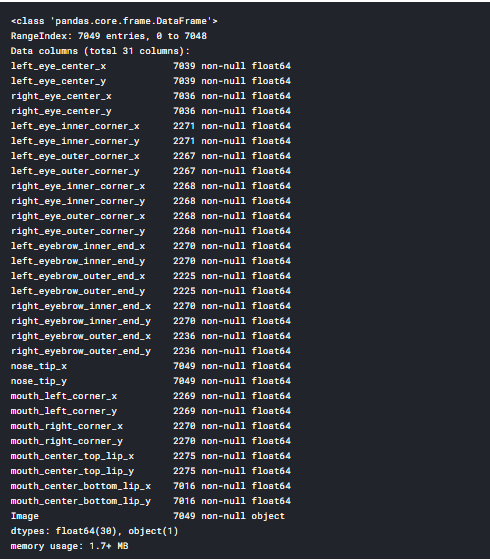
Fill the Nan values and Separate and reshape input values(x_train)
train_df.fillna(method='ffill',inplace=True)
Separate and reshape input values(x_train) in the training dataset :
An array is created using an image, ‘keypoints’: key points will be a sample of our dataset. Our dataset will accept an optional argument transform, allowing us to perform any necessary processing on the sample.
image_df = train_df['Image']
imageArr = []
for i in range(0,len(image_df)):
     img = image_df[i].split()
     img = ['0' if x == '' else x for x in img]
     imageArr.append(img)
 x_train = np.array(imageArr,dtype='float')
 x_train = x_train.reshape(-1,96,96,1)
 print(x_train.shape)
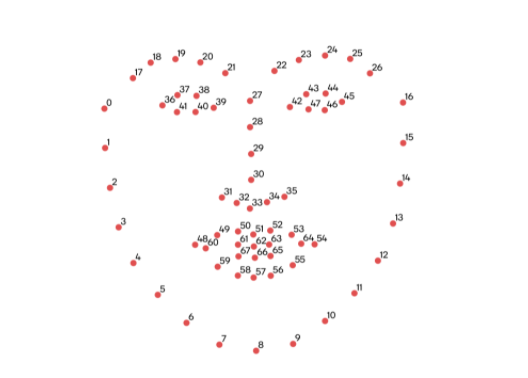
Create a CNN that takes pictures as input and outputs key points:
The input picture size is 224*224px (as determined by transform) and the output class scores are 136, or 136/2 = 68. (our desired 68 key points) and separate the target value
keypoints_df = train_df.drop('Image',axis = 1)
y_train = np.array(keypoints_df,dtype='float')
print(y_train.shape)
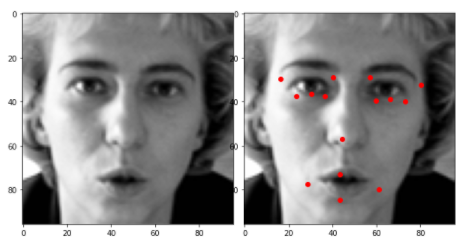
def visualizeWithNoKeypoints(index):
    plt.imshow(x_train[index].reshape(96,96),cmap='gray')
def visualizeWithKeypoints(index):
    plt.imshow(x_train[index].reshape(96,96),cmap='gray')
    for i in range(1,31,2):
        plt.plot(y_train[0][i-1],y_train[0][i],'ro')
After we have written the visualize function and next, we can visualize each image using the function call
import matplotlib.pyplot as plt
fig = plt.figure(figsize=(8,4))
fig.subplots_adjust(left=0,right=1,bottom=0,top=1,hspace=0.05,wspace=0.05)
plt.subplot(1,2,1)
visualizeWithNoKeypoints(1)
plt.subplot(1,2,2)
visualizeWithKeypoints(1)
Alright, The data has been preprocessed. Now it’s time to create a training model. To create our CNN model, we’ll utilize the Keras framework.
from keras.models import Sequential, Model
from keras.layers import Activation, Convolution2D,MaxPooling2D,BatchNormalization, Flatten, Dense, Dropout
from keras.layers.advanced_activations import LeakyReLU
Start with simply one or two epochs initially to rapidly assess how your model is training and determine whether you should alter its structure or hyperparameters. Keep track of how your model’s loss changes over time as you train: does it reduce fast at first, then slow down?
Use these initial observations to make changes to your model and decide on the best architecture before you train for many epochs and create a final model.
model = Sequential()
model.add(Convolution2D(32,(3,3),padding='same',use_bias=False, input_shape=(96,96,1)))
model.add(LeakyReLU(alpha = 0.1))
model.add(BatchNormalization())
model.add(Convolution2D(32,(3,3),padding='same',use_bias = False))
model.add(LeakyReLU(alpha=0.1))
model.add(BatchNormalization())
model.add(MaxPooling2D(pool_size=(2,2)))
model.add(Convolution2D(64,(3,3),padding='same',use_bias = False))
model.add(LeakyReLU(alpha=0.1))
model.add(BatchNormalization())
model.add(Convolution2D(64, (3,3), padding='same', use_bias=False))
model.add(LeakyReLU(alpha = 0.1))
model.add(BatchNormalization())
model.add(MaxPooling2D(pool_size=(2, 2)))
model.add(Convolution2D(96, (3,3), padding='same', use_bias=False))
model.add(LeakyReLU(alpha = 0.1))
model.add(BatchNormalization())
model.add(Convolution2D(96, (3,3), padding='same', use_bias=False))
model.add(LeakyReLU(alpha = 0.1))
model.add(BatchNormalization())
model.add(MaxPooling2D(pool_size=(2, 2)))
model.add(Convolution2D(128, (3,3),padding='same', use_bias=False))
# model.add(BatchNormalization())
model.add(LeakyReLU(alpha = 0.1))
model.add(BatchNormalization())
model.add(Convolution2D(128, (3,3),padding='same', use_bias=False))
model.add(LeakyReLU(alpha = 0.1))
model.add(BatchNormalization())
model.add(MaxPooling2D(pool_size=(2, 2)))
model.add(Convolution2D(256, (3,3),padding='same',use_bias=False))
model.add(LeakyReLU(alpha = 0.1))
model.add(BatchNormalization())
model.add(Convolution2D(256, (3,3),padding='same',use_bias=False))
model.add(LeakyReLU(alpha = 0.1))
model.add(BatchNormalization())
model.add(MaxPooling2D(pool_size=(2, 2)))
model.add(Convolution2D(512, (3,3), padding='same', use_bias=False))
model.add(LeakyReLU(alpha = 0.1))
model.add(BatchNormalization())
model.add(Convolution2D(512, (3,3), padding='same', use_bias=False))
model.add(LeakyReLU(alpha = 0.1))
model.add(BatchNormalization())
model.add(Flatten())
model.add(Dense(512,activation='relu'))
model.add(Dropout(0.1))
model.add(Dense(30))
model.summary()
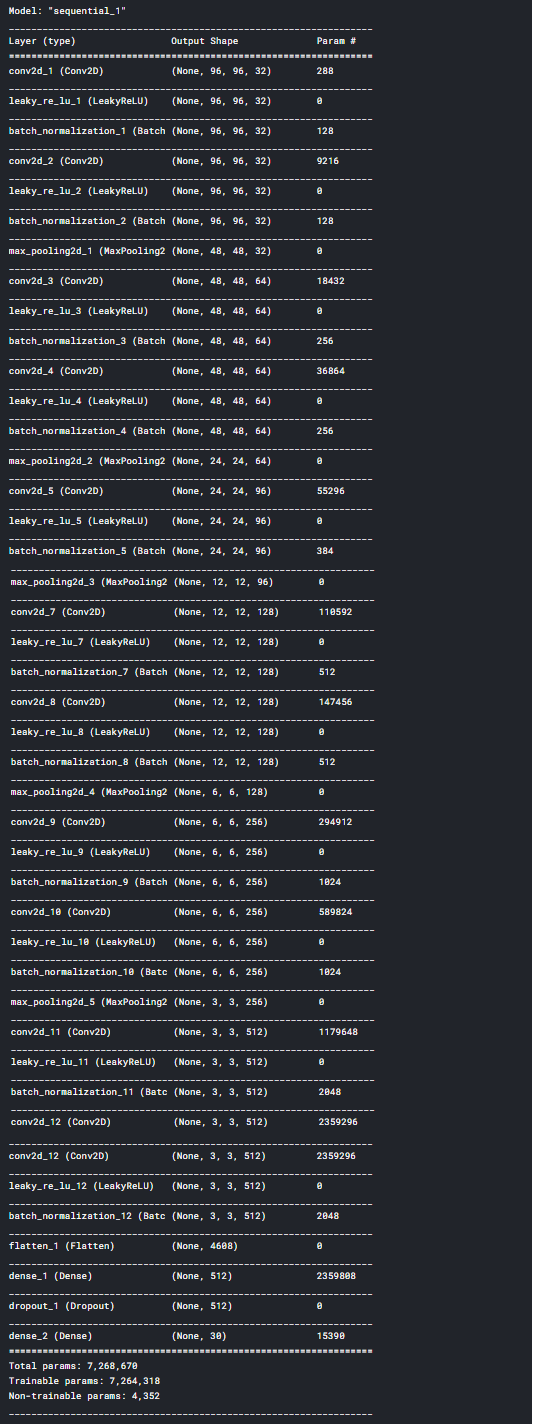
The next step is to configure the model :
model.compile(optimizer='adam',loss='mean_squared_error',metrics=['mae','acc'])
model.fit(x_train,y_train,batch_size=256,epochs=45,validation_split=2.0)
Sample Output:
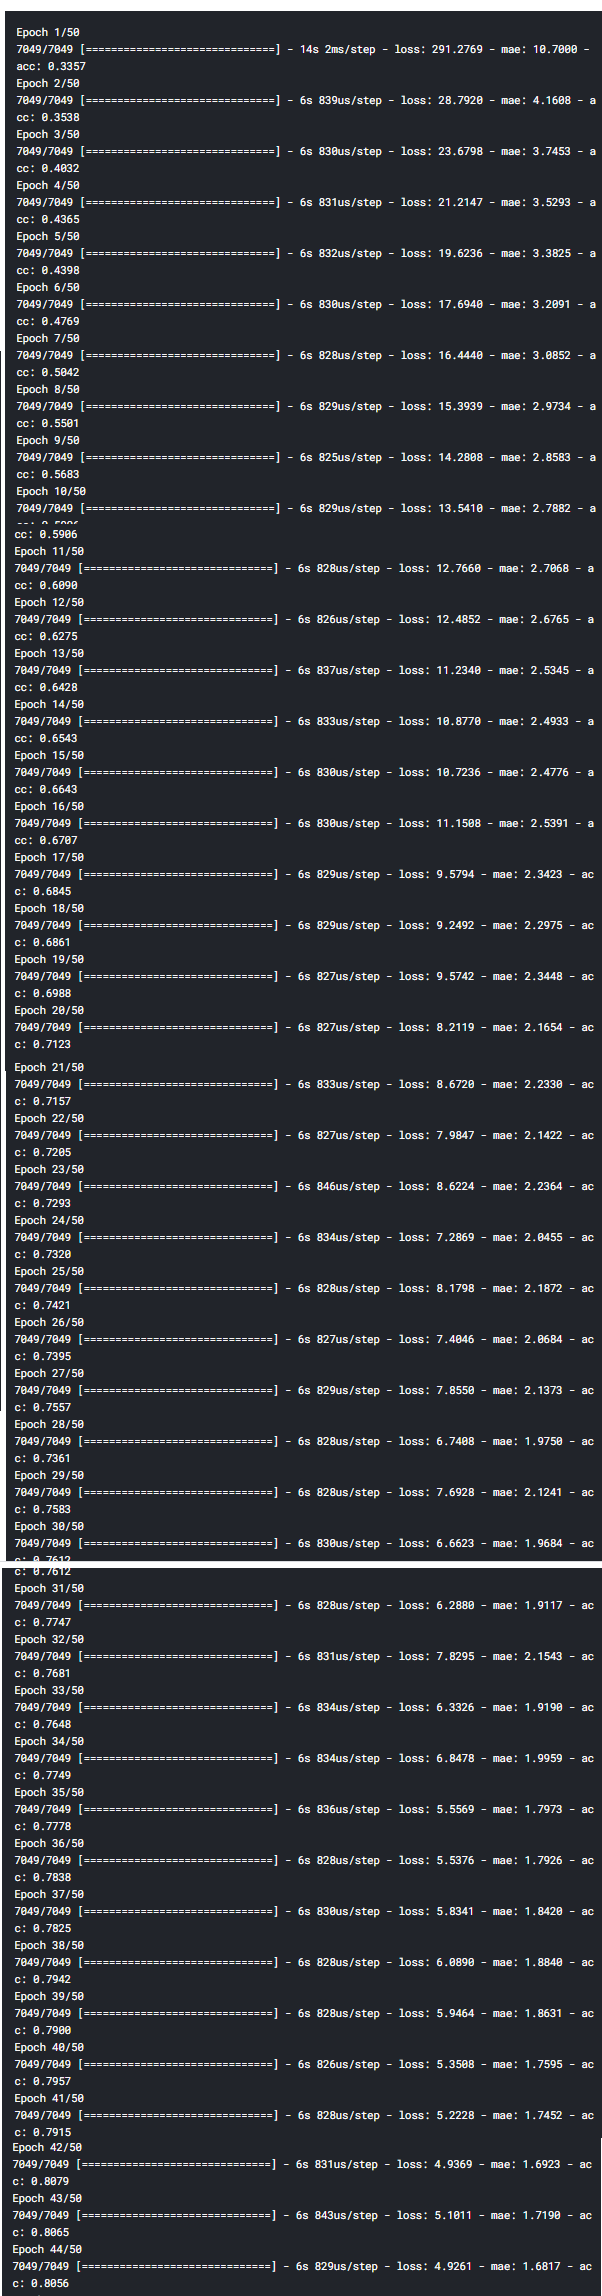
A total number of 50 iterations were performed in the whole training dataset.
We have learned how to train a deep learning model simply using CNN.
Now it’s time to put the model to the test using our data collection. We must first prepare our test set.
test_df.isnull().any()
x test: Separate and reshape input test values
image_df = test_df['Image']
keypoints_df = test_df.drop('Image',axis = 1)
imageArr = []

for i in range(0,len(image_df)):
    img = image_df[i].split()
    img = ['0' if x=='' else x for <a onclick="parent.postMessage({'referent':'.kaggle.usercode.9109824.32742593.[5124,5127].x'}, '*')">x in img]
    imageArr.append(img)
x_test = np.<a onclick="parent.postMessage({'referent':'.numpy.array'}, '*')">array(imageArr,dtype='float')
x_test = x_test.reshape(-1,96,96,1)
print(x_test.shape)
We know going to separate target values (y_test) in the test data set
y_test = np.<a onclick="parent.postMessage({'referent':'.numpy.array'}, '*')">array(keypoints_df,dtype='float')
print(y_test.shape)
Now, it’s time to predict the results of the trained model;
pred = model.predict(x_test)
idLookupTable.head()
| RowId | ImageId | FeatureName | Location | |
|---|---|---|---|---|
| 0 | 1 | 1 | left_eye_center_x | NaN |
| 1 | 2 | 1 | left_eye_center_y | NaN |
| 2 | 3 | 1 | right_eye_center_x | NaN |
| 3 | 4 | 1 | right_eye_center_y | NaN |
| 4 | 5 | 1 | left_eye_inner_corner_x | NaN |
We have learned how to build a deep learning facial Keypoint detection model simply using CNN.
Some Useful applications of facial keypoint detection:
The technology’s applicability is numerous and diverse. The following are only a handful of the more intriguing applications of facial recognition in today’s corporate world.
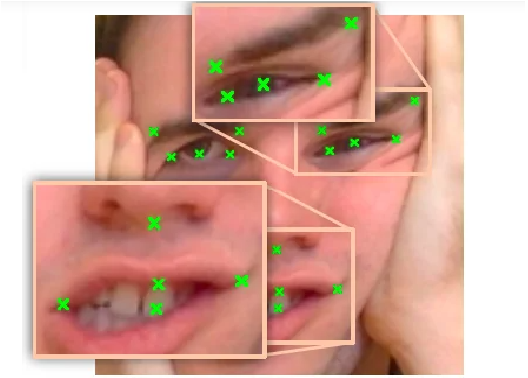
1) Detecting facial keypoints with a CNN and using them in apps with face filters
Face filters, which overlay photos of people’s faces with amusing things, have grown popular. They’re commonly found on social media platforms. The face keypoint (or “keypoints”) detection technology is used in this filter application.
The important regions of the face from which a person’s facial expressions — and hence emotions — may be assessed are known as facial key points. They’re crucial in the development of real-time apps for detecting sleepiness, assessing biometrics, and reading people’s emotions.

Source: https://developer.qualcomm.com/sites/default/files/attachments/facial_expression_detection-07_0.png
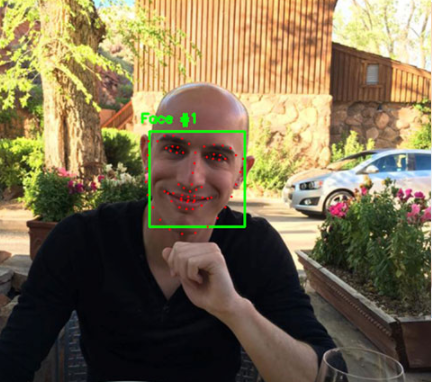
2) Virtual and augmented reality (AR)
Face keypoint recognition is used in several popular smartphone apps. Face filters on Instagram, Snapchat, and LINE are some well-known examples. The AR software can properly superimpose picture filters over the user’s face in real-time by identifying the user’s facial key points.
Source: https://www.alastairbreeze.com/wp-content/uploads/2017/09/Screen-Shot-2017-09-23-at-20.40.31.png
If you are a game or app designer, The algorithm will perform much better if the user concentrates on placing things closer to the corners of the floor or table. The algorithms will always discover enough key points near the anchor because of this architecture.
3) Snap pay(Cashless payment):

Image courtesy of SnapPay
While not yet accessible in most countries, face recognition payments are currently accepted by a large number of retailers in China. SnapPay also announced the debut of facial recognition payment technology in North America on October 16th, 2019. In all emerging nations, this mode of payment is being introduced.
4) Security Doors with face lock:
Security gates or doors are another application for this technology. Facial recognition technology may be used to allow or refuse admission to your apartment complex, the lobby of your company, or even railway station ticket barriers. While this technology isn’t widely used in other nations.
About Myself :
I’m Lavanya from Chennai. I am a passionate writer and enthusiastic content maker. I used to read many books on deep learning. I am currently pursuing my B. Tech in Computer Engineering and have a strong interest in the fields of deep learning. I am looking forward to your valuable comments and views on my article.
Conclusion:
I hope you enjoyed the article, and I am happy if I hear some comments about my article from your side, so feel free to add them up in the comment section. Thank You.


Awesome 💙
It's a great blog and shared to my students