Docker-based Python Development with CUDA Support on PyCharm and/or Visual Studio Code
Introduction
Setting up a development environment is not easy if you are inexperienced, especially if a lot of technologies you wish to learn are involved.
This tutorial is aimed to show you how to set up a basic Docker-based Python development environment with CUDA support in PyCharm or Visual Studio Code.
Disclaimers
- At the time of writing, I was unable to use CUDA inside of Docker in Windows 10 Home (even with the Insider build) so this tutorial has been implemented with Linux in mind even though there’s basically nothing that is platform-specific.
- Using Docker as a remote Python interpreter with PyCharm is possible only with the Professional edition.
- I will assume that you already installed Docker on your machine.
- I will assume that you already installed CUDA on your machine. If you are still setting up your Linux machine and you are not willing to research much about it I usually recommend Pop!_OS. In this article, you can find how to setup CUDA and cuDNN very easily on their platform. The article also provides instructions to use their packages on Ubuntu.
Project structure
For this tutorial I’m using a toy project with just 3 files:
- A
Dockerfileto generate the container. - A
requirements.txtfile that contains the dependencies of the project. - A
single run.pyfile that contains some code to run. Obviously your personal project will most likely be more complex, you may use a different method for dependency management and you might also use adocker-compose.yamlfile but for the sake of getting my point through that is pointless complexity.
Dockerfile
For an article more focused on Docker and Dockerfiles I recommend the Docker Beginner’s Guide.
Here follow our Dockerfile and a brief explanation
FROM nvidia/cuda:10.2-devel

# Miniconda install copy-pasted from Miniconda's own Dockerfile reachable
# at: https://github.com/ContinuumIO/docker-images/blob/master/miniconda3/debian/Dockerfile

ENV PATH /opt/conda/bin:$PATH

RUN apt-get update --fix-missing && \
    apt-get install -y wget bzip2 ca-certificates libglib2.0-0 libxext6 libsm6 libxrender1 git mercurial subversion && \
    apt-get clean

RUN wget --quiet https://repo.anaconda.com/miniconda/Miniconda3-latest-Linux-x86_64.sh -O ~/miniconda.sh && \
    /bin/bash ~/miniconda.sh -b -p /opt/conda && \
    rm ~/miniconda.sh && \
    /opt/conda/bin/conda clean -tipsy && \
    ln -s /opt/conda/etc/profile.d/conda.sh /etc/profile.d/conda.sh && \
    echo ". /opt/conda/etc/profile.d/conda.sh" >> ~/.bashrc && \
    echo "conda activate base" >> ~/.bashrc && \
    find /opt/conda/ -follow -type f -name '*.a' -delete && \
    find /opt/conda/ -follow -type f -name '*.js.map' -delete && \
    /opt/conda/bin/conda clean -afy

# Project setup

WORKDIR /code

COPY requirements.txt .

RUN pip install -r requirements.txt

COPY . .

CMD ["python", "./run.py"]
In layman’s terms a Dockerfile describes a procedure to generate a Docker image that is then used to create Docker containers. This Dockerfile builds on top of the nvidia/cuda:10.2-devel image made available in DockerHub directly by NVIDIA.
nvidia/cuda:10.2-devel is a development image with the CUDA 10.2 toolkit already installed
Now you just need to install what we need for Python development and setup our project.
In the middle section of the Dockerfile there is a Miniconda3 installation. I decided to use Miniconda instead of just using Python because it’s my go-to platform for most of my projects. We are leveraging none of Miniconda capabilities so it is kind of overkill. Swapping out Miniconda with a vanilla installation of Python in the Dockerfile is left to the reader as an exercise (do not panic, just use the same commands you would use on a new Ubuntu box).
The last section is about the project setup, we are just installing the dependencies and copying all the files inside the image work directory and choosing the command to launch when docker run is called without a specified command.
To build the Docker image just navigate with your shell of choice to the path containing the Dockerfile and run:
docker build -t <image_name> .
This will generate the Docker image as described by the configuration and give it the name image_name. If in the name no tag is specified latest is used as a default. To specify the tag just write it after a colon.
I will use the name pytorch-development-box for the image in the rest of the tutorial.
requirements.txt
I’m using only Pytorch and Torchvision as the dependencies for this project. I use those packages a lot and I will use their CUDA availability method to check if everything is working. So the content of my requirements.txt is:
torch
torchvision
run.py
My Python file is quite simple, I’m just checking if CUDA is available or not.
import torch.cuda

if torch.cuda.is_available():
    print("CUDA is available :D")
else:
    print("CUDA isn't available :(")
Setting up PyCharm
Using a remote Python interpreter from Docker is available only on PyCharm Professional. So, let’s see how to set it up.
Once you’ve built your Docker image and opened your project folder in PyCharm navigate to File > Settings > Project > Python Interpreter.
You should see something like this:
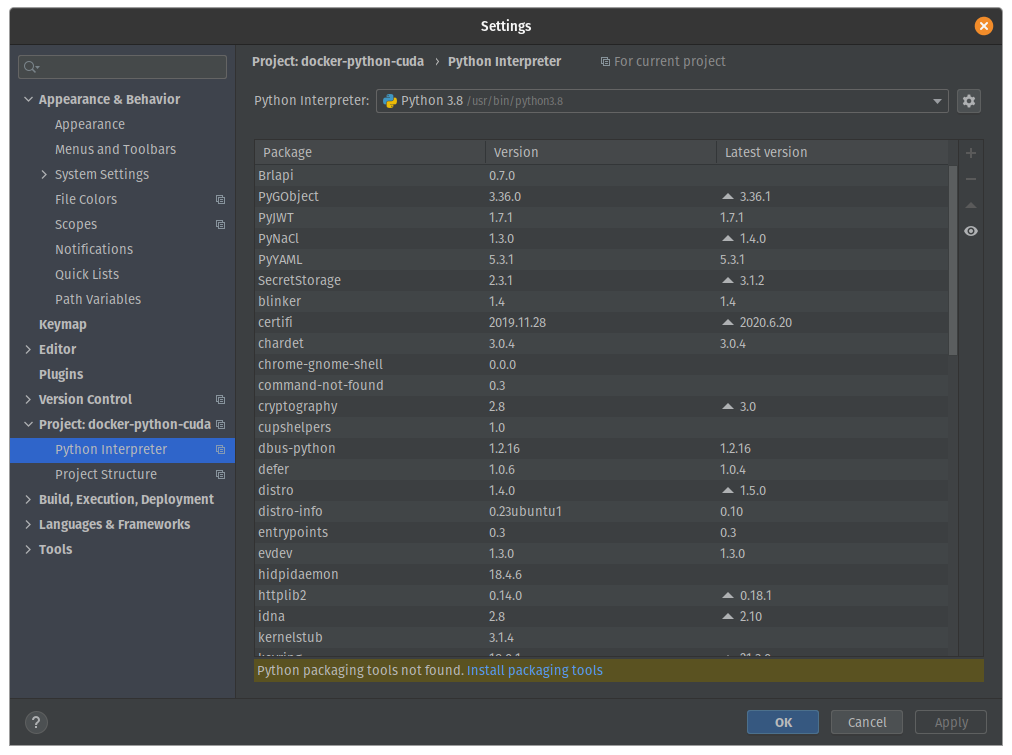
Now click on the little gear near the top-right and add a new Python interpreter.
Here you will need to select Docker and choose the image name you selected before in the drop-down menu called Image name like so:

After this configuration is confirmed, wait for the indexing to finish, and try running run.py.
CUDA isn't available :(
At this point, we didn’t configure the Run/Debug configuration to have Docker use the GPU but we can quickly fix it.
Open the auto-generated Run/Debug configuration and add --gpus all at the end of the Docker container settings.
You should end up with something like this:
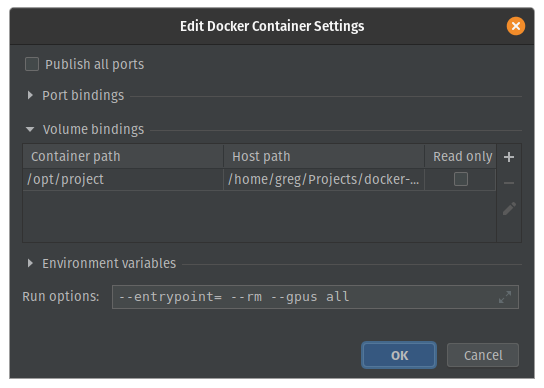
Confirm this configuration and run it. The CUDA result is available now!
Setting up Visual Studio Code
I will rely on the new Remote Development extensions for Visual Studio Code to setup development through Docker.
The first step will be installing the Remote Development extension pack and opening the project folder.
Use the Add Development Container Configuration Files command from the Visual Studio command palette.
Choose to use your own Dockerfile.
At this point a devcontainer.json file will be created into a .devcontainer directory and it will look like this:
// For format details, see https://aka.ms/vscode-remote/devcontainer.json or this file's README at:
// https://github.com/microsoft/vscode-dev-containers/tree/v0.128.0/containers/docker-existing-dockerfile
{
	"name": "Existing Dockerfile",

	// Sets the run context to one level up instead of the .devcontainer folder.
	"context": "..",

	// Update the 'dockerFile' property if you aren't using the standard 'Dockerfile' filename.
	"dockerFile": "../Dockerfile",

	// Set *default* container specific settings.json values on container create.
	"settings": {
		"terminal.integrated.shell.linux": null
	},

	// Add the IDs of extensions you want installed when the container is created.
	"extensions": []

	// Use 'forwardPorts' to make a list of ports inside the container available locally.
	// "forwardPorts": [],

	// Uncomment the next line to run commands after the container is created - for example installing curl.
	// "postCreateCommand": "apt-get update && apt-get install -y curl",

	// Uncomment when using a ptrace-based debugger like C++, Go, and Rust
	// "runArgs": [ "--cap-add=SYS_PTRACE", "--security-opt", "seccomp=unconfined" ],

	// Uncomment to use the Docker CLI from inside the container. See https://aka.ms/vscode-remote/samples/docker-from-docker.
	// "mounts": [ "source=/var/run/docker.sock,target=/var/run/docker.sock,type=bind" ],

	// Uncomment to connect as a non-root user. See https://aka.ms/vscode-remote/containers/non-root.
	// "remoteUser": "vscode"
}
A prompt to reopen the folder in the container will pop-up.
Before doing so we just need to select some extensions to use while developing in the container.
Go to the Extensions tab, browse for the extensions you need and you can right-click and select Add to devcontainer.json to add them to the configuration.
Now we just need to add a runArgs key for enabling the GPU and we will be ready to start development.
Minus the comments you should end up with something like this:
{
	"name": "Existing Dockerfile",
	"context": "..",
	"dockerFile": "../Dockerfile",
	"settings": {
		"terminal.integrated.shell.linux": null
	},
	"extensions": [
		"ms-python.python"
	],
	// This was added!
	"runArgs": [
		"--gpus=all"
	]
}
Now from the command palette, we can Rebuild and Reopen in Container and we will be ready to go!
Conclusion
Now you have quite a basic development environment configured in your IDE that is based on your own Docker image and all of this with GPU support.
All that we need to do to customize it to fit your project needs and start having fun!
About the Author

Gregory Sech – Data Science Student
Data Science student at Ca’ Foscari University of Venice. Passionate about Deep Learning


One of the best, informative and my favorite blog ever.