AWS Big Data Blog
Use Amazon EMR with S3 Access Grants to scale Spark access to Amazon S3
Amazon EMR is pleased to announce integration with Amazon Simple Storage Service (Amazon S3) Access Grants that simplifies Amazon S3 permission management and allows you to enforce granular access at scale. With this integration, you can scale job-based Amazon S3 access for Apache Spark jobs across all Amazon EMR deployment options and enforce granular Amazon S3 access for better security posture.
In this post, we’ll walk through a few different scenarios of how to use Amazon S3 Access Grants. Before we get started on walking through the Amazon EMR and Amazon S3 Access Grants integration, we’ll set up and configure S3 Access Grants. Then, we’ll use the AWS CloudFormation template below to create an Amazon EMR on Amazon Elastic Compute Cloud (Amazon EC2) Cluster, an EMR Serverless application and two different job roles.
After the setup, we’ll run a few scenarios of how you can use Amazon EMR with S3 Access Grants. First, we’ll run a batch job on EMR on Amazon EC2 to import CSV data and convert to Parquet. Second, we’ll use Amazon EMR Studio with an interactive EMR Serverless application to analyze the data. Finally, we’ll show how to set up cross-account access for Amazon S3 Access Grants. Many customers use different accounts across their organization and even outside their organization to share data. Amazon S3 Access Grants make it easy to grant cross-account access to your data even when filtering by different prefixes.
Besides this post, you can learn more about Amazon S3 Access Grants from Scaling data access with Amazon S3 Access Grants.
Prerequisites
Before you launch the AWS CloudFormation stack, ensure you have the following:
- An AWS account that provides access to AWS services
- The latest version of the AWS Command Line Interface (AWS CLI)
- An AWS Identity and Access Management (AWS IAM) user with an access key and secret key to configure the AWS CLI, and permissions to create an IAM role, IAM policies, and stacks in AWS CloudFormation
- A second AWS account if you wish to test the cross-account functionality
Walkthrough
Create resources with AWS CloudFormation
In order to use Amazon S3 Access Grants, you’ll need a cluster with Amazon EMR 6.15.0 or later. For more information, see the documentation for using Amazon S3 Access Grants with an Amazon EMR cluster, an Amazon EMR on EKS cluster, and an Amazon EMR Serverless application. For the purpose of this post, we’ll assume that you have two different types of data access users in your organization—analytics engineers with read and write access to the data in the bucket and business analysts with read-only access. We’ll utilize two different AWS IAM roles, but you can also connect your own identity provider directly to IAM Identity Center if you like.
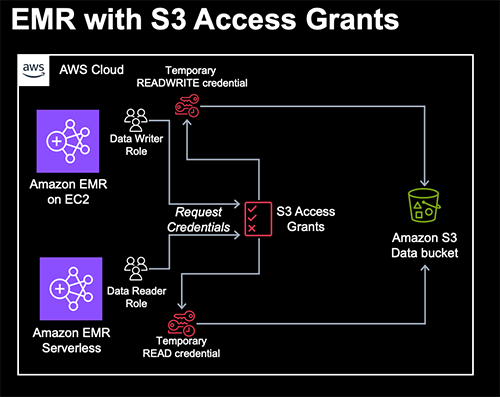
Here’s the architecture for this first portion. The AWS CloudFormation stack creates the following AWS resources:
- A Virtual Private Cloud (VPC) stack with private and public subnets to use with EMR Studio, route tables, and Network Address Translation (NAT) gateway.
- An Amazon S3 bucket for EMR artifacts like log files, Spark code, and Jupyter notebooks.
- An Amazon S3 bucket with sample data to use with S3 Access Grants.
- An Amazon EMR cluster configured to use runtime roles and S3 Access Grants.
- An Amazon EMR Serverless application configured to use S3 Access Grants.
- An Amazon EMR Studio where users can login and create workspace notebooks with the EMR Serverless application.
- Two AWS IAM roles we’ll use for our EMR job runs: one for Amazon EC2 with write access and another for Serverless with read access.
- One AWS IAM role that will be used by S3 Access Grants to access bucket data (i.e., the Role to use when registering a location with S3 Access Grants. S3 Access Grants use this role to create temporary credentials).
To get started, complete the following steps:
- Choose Launch Stack:

- Accept the defaults and select I acknowledge that this template may create IAM resources.
The AWS CloudFormation stack takes approximately 10–15 minutes to complete. Once the stack is finished, go to the outputs tab where you will find information necessary for the following steps.
Create Amazon S3 Access Grants resources
First, we’re going to create an Amazon S3 Access Grants resources in our account. We create an S3 Access Grants instance, an S3 Access Grants location that refers to our data bucket created by the AWS CloudFormation stack that is only accessible by our data bucket AWS IAM role, and grant different levels of access to our reader and writer roles.
To create the necessary S3 Access Grants resources, use the following AWS CLI commands as an administrative user and replace any of the fields between the arrows with the output from your CloudFormation stack.
Next, we create a new S3 Access Grants location. What is a Location? Amazon S3 Access Grants works by vending AWS IAM credentials with access scoped to a particular S3 prefix. An S3 Access Grants location will be associated with an AWS IAM Role from which these temporary sessions will be created.
In our case, we’re going to scope the AWS IAM Role to the bucket created with our AWS CloudFormation stack and give access to the data bucket role created by the stack. Go to the outputs tab to find the values to replace with the following code snippet:
Note the AccessGrantsLocationId value in the response. We’ll need that for the next steps where we’ll walk through creating the necessary S3 Access Grants to limit read and write access to your bucket.
- For the read/write user, use
s3-control create-access-grantto allow READWRITE access to the “output/*” prefix: - For the read user, use
s3control create-access-grantagain to allow only READ access to the same prefix:
Demo Scenario 1: Amazon EMR on EC2 Spark Job to generate Parquet data
Now that we’ve got our Amazon EMR environments set up and granted access to our roles via S3 Access Grants, it’s important to note that the two AWS IAM roles for our EMR cluster and EMR Serverless application have an IAM policy that only allow access to our EMR artifacts bucket. They have no IAM access to our S3 data bucket and instead use S3 Access Grants to fetch short-lived credentials scoped to the bucket and prefix. Specifically, the roles are granted s3:GetDataAccess and s3:GetDataAccessGrantsInstanceForPrefix permissions to request access via the specific S3 Access Grants instance created in our region. This allows you to easily manage your S3 access in one place in a highly scoped and granular fashion that enhances your security posture. By combining S3 Access Grants with job roles on EMR on Amazon Elastic Kubernetes Service (Amazon EKS) and EMR Serverless as well as runtime roles for Amazon EMR steps beginning with EMR 6.7.0, you can easily manage access control for individual jobs or queries. S3 Access Grants are available on EMR 6.15.0 and later. Let’s first run a Spark job on EMR on EC2 as our analytics engineer to convert some sample data into Parquet.
For this, use the sample code provided in converter.py. Download the file and copy it to the EMR_ARTIFACTS_BUCKET created by the AWS CloudFormation stack. We’ll submit our job with the ReadWrite AWS IAM role. Note that for the EMR cluster, we configured S3 Access Grants to fall back to the IAM role if access is not provided by S3 Access Grants. The DATA_WRITER_ROLE has read access to the EMR artifacts bucket through an IAM policy so it can read our script. As before, replace all the values with the <> symbols from the Outputs tab of your CloudFormation stack.
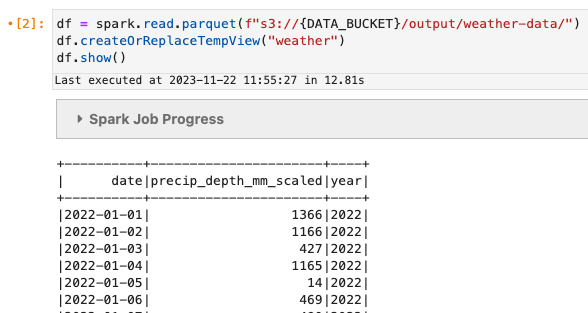
Once the job finishes, we should see some Parquet data in s3://<DATA_BUCKET>/output/weather-data/. You can see the status of the job in the Steps tab of the EMR console.
Demo Scenario 2: EMR Studio with an interactive EMR Serverless application to analyze data
Now let’s go ahead and login to EMR Studio and connect to your EMR Serverless application with the ReadOnly runtime role to analyze the data from scenario 1. First we need to enable the interactive endpoint on your Serverless application.
- Select the EMRStudioURL in the Outputs tab of your AWS CloudFormation stack.
- Select Applications under the Serverless section on the left-hand side.

- Select the EMRBlog application, then the Action dropdown, and Configure.
- Expand the Interactive endpoint section and make sure that Enable interactive endpoint is checked.

- Scroll down and click Configure application to save your changes.
- Back on the Applications page, select EMRBlog application, then the Start application button.
Next, create a new workspace in our Studio.
- Choose Workspaces on the left-hand side, then the Create workspace button.
- Enter a Workspace name, leave the remaining defaults, and choose Create Workspace.
- After creating the workspace, it should launch in a new tab in a few seconds.
Now connect your Workspace to your EMR Serverless application.
- Select the EMR Compute button on the left-hand side as shown in the following code.
- Choose EMR Serverless as the compute type.
- Choose the EMRBlog application and the runtime role that starts with EMRBlog.
- Choose Attach. The window will refresh and you can open a new PySpark notebook and follow along below. To execute the code yourself, download the AccessGrantsReadOnly.ipynb notebook and upload it into your workspace using the Upload Files button in the file browser.

Let’s do a quick read of the data.
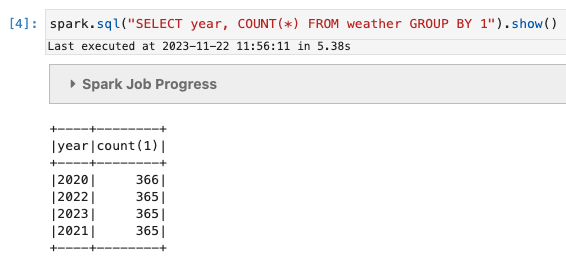
We’ll do a simple count(*):
You can also see that if we try to write data into the output location, we get an Amazon S3 error.

While you can also grant similar access via AWS IAM policies, Amazon S3 Access Grants can be useful for situations where your organization has outgrown managing access via IAM, wants to map S3 Access Grants to IAM Identity Center principals or roles, or has previously used EMR File System (EMRFS) Role Mappings. S3 Access Grants credentials are also temporary providing more secure access to your data. In addition, as shown below, cross-account access also benefits from the simplicity of S3 Access Grants.
Demo Scenario 3 – Cross-account access
One of the other more common access patterns is accessing data across accounts. This pattern has become increasingly common with the emergence of data mesh, where data producers and consumers are decentralized across different AWS accounts.
Previously, cross-account access required setting up complex cross-account assume role actions and custom credentials providers when configuring your Spark job. With S3 Access Grants, we only need to do the following:
- Create an Amazon EMR job role and cluster in a second data consumer account
- The data producer account grants access to the data consumer account with a new instance resource policy
- The data producer account creates an access grant for the data consumer job role
And that’s it! If you have a second account handy, go ahead and deploy this AWS CloudFormation stack in the data consumer account, to create a new EMR Serverless application and job role. If not, just follow along below. The AWS CloudFormation stack should finish creating in under a minute. Next, let’s go ahead and grant our data consumer access to the S3 Access Grants instance in our data producer account.
- Replace
<DATA_PRODUCER_ACCOUNT_ID>and<DATA_CONSUMER_ACCOUNT_ID>with the relevant 12-digit AWS account IDs. - You may also need to change the region in the command and policy.
- And then grant READ access to the output folder to our EMR Serverless job role in the data consumer account.
Now that we’ve done that, we can read data in the data consumer account from the bucket in the data producer account. We’ll just run a simple COUNT(*) again. Replace the <APPLICATION_ID>, <DATA_CONSUMER_JOB_ROLE>, and <DATA_CONSUMER_LOG_BUCKET> with the values from the Outputs tab on the AWS CloudFormation stack created in your second account.
And replace <DATA_PRODUCER_BUCKET> with the bucket from your first account.
Wait for the job to reach a completed state, and then fetch the stdout log from your bucket, replacing the <APPLICATION_ID>, <JOB_RUN_ID> from the job above, and <DATA_CONSUMER_LOG_BUCKET>.
If you are on a unix-based machine and have gunzip installed, then you can use the following command as your administrative user.
Note that this command only uses AWS IAM Role Policies, not Amazon S3 Access Grants.
Otherwise, you can use the get-dashboard-for-job-run command and open the resulting URL in your browser to view the Driver stdout logs in the Executors tab of the Spark UI.
Cleaning up
In order to avoid incurring future costs for examples resources in your AWS accounts, be sure to take the following steps:
- You must manually delete the Amazon EMR Studio workspace created in the first part of the post
- Empty the Amazon S3 buckets created by the AWS CloudFormation stacks
- Make sure you delete the Amazon S3 Access Grants, resource policies, and S3 Access Grants location created in the steps above using the
delete-access-grant,delete-access-grants-instance-resource-policy,delete-access-grants-location, anddelete-access-grants-instancecommands. - Delete the AWS CloudFormation Stacks created in each account
Comparison to AWS IAM Role Mapping
In 2018, EMR introduced EMRFS role mapping as a way to provide storage-level authorization by configuring EMRFS with multiple IAM roles. While effective, role mapping required managing users or groups locally on your EMR cluster in addition to maintaining the mappings between those identities and their corresponding IAM roles. In combination with runtime roles on EMR on EC2 and job roles for EMR on EKS and EMR Serverless, it is now easier to grant access to your data on S3 directly to the relevant principal on a per-job basis.
Conclusion
In this post, we showed you how to set up and use Amazon S3 Access Grants with Amazon EMR in order to easily manage data access for your Amazon EMR workloads. With S3 Access Grants and EMR, you can easily configure access to data on S3 for IAM identities or using your corporate directory in IAM Identity Center as your identity source. S3 Access Grants is supported across EMR on EC2, EMR on EKS, and EMR Serverless starting in EMR release 6.15.0.
To learn more, see the S3 Access Grants and EMR documentation and feel free to ask any questions in the comments!
About the author
 Damon Cortesi is a Principal Developer Advocate with Amazon Web Services. He builds tools and content to help make the lives of data engineers easier. When not hard at work, he still builds data pipelines and splits logs in his spare time.