Preprocessing Layers in TensorFlow Keras
Introduction
Explore the power of TensorFlow Keras preprocessing layers! This article will show you the tools that TensorFlow Keras gives you to get your data ready for neural networks quickly and easily. Keras’s flexible preprocessing layers are extremely handy when working with text, numbers, or images. We’ll examine the importance of these layers and how they simplify the process of preparing data, including encoding, normalization, resizing, and augmentation.
Learning Objectives
- Understanding the role and significance of TF-Keras preprocessing layers in data preparation for neural networks.
- Exploring various preprocessing layers for text and image data.
- Learning how to apply different preprocessing techniques such as normalization, encoding, resizing, and augmentation.
- Gaining proficiency in utilizing TF-Keras preprocessing layers to streamline the data preprocessing pipeline.
- Finally learn to preprocess diverse types of data in a simple manner for improved model performance in neural network applications.
Table of contents
What are TF-Keras Preprocessing Layers ?
The TensorFlow-Keras preprocessing layers API allows developers to construct input processing pipelines that seamlessly integrate with Keras models. These pipelines are adaptable for use both within Keras workflows and as standalone preprocessing routines in other frameworks. They can be effortlessly combined with Keras models, ensuring efficient and unified data handling. Additionally, these preprocessing pipelines can be saved and exported as part of a Keras SavedModel, facilitating easy deployment and sharing of models.
What is the Need of TF-Keras?
Prior to the data being fed into the neural network model, it plays a crucial role in the data preparation pipeline. You may construct end-to-end model pipelines that incorporate phases for both data preparation and model training using Keras preprocessing layers. By combining the entire workflow into a single Keras model, this feature simplifies the development process and promotes reproducibility.
Ways to Use Preprocessing Layers
We have two approaches to use these preprocessing layers. Let us explore them.
Approach 1
Incorporating preprocessing layers directly into the model architecture. This involves integrating preprocessing steps as part of the model’s computational graph, ensuring that data transformations occur synchronously with the rest of the model execution. This approach leverages the computational power of devices, such as GPUs, enabling efficient preprocessing alongside model training. Particularly advantageous for operations like normalization, image preprocessing, and data augmentation, this method maximizes the benefits of GPU acceleration.
Approach 2
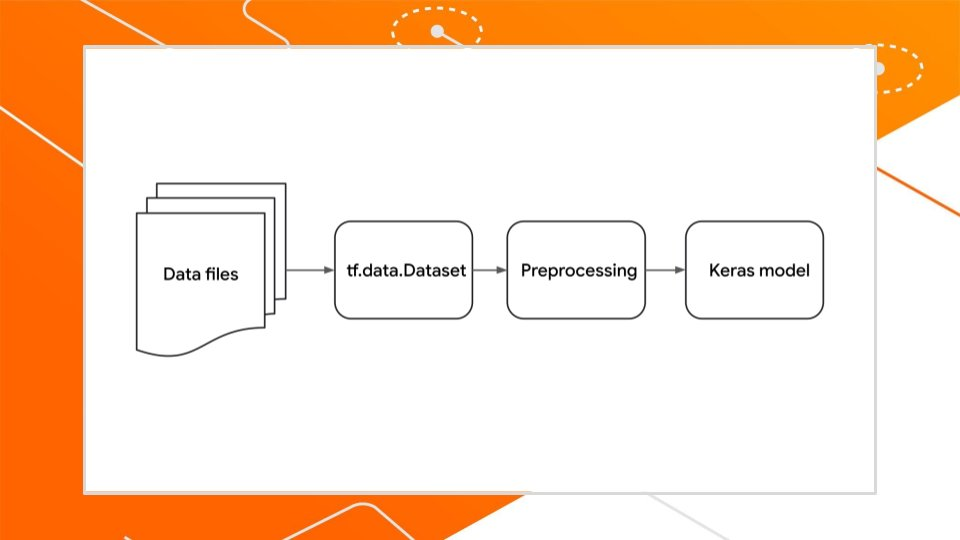
Applying preprocessing to the input data pipeline, here the preprocessing is conducted on the CPU asynchronously, with the preprocessed data buffered before being fed into the model. By utilizing techniques such as dataset mapping and prefetching, preprocessing can occur efficiently in parallel with model training, optimizing overall performance. This can be used for TextVectorization.
Handling Image Data Using Image Preprocessing and Augmentation Layers
Image preprocessing layers, such as tf.keras.layers.Resizing, tf.keras.layers.Rescaling, and tf.keras.layers.CenterCrop, prepare image inputs by resizing, rescaling, and cropping them to standardized dimensions and ranges.
- tf.keras.layers.Resizing adjusts image dimensions to a specified size.
- tf.keras.layers.Rescaling transforms pixel values, e.g., from [0, 255] to [0, 1].
Image data augmentation layers, like tf.keras.layers.RandomCrop, tf.keras.layers.RandomFlip, tf.keras.layers.RandomTranslation, tf.keras.layers.RandomRotation, tf.keras.layers.RandomZoom, and tf.keras.layers.RandomContrast, introduce random transformations to augment the training data, enhancing the model’s robustness and generalization.
Let us use these layers on the emergency classification dataset from kaggle to learn how they can be implemented (note that here label 1 means presence of an emergency vehicle).
import pandas as pd
import numpy as np
import cv2
from skimage.io import imread, imshow
data=pd.read_csv('/kaggle/input/emergency-vehicles-identification/Emergency_Vehicles/train.csv')
data.head()
x=[]
for i in data.image_names:
    img=cv2.imread('/kaggle/input/emergency-vehicles-identification/Emergency_Vehicles/train/'+i)
 x.append(img)
x=np.array(x)
y=data['emergency_or_not']
import tensorflow as tf
from tensorflow.keras.layers import *
from tensorflow.keras import Sequential, Model
from tensorflow.keras.layers import Conv2D, MaxPooling2D, Flatten, Dense
target_size = (224, 224)
data_augmentation = tf.keras.Sequential([
    tf.keras.layers.RandomFlip("horizontal"),
    tf.keras.layers.RandomTranslation(height_factor=0.1, width_factor=0.1),
    tf.keras.layers.RandomRotation(factor=0.2),
    tf.keras.layers.RandomZoom(height_factor=0.2, width_factor=0.2),
    tf.keras.layers.RandomContrast(factor=0.2)
])

# Define the model
model = Sequential([
    Input(shape=(target_size[0], target_size[1], 3)),  # Define input shape
    Resizing(*target_size),
    Rescaling(1./255),
    data_augmentation,
    Conv2D(32, (3, 3), activation='relu'),
    MaxPooling2D((2, 2)),
    Conv2D(64, (3, 3), activation='relu'),
    MaxPooling2D((2, 2)),
    Conv2D(128, (3, 3), activation='relu'),
    MaxPooling2D((2, 2)),
    Flatten(),
    Dense(128, activation='relu'),
    Dense(1, activation='sigmoid')
])

# Compile the model
model.compile(optimizer='adam',
              loss='binary_crossentropy',
              metrics=['accuracy'])
# Display model summary
model.summary()
from sklearn.model_selection import train_test_split
x_train,x_test,y_train,y_test = train_test_split(x,y,random_state=45,test_size=0.3,shuffle=True,stratify=y)
model.fit(x_train,y_train,validation_data=(x_test,y_test),epochs=10)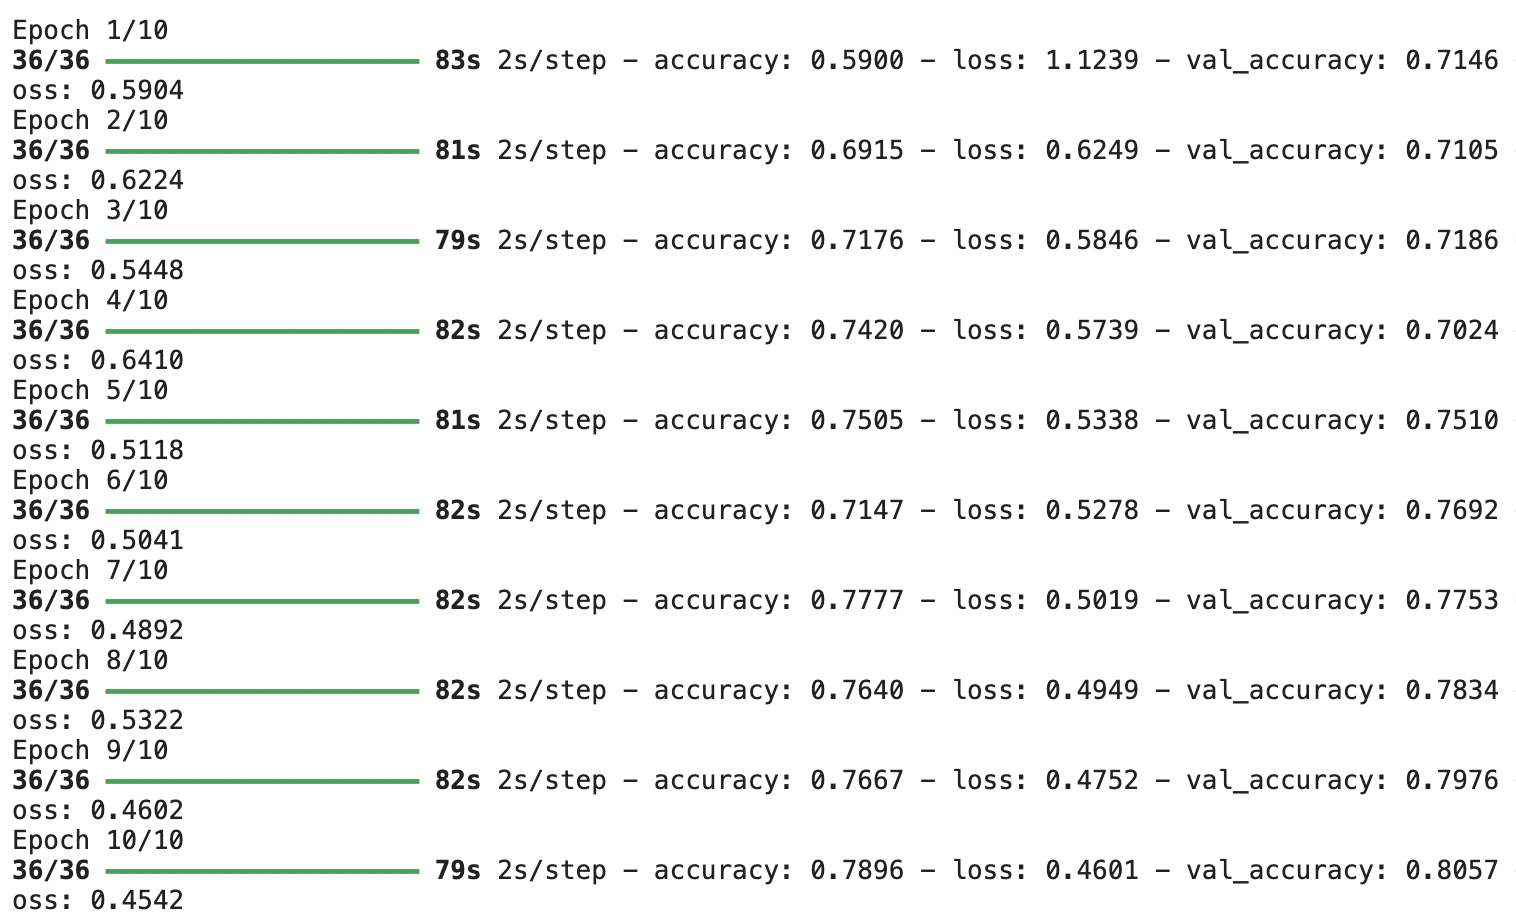
data=pd.read_csv('/kaggle/input/emergency-vehicles-identification/Emergency_Vehicles/test.csv')
x_test=[]
for i in data.image_names:
    img=cv2.imread('/kaggle/input/emergency-vehicles-identification/Emergency_Vehicles/test/'+i)
    x_test.append(img)
x_test=np.array(x_test)
y_preds=model.predict(x_test)
y_predictions = [1 if x > 0.5 else 0 for x in y_preds]
import matplotlib.pyplot as plt

# Create a figure and axis outside the loop
fig, axes = plt.subplots(2, 2, figsize=(12, 6))
for i, ax in enumerate(axes.flatten()):
    ax.imshow(x_test[i])
    if y_predictions[i]==1:
        ax.set_title(f"Emergency")
    else:
        ax.set_title(f"Non-Emergency")
    ax.axis('off')
plt.tight_layout()
plt.show()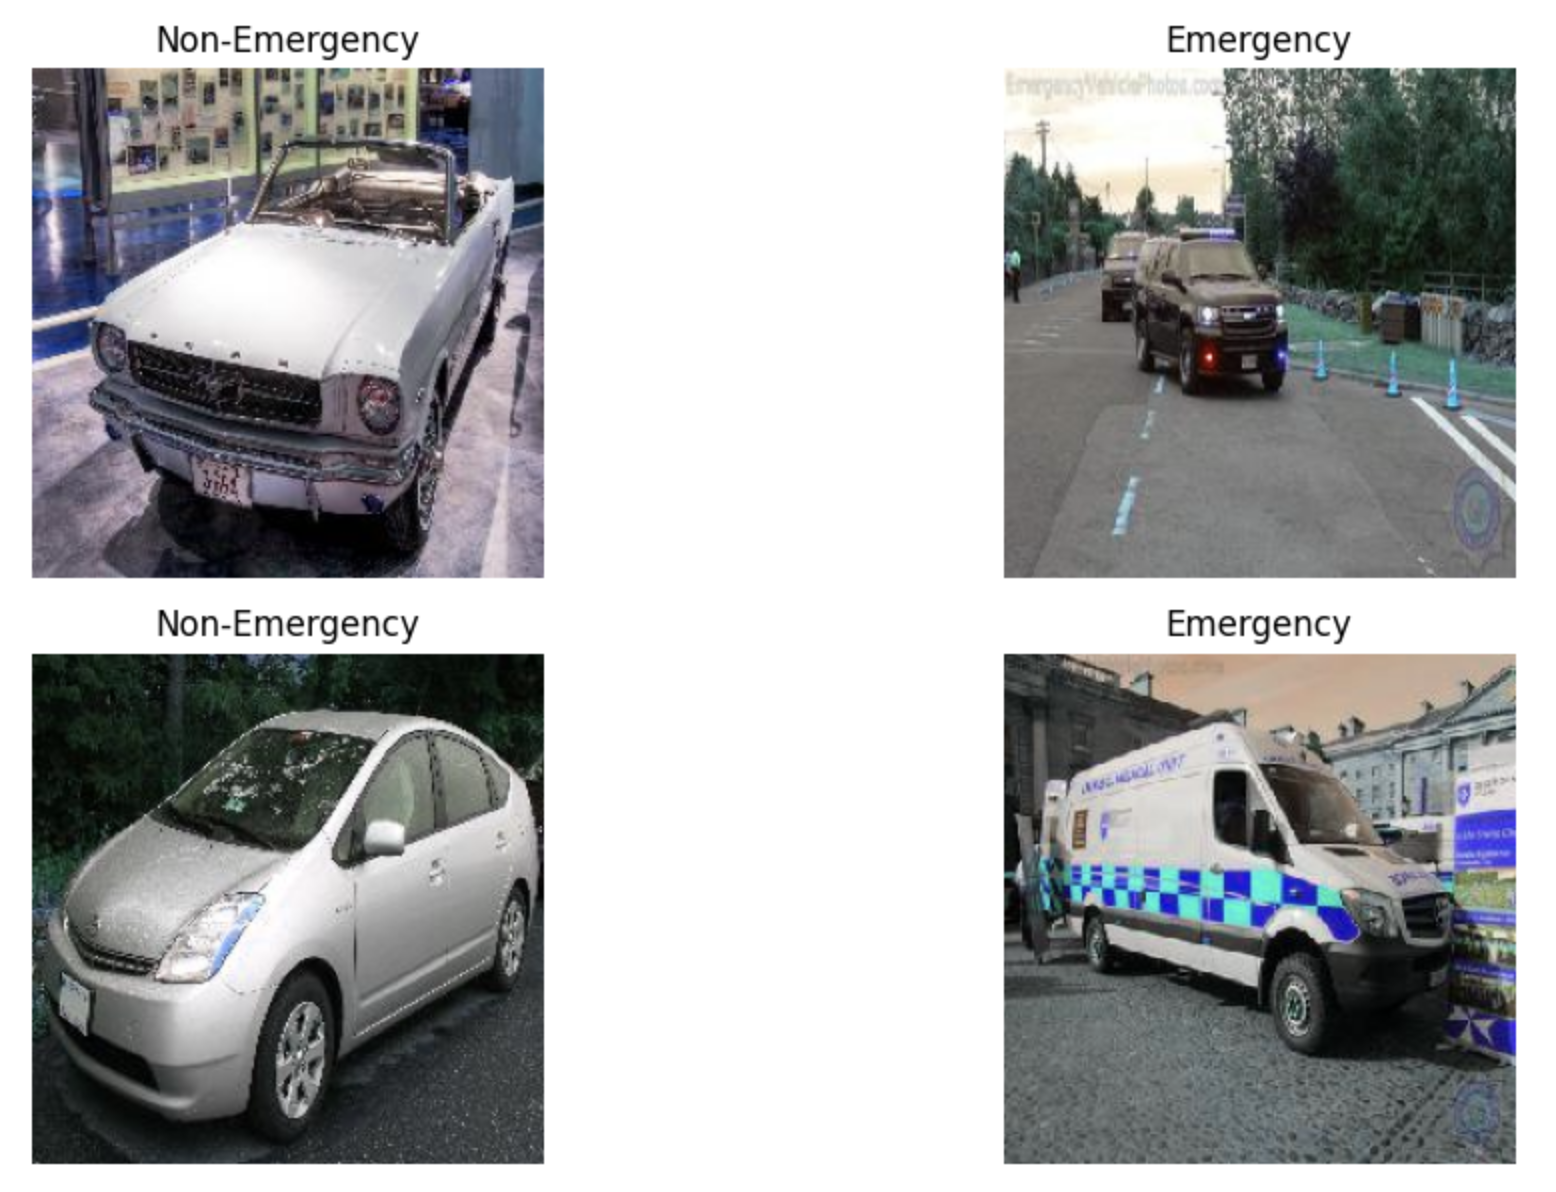
Observations
- Notice that we didn’t need to know about what preprocessing we needed to perform and we directly fed the test data to the model.
- In this scenario, we apply preprocessing techniques like resizing, rescaling, cropping, and augmentation to image data using various layers from TensorFlow’s Keras API. These techniques help prepare the images for model training by standardizing their sizes and introducing variations for improved generalization. Training the model on the preprocessed images enables it to learn and make predictions based on the features extracted from the images.
- By incorporating these preprocessing layers directly into the neural network model, the entire preprocessing becomes part of the model architecture
- Moreover, by encapsulating the preprocessing steps within the model, the model becomes more portable and reusable. It allows for easy deployment and inference on new data without the need to manually preprocess the data externally.
Handling Text Data using Preprocessing Layers
For text preprocessing we use tf.keras.layers.TextVectorization, this turns the text into an encoded representation that can be easily fed to an Embedding layer or a Dense layer.
Let me demonstrate the use of the TextVectorizer using Tweets dataset from kaggle:
import pandas as pd
import tensorflow as tf
import re
# Read the CSV file into a pandas DataFrame
data = pd.read_csv('train.csv')
# Define a function to remove special characters from text
def remove_special_characters(text):
pattern = r'[^a-zA-Z0-9\s]'
cleaned_text = re.sub(pattern, '', text)
return cleaned_text
# Apply the remove_special_characters function to the 'tweet' column
data['tweet'] = data['tweet'].apply(remove_special_characters)
# Drop the 'id' column
data.drop(['id'], axis=1, inplace=True)
# Define the TextVectorization layer
preprocessing_layer = tf.keras.layers.TextVectorization(
max_tokens=100, # Adjust the number of tokens as needed
output_mode='int', # Output integers representing tokens
output_sequence_length=10 # Adjust the sequence length as needed
)
# Adapt the TextVectorization layer to the data and then fit to it
preprocessing_layer.adapt(data['tweet'].values)
# Convert pandas DataFrame to TensorFlow Dataset
dataset = tf.data.Dataset.from_tensor_slices((data['tweet'].values, data['label'].values))
# Apply the preprocessing layer to the dataset
dataset = dataset.map(lambda x, y: (preprocessing_layer(x), tf.expand_dims(y, -1)))
# Prefetch the data for efficient processing
dataset = dataset.prefetch(tf.data.AUTOTUNE)
train_size = int(0.8 * data.shape[0])
train_dataset = dataset.take(train_size)
val_dataset = dataset.skip(train_size)
# Prefetch the data for efficient processing
train_dataset = train_dataset.prefetch(tf.data.AUTOTUNE)
val_dataset = val_dataset.prefetch(tf.data.AUTOTUNE)
# Build the model
model = tf.keras.Sequential([
tf.keras.layers.Embedding(input_dim=len(preprocessing_layer.get_vocabulary()) + 1, output_dim=64, mask_zero=True),
tf.keras.layers.Dense(64, activation='relu'),
tf.keras.layers.Dense(1, activation='sigmoid')
])
# Compile the model
model.compile(optimizer='adam',loss='binary_crossentropy')
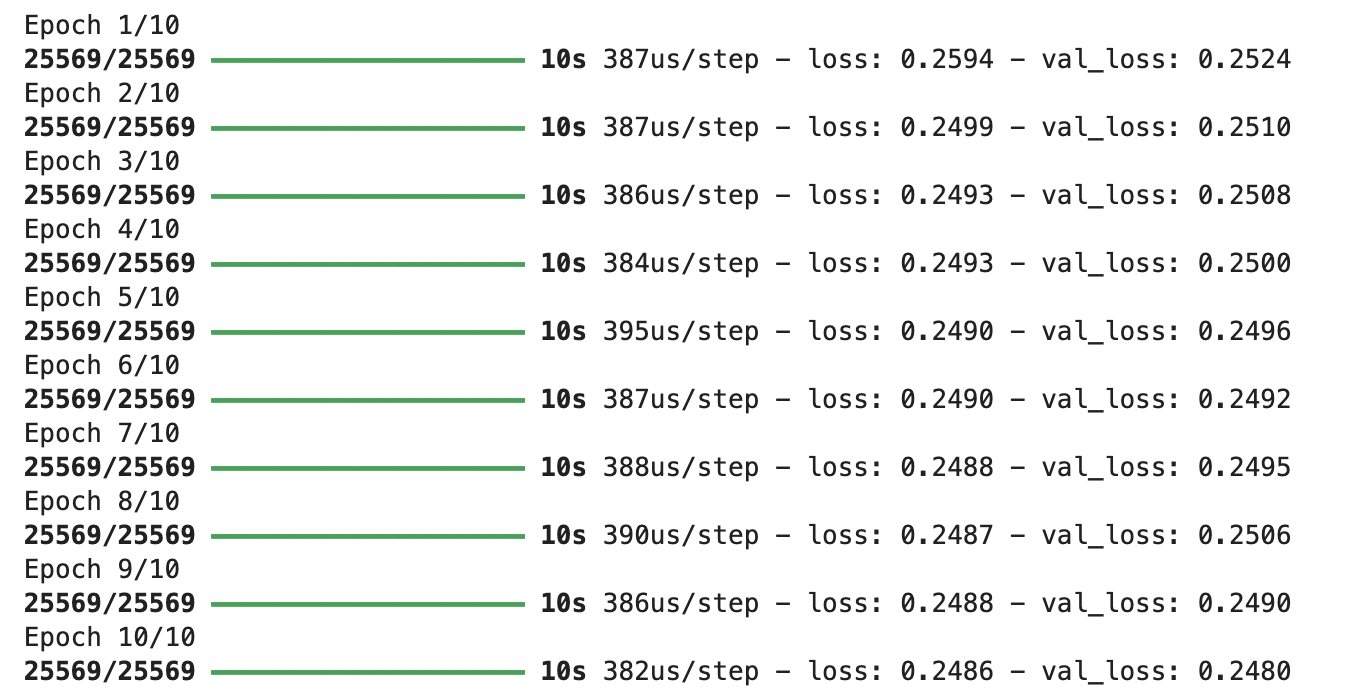
history = model.fit(train_dataset, epochs=10, validation_data=val_dataset)
The TextVectorization layer exposes itself to the training data using the adapt() method because these are non-trainable layers, and their state must be set before the model training. This allows the layer to analyze the training data and configure its internal state accordingly. Once the object is instantiated, it can be reused on the test data later on.
“tf.data.AUTOTUNE” dynamically adjusts the data processing operations in TensorFlow to maximize CPU utilization. Applying prefetching to the pipeline enables the system to automatically tune the number of elements to prefetch, optimizing performance during training and validation.
Comparison of TextVectorizer with another module Tokenizer
Let’s compare TextVectorizer with another module Tokenizer from tf.keras.preprocessing.text to convert text to numerical values:
import tensorflow as tf

# Define the sample text data
text_data = [
    "The quick brown fox jumps over the lazy dog.",
    "The dog barks loudly in the night.",
    "A brown cat sleeps peacefully on the windowsill."
]

# Define TextVectorization layer
vectorizer = tf.keras.layers.TextVectorization(output_mode='int', output_sequence_length=10)

# Adapt the TextVectorization layer to the text data
vectorizer.adapt(text_data)

# Vectorize the text data
vectorized_text = vectorizer(text_data)

print("Vectorized Text (using TextVectorization):")
print(vectorized_text.numpy())

from tensorflow.keras.preprocessing.text import Tokenizer
from tensorflow.keras.preprocessing.sequence import pad_sequences

# Initialize Tokenizer
tokenizer = Tokenizer()
tokenizer.fit_on_texts(text_data)

# Convert text to matrix using texts_to_matrix
matrix = tokenizer.texts_to_matrix(text_data, mode='count')

print("\nMatrix (using texts_to_matrix):")
print(matrix)
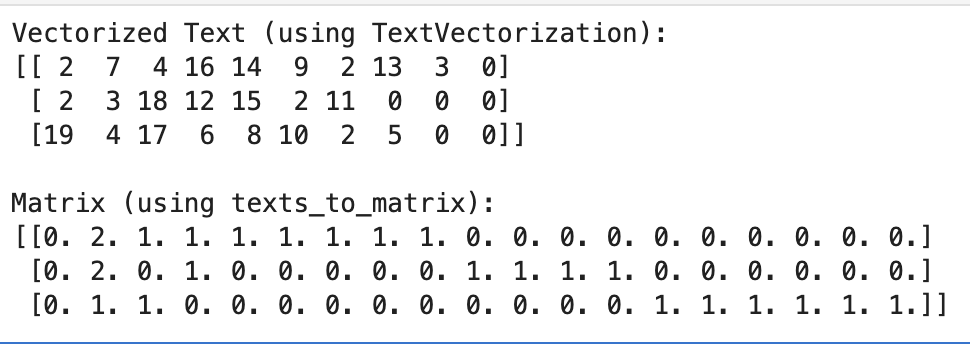
At the first glance we can see that the dimensions from both of them are different, let’s look at the differences in detail:
Output Content
- TextVectorization: Outputs a tensor with integer values, representing the indices of tokens in the vocabulary. The output_sequence_length parameter determines the shape of the output tensor, padding or truncating the sequences to a fixed length.
- texts_to_matrix: Outputs a matrix where each row corresponds to a text sample, and each column corresponds to a unique word in the vocabulary. The values in the matrix represent word counts, determined by the mode parameter.
Data Structure
- TextVectorization: Outputs a tensor.
- texts_to_matrix: Outputs a numpy array.
Dimensionality
- TextVectorization: The output_sequence_length parameter determines the shape of the output tensor, resulting in fixed-length sequences.
- texts_to_matrix: The number of text samples and the size of the vocabulary determine the shape of the output matrix.
Flexibility
- TextVectorization: Provides more flexibility in terms of preprocessing options, such as tokenization, lowercasing, and padding/truncating sequences.
- texts_to_matrix: Provides options for different matrix modes (‘binary’, ‘count’, ‘tfidf’, ‘freq’) but doesn’t offer as much control over preprocessing steps.
Other Preprocessing Layers in TensorFlow Keras
Numerical features preprocessing
- tf.keras.layers.Normalization: It performs feature-wise normalization of the input.
- tf.keras.layers.Discretization: It turns continuous numerical features into categorical features (Integer).
These layers can easily be implemented in the following way:
import numpy as np
import tensorflow as tf
import keras
from keras import layers

data = np.array(
    [
        [0.1, 0.4, 0.8],
        [0.8, 0.9, 1.0],
        [1.5, 1.6, 1.7],
    ]
)
layer = layers.Normalization()
layer.adapt(data)
normalized_data = layer(data)
print("Normalized features: ", normalized_data)
print()
print("Features mean: %.2f" % (normalized_data.numpy().mean()))
print("Features std: %.2f" % (normalized_data.numpy().std()))

data = np.array([[-1.5, 1.0, 3.4, .5], [0.0, 3.0, 1.3, 0.0]])
layer = tf.keras.layers.Discretization(num_bins=4, epsilon=0.01)
layer.adapt(data)
print(layer(data))

The Normalization layers make each feature to have a mean close to 0 and a standard deviation close to 1, which is a characteristic of standardized data.
It is worth noting that we can set the mean and standard deviation of the resultant features to our preferences by utilizing the normalization layer’s hyperparameters.

Coming to the outputs of the latter code, the discretization layer creates equi-width bins. In the first row, the first feature -1.5 belongs to bin 0, the second feature 1.0 belongs to bin 2, the third feature 3.4 belongs to bin 3, and the fourth feature 0.5 belongs to bin 2.
Categorical Features Preprocessing
- tf.keras.layers.CategoryEncoding transforms integer categorical features into dense representations like one-hot, multi-hot, or count.
- tf.keras.layers.Hashing executes categorical feature hashing, commonly referred to as the “hashing trick”.
- tf.keras.layers.IntegerLookup converts integer categorical values into an encoded representation compatible with Embedding or Dense layers.
- tf.keras.layers.StringLookup converts string categorical values into an encoded representation compatible with Embedding or Dense layers.
Let’s explore how to preprocess categorical features:
import tensorflow as tf

# Sample data
data = [3,2,0,1]

# Category encoding
encoder_layer = tf.keras.layers.CategoryEncoding(num_tokens=4, output_mode="one_hot")
category=encoder_layer(data)
print("Category Encoding:")
print(category)

hashing_layer = tf.keras.layers.Hashing(num_bins=3)
data = [['A'], ['B'], ['C'], ['D'], ['E']]
hash=hashing_layer(data)
print(hash)
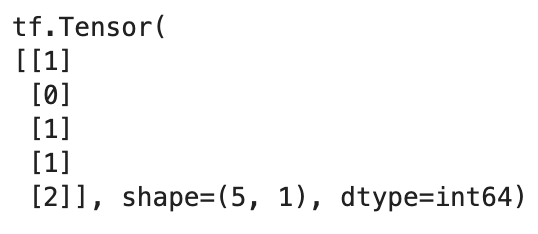
In the Category Encoding
The elements in the matrix are float values representing the one-hot encoding of each category.
For example, the first row [0. 0. 0. 1.] corresponds to the category 3 (as indexing starts from 0), indicating that the original data item was 3.
In Hashing
Each element represents the hash value assigned to the corresponding item.
For example, the first row [1] indicates that the hashing algorithm assigned the first item to the value 1.
Similarly, the second row [0] indicates that the hashing algorithm assigned the second item to the value 0.
Applications of TF_Keras
There are multiple applications of TF-Keras. Let us look into few of the most important ones:
Portability and Reduced Training/Serving Skew
By integrating preprocessing layers into the model itself, it becomes easier to export an inference-only end-to-end model. This ensures that all the necessary preprocessing steps are encapsulated within the model, making it portable.
Users of the model don’t need to worry about the details of how each feature is preprocessed, encoded, or normalized. Whether it’s raw images or structured data, the inference model can handle them seamlessly without requiring users to understand the preprocessing pipelines.
Ease of Exporting to Other Runtimes
Exporting models to other runtimes, such as TensorFlow.js, becomes more straightforward when the model includes preprocessing layers within it. There’s no need to reimplement the preprocessing pipeline in the target language or framework.
Inference Model that Processes Raw Data
With preprocessing layers integrated into the model, the inference model can directly process raw data. This is advantageous as it simplifies the deployment process and eliminates the need for users to preprocess data separately before feeding it into the model.
Multi-Worker Training with Preprocessing Layers
Preprocessing layers are compatible with the tf.distribute API, enabling training across multiple machines or workers. For optimal performance, place these layers inside a tf.distribute.Strategy.scope().
Text Preprocessing
The text can be encoded using different schemes such as multi-hot encoding or TF-IDF weighting. These preprocessing steps can be included within the model, simplifying the deployment process.
Things to consider:
- While working with very large vocabularies in lookup layers (e.g., TextVectorization, StringLookup) may impact performance. For such cases, it’s recommended to pre-compute the vocabulary and store it in a file rather than using adapt().
- The TensorFlow team is slated to fix known issues with using lookup layers on TPUs or with ParameterServerStrategy in TensorFlow 2.7.
Conclusion
The TensorFlow Keras preprocessing layers API empowers developers to create Keras-native input processing pipelines. It facilitates building end-to-end models that handle raw data, perform feature normalization, and apply categorical feature encoding or hashing. You can integrate these preprocessing layers, adaptable to training data, directly into Keras models or employ them independently. Whether processed within the model or as part of the dataset, these functionalities enhance model portability and mitigate training/serving discrepancies, offering flexibility and efficiency in model deployment across diverse environments.
Frequently Asked Questions
A. To utilize TensorFlow preprocessing layers, you can employ the tensorflow.keras.layers module. First, import the necessary layers for your preprocessing tasks such as Normalization, TextVectorization ..etc.
A. Yes, you can define custom layers in Keras by subclassing tf.keras.layers.Layer and implementing the __init__ and call methods to specify the layer’s configuration and computation, respectively.
A. TensorFlow Keras preprocessing layers support a wide range of preprocessing tasks, including:
-Normalization and standardization of numerical features.
-Encoding categorical features using one-hot encoding, integer encoding, or embeddings.
-Text vectorization for natural language processing tasks.
-Handling missing values and feature scaling.
-Feature discretization and bucketization.
-Image preprocessing such as resizing, cropping, and data augmentation.


