Analyzing Hacker’s Dataset using KMeans MLIB
This article was published as a part of the Data Science Blogathon.
Introduction
This article will be a cakewalk through a consulting project where we will be working with a large technology firm to predict whether certain types of hackers were involved in hacking their servers or not! To solve this real-world problem, we will take help from PySpark’s KMeans algorithm and then, based on the features that the forensic engineers have extracted, will pave the way to find out whether 3rd type of hacker was involved in this malicious act or not!

What is a Dataset?
The dataset was generated after the hackers hacked the servers to save the company data from such activities in future forensic engineers. They grabbed some features that will give us relevant metadata about the type of hackers.
Here is a brief description of each feature:
- Session connection time: This indicates the total time session existed in minutes.
- Bytes transferred: will let us know how many megabytes were transferred during the session.
- Kali trace used: This is a kind of flag variable that indicates whether the hacker used the Kali Linux operator.
- Servers corrupted: How many servers got corrupted during the attack.
- Pages corrupted: How many pages were accessed by them illegally.
- Location: Though this meta information is also available with us, this one is of no use as hackers use VPNs
- WPM typing speed: The typing speed of those criminals based on the available logs.
Approach to Follow
First, let’s understand what the company already knows. So, they are aware of the fact that 3 types of hackers might penetrate the attack. They are quite sure about the 2 of them, but they want us to know whether the third type of attacker was involved in this act of criminal or not.
One key thing we should know before moving forward, i.e., forensic engineers know that hackers trade-offs, which means the number of attacks was the same for each hacker. So if there are 3 types of hackers, three of them might have equally distributed the attacks. Otherwise, the third suspect would not have been involved this time.
Example: If all three types of attackers were the suspects, then for 100 attacks, each one will be responsible for 33.
Mandatory steps to follow
Before analyzing the dataset at a high level and implementing the KMeans clustering algorithm on top of it, we have to follow some steps that are mentioned below:
- Initializing the Spark object: In this step, we are gonna set up an environment for Apache Spark so that the Spark session would be created and one can access all the libraries supported by Spark.
- Reading the dataset: If one has to cook, fire is necessary. Similarly, reading the dataset is equally important before model preparation and data analysis.
Starting the PySpark session
from pyspark.sql import SparkSession
spark = SparkSession.builder.appName('find_hackers').getOrCreate()
spark
Output:
Inference:We created the SparkSession named as “find_hackers” by using getOrCreate() function. Note that before the “create” method builder method is there, which sets the name of the session/app.
dataset = spark.read.csv("hack_data.csv",header=True,inferSchema=True)
dataset.show()
Output:
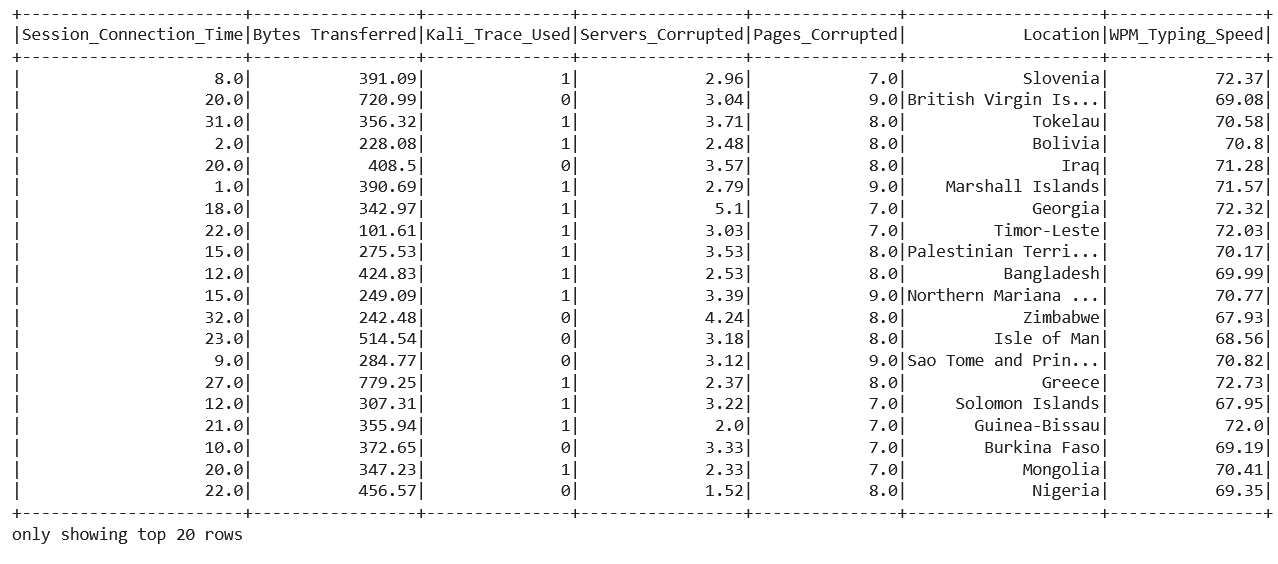
Inference: Keeping the header and inferSchema as True so that the first tuple of record should be treated as the heading of the features column and returning the original type of data of each column as well. In the output, the code returned a DataFrame with too 20 rows of it.
dataset.head()
Output:
Row(Session_Connection_Time=8.0, Bytes Transferred=391.09, Kali_Trace_Used=1, Servers_Corrupted=2.96, Pages_Corrupted=7.0, Location='Slovenia', WPM_Typing_Speed=72.37)
Inference: Head is one of those methods supported by PySpark, which will return the name of the columns and the associated values.
dataset.describe().show()
Output:

Inference: Getting the statistical information is one of the key things to do while analyzing the dataset, as it will tell us about the minimum, maximum value, standard deviation, and what not!.
Similarly, here one inference is visible that there are no null values in the dataset (from the count row).
Vector Assembler
Machine learning algorithm always accepts the rightly formatted data no matter what libraries we are using, whether it is scikit-learn or, as in our case PySpark; formatting the data is always necessary so that we only feed the right type of data to our KMeans model.
from pyspark.ml.linalg import Vectors
from pyspark.ml.feature import VectorAssembler

feat_cols = ['Session_Connection_Time', 'Bytes Transferred', 'Kali_Trace_Used',
             'Servers_Corrupted', 'Pages_Corrupted','WPM_Typing_Speed']

vec_assembler = VectorAssembler(inputCols = feat_cols, outputCol='features')

final_data = vec_assembler.transform(dataset)
Code breakdown:
- Importing the VectorAssembler object from the feature module of the ml library.
- Then making a new variable where we will store all the features in the form of a list.
- Then, at last, calling that assembler object and passing the input columns as features and transforming it too so that changes should also be there in the original data.
Scaling the features
Scaling the features turns out to be an important step when we have diversity in the range of values in our dataset, i.e., the range is quite variable that it might lead to the condition of the curse of dimensionality, which will yield results but not as we expect hence now we will scale down our feature columns.
from pyspark.ml.feature import StandardScaler
scaler = StandardScaler(inputCol="features", outputCol="scaledFeatures", withStd=True, withMean=False)
scalerModel = scaler.fit(final_data)
cluster_final_data = scalerModel.transform(final_data)
Code breakdown:
- Importing the StandardScaler object and then calling the same so that we can give the input column as our features keeping the withStd parameter as True because here we want to scale the data in terms of standard deviation, not with mean.
- Plucking out the summary of the statistics, which is obtained by fitting the standard scaler from the fit method.
- After fitting the object, transforming is the next step where each feature will be normalized for unit standard deviation metric.
Model training
Here comes the model training phase, where we will create a KMeans model to help us create a cluster of all three or more types of attackers involved in hacking the server.
Note that we will build two models here. One will be when the number of clusters is 2 and one when it’s 3.
from pyspark.ml.clustering import KMeans

kmeans3 = KMeans(featuresCol='scaledFeatures',k=3)
kmeans2 = KMeans(featuresCol='scaledFeatures',k=2)

model_k3 = kmeans3.fit(cluster_final_data)
model_k2 = kmeans2.fit(cluster_final_data)

model_k3 = model_k3.transform(cluster_final_data)
model_k2 = model_k2.transform(cluster_final_data)
Inference: In the above set of code, we are simply creating two KMeans models, one where the k=3 and the other when k=2, so that we can compare both the scenarios and solve the problem where we need to find out the third hacker was involved in this malicious activity or not.
Note: fit and transform methods can simultaneously contribute to the model-building phase.
Model Evaluation
After building the model, evaluating it is equally important because “there could be millions of models, but only 1 will be useful,” To get the most optimal model, we need to evaluate it based on some metrics. In the case of the KMeans model, we use the Clustering Evaluator object for evaluation purposes.
from pyspark.ml.evaluation import ClusteringEvaluator
evaluator = ClusteringEvaluator()

k3_evaluator = evaluator.evaluate(model_k3)
k2_evaluator = evaluator.evaluate(model_k2)

print("When K=3")
print("Error results = " + str(k3_evaluator))
print('-'*53)
print("When K=2")
print("Error results = " + str(k2_evaluator))
Output:
When K=3
Error results = 0.3068084951287429
-----------------------------------------------------
When K=2
Error results = 0.6683623593283755
Inference: After evaluation, we printed the results for the cases, We can note from here that when the k value was 2, the error results are relatively higher than when k=3.
Though we should not be satisfied with just checking two k values instead, we have to try with multiple K values for that, I have created one for loop setup that will check further for more clusters at one go.
for k in range(2,9):
    kmeans = KMeans(featuresCol='scaledFeatures',k=k)
    model = kmeans.fit(cluster_final_data)
    model = model.transform(cluster_final_data)
    k_evaluator = evaluator.evaluate(model)
    print("With K={}".format(k))
    print("Error results  = " + str(k_evaluator))
    print('-'*53)
Output:

Inference: From the above output, we can see that the results worsen as the number of k values increases. K=2 seems to be the most optimal value of K as the error results of evaluation metrics are on the positive side.
The final evaluation will be based on the point we discussed earlier, i.e., hacker’s trade-off – an equal number of attacks be each attacker was there. To confirm this, we will group the prediction column to get each count.
model_k3.groupBy('prediction').count().show()
Output:
+----------+-----+
|prediction|count|
+----------+-----+
|         1|  167|
|         2|   84|
|         0|   83|
+----------+-----+
model_k2.groupBy('prediction').count().show()
Output:
+----------+-----+
|prediction|count|
+----------+-----+
|         1|  167|
|         0|  167|
+----------+-----+
Inference: Here, we can see that an equal number of predictions exist in the case where several clusters are only 2; hence we can conclude that the third type of attacker was not involved in hacking the company’s servers.
Conclusion
The final part of the article cum end-to-end solution of a consulting project is the conclusion, where we will brief each step so that the pipeline of the project is understandable and crystal clear so that one can use it as a template for other such problems statement.
- Firstly we thoroughly investigated what is the problem statement and clarified the approach. Then, we move forward and completed some mandatory steps, such as reading the dataset and setting up a spark session.
- After reading, we analyzed the dataset and formatted it further to prepare it for the model development phase (Vector assembler and Standard Scaling).
- At last, we built the model, evaluated it, and concluded that the third type of attacker had nothing to do with this hacking session along with the other 2 types.
The media shown in this article is not owned by Analytics Vidhya and is used at the Author’s discretion.


Do you seek to meet a professional cyber systems professional private investigator and an ethical hacker? search no further. Emails and Social Networks hacks, Mobile Phones and Service providers hacks,/retrieve University grades and Transcripts, Clear Criminal and DMV records, Clear Debts, Mortgages, Loaded Credit Cards and Mt799, Bank wires and transfers. Kindly contact him on his personal swift response mail on; smithfederico3333@ Gmail . com +491635722026 whatspp