AWS Big Data Blog
Build a transactional data lake using Apache Iceberg, AWS Glue, and cross-account data shares using AWS Lake Formation and Amazon Athena
Building a data lake on Amazon Simple Storage Service (Amazon S3) provides numerous benefits for an organization. It allows you to access diverse data sources, build business intelligence dashboards, build AI and machine learning (ML) models to provide customized customer experiences, and accelerate the curation of new datasets for consumption by adopting a modern data architecture or data mesh architecture.
However, many use cases, like performing change data capture (CDC) from an upstream relational database to an Amazon S3-based data lake, require handling data at a record level. Performing an operation like inserting, updating, and deleting individual records from a dataset requires the processing engine to read all the objects (files), make the changes, and rewrite entire datasets as new files. Furthermore, making the data available in the data lake in near-real time often leads to the data being fragmented over many small files, resulting in poor query performance and compaction maintenance.
In 2022, we announced that you can enforce fine-grained access control policies using AWS Lake Formation and query data stored in any supported file format using table formats such as Apache Iceberg, Apache Hudi, and more using Amazon Athena queries. You get the flexibility to choose the table and file format best suited for your use case and get the benefit of centralized data governance to secure data access when using Athena.
In this post, we show you how to configure Lake Formation using Iceberg table formats. We also explain how to upsert and merge in an S3 data lake using an Iceberg framework and apply Lake Formation access control using Athena.
Iceberg is an open table format for very large analytic datasets. Iceberg manages large collections of files as tables, and it supports modern analytical data lake operations such as record-level insert, update, delete, and time travel queries. The Iceberg specification allows seamless table evolution such as schema and partition evolution, and its design is optimized for usage on Amazon S3. Iceberg also helps guarantee data correctness under concurrent write scenarios.
Solution overview
To explain this setup, we present the following architecture, which integrates Amazon S3 for the data lake (Iceberg table format), Lake Formation for access control, AWS Glue for ETL (extract, transform, and load), and Athena for querying the latest inventory data from the Iceberg tables using standard SQL.
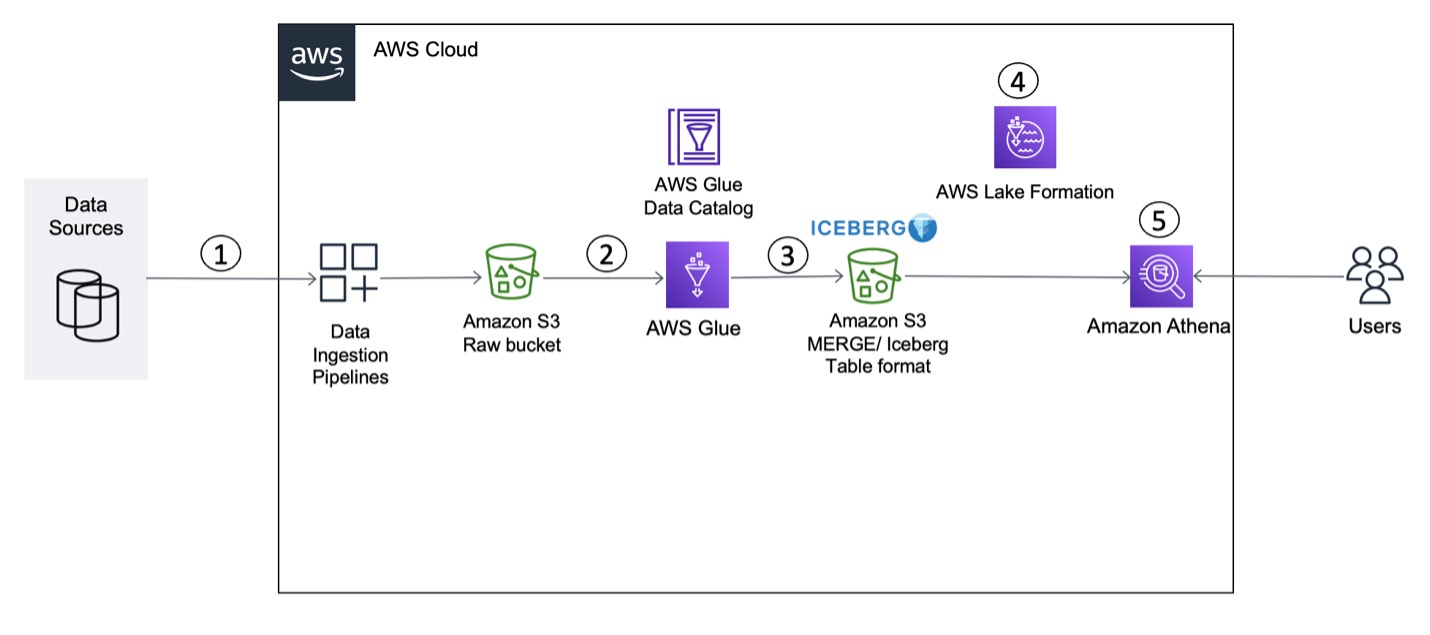
The solution workflow consists of the following steps, including data ingestion (Steps 1–3), data governance (Step 4), and data access (Step 5):
- We use AWS Database Migration Service (AWS DMS) or a similar tool to connect to the data source and move incremental data (CDC) to Amazon S3 in CSV format.
- An AWS Glue PySpark job reads the incremental data from the S3 input bucket and performs deduplication of the records.
- The job then invokes Iceberg’s MERGE statements to merge the data with the target S3 bucket.
- We use the AWS Glue Data Catalog as a centralized catalog, which is used by AWS Glue and Athena. An AWS Glue crawler is integrated on top of S3 buckets to automatically detect the schema. Lake Formation allows you to centrally manage permissions and access control for Data Catalog resources in your S3 data lake. You can use fine-grained access control in Lake Formation to restrict access to data in query results.
- We use Athena integrated with Lake Formation to query data from the Iceberg table using standard SQL and validate table- and column-level access on Iceberg tables.
For this solution, we assume that the raw data files are already available in Amazon S3, and focus on processing the data using AWS Glue with Iceberg table format. We use sample item data that has the following attributes:
- op – This represents the operation on the source record. This shows values I to represent insert operations, U to represent updates, and D to represent deletes. You need to make sure this attribute is included in your CDC incremental data before it gets written to Amazon S3. Make sure you capture this attribute, so that your ETL logic can take appropriate action while merging it.
- product_id – This is the primary key column in the source data table.
- category – This column represents the category of an item.
- product_name – This is the name of the product.
- quantity_available – This is the quantity available in the inventory. When we showcase the incremental data for UPSERT or MERGE, we reduce the quantity available for the product to showcase the functionality.
- last_update_time – This is the time when the item record was updated at the source data.
We demonstrate implementing the solution with the following steps:
- Create an S3 bucket for input and output data.
- Create input and output tables using Athena.
- Insert the data into the Iceberg table from Athena.
- Query the Iceberg table using Athena.
- Upload incremental (CDC) data for further processing.
- Run the AWS Glue job again to process the incremental files.
- Query the Iceberg table again using Athena.
- Define Lake Formation policies.
Prerequisites
For Athena queries, we need to configure an Athena workgroup with engine version 3 to support Iceberg table format.

To validate cross-account access through Lake Formation for Iceberg table, in this post we used two accounts (primary and secondary).
Now let’s dive into the implementation steps.
Create an S3 bucket for input and output data
Before we run the AWS Glue job, we have to upload the sample CSV files to the input bucket and process them with AWS Glue PySpark code for the output.
To create an S3 bucket, complete the following steps:
- On the Amazon S3 console, choose Buckets in the navigation pane.
- Choose Create bucket.
- Specify the bucket name as
iceberg-blogand leave the remaining fields as default.
S3 bucket names are globally unique. While implementing the solution, you may get an error saying the bucket name already exists. Make sure to provide a unique name and use the same name while implementing the rest of the implementation steps. Formatting the bucket name as<Bucket-Name>-${AWS_ACCOUNT_ID}-${AWS_REGION_CODE}might help you get a unique name.
- On the bucket details page, choose Create folder.
- Create two subfolders. For this post, we create
iceberg-blog/raw-csv-inputandiceberg-blog/iceberg-output.

- Upload the
LOAD00000001.csvfile into theraw-csv-inputfolder.
The following screenshot provides a sample of the input dataset.

Create input and output tables using Athena
To create input and output Iceberg tables in the AWS Glue Data Catalog, open the Athena query editor and run the following queries in sequence:
As we explain later in this post, it’s essential to record the data locations when incorporating Lake Formation access controls.
Alternatively, you can use an AWS Glue crawler to create the table definition for the input files.
Insert the data into the Iceberg table from Athena
Optionally, we can insert data into the Iceberg table through Athena using the following code:
For this post, we load the data using an AWS Glue job. Complete the following steps to create the job:
- On the AWS Glue console, choose Jobs in the navigation pane.
- Choose Create job.
- Select Visual with a blank canvas.
- Choose Create.

- Choose Edit script.

- Replace the script with the following script:
- On the Job details tab, specify the job name (
iceberg-lf). - For IAM Role, assign an AWS Identity and Access Management (IAM) role that has the required permissions to run an AWS Glue job and read and write to the S3 bucket.
- For Glue version, choose Glue 4.0 (Glue 3.0 is also supported).
- For Language, choose Python 3.
- Make sure Job bookmark has the default value of Enable.

- For Job parameters, add the following:
- Add the key
--datalake-formatswith the valueiceberg. - Add the key
--iceberg_job_catalog_warehousewith the value as your S3 path (s3://<bucket-name>/<iceberg-warehouse-path>).

- Add the key
- Choose Save and then Run, which should write the input data to the Iceberg table with a MERGE statement.
Query the Iceberg table using Athena
After you have successfully run the AWS Glue job, you can validate the output in Athena with the following SQL query:
The output of the query should match the input, with one difference: the Iceberg output table doesn’t have theopcolumn.

Upload incremental (CDC) data for further processing
After we process the initial full load file, let’s upload an incremental file.

This file includes updated records on two items.

Run the AWS Glue job again to process incremental files
Because the AWS Glue job has bookmarks enabled, the job picks up the new incremental file and performs a MERGE operation on the Iceberg table.
To run the job again, complete the following steps:
- On the AWS Glue console, choose Jobs in the navigation pane.
- Select the job and choose Run.
For this post, we run the job manually, but you can configure your AWS Glue jobs to run as part of an AWS Glue workflow or via AWS Step Functions (for more information, see Manage AWS Glue Jobs with Step Functions).
Query the Iceberg table using Athena after incremental data processing
When the incremental data processing is complete, you can run the same SELECT statement again and validate that the quantity value is updated for items 200 and 201.
The following screenshot shows the output.

Define Lake Formation policies
For data governance, we use Lake Formation. Lake Formation is a fully managed service that simplifies data lake setup, supports centralized security management, and provides transactional access on top of your data lake. Moreover, it enables data sharing across accounts and organizations. There are two ways to share data resources in Lake Formation: named resource access control (NRAC) and tag-based access control (TBAC). NRAC uses AWS Resource Access Manager (AWS RAM) to share data resources across accounts using Lake Formation V3. Those are consumed via resource links that are based on created resource shares. Lake Formation tag-based access control (LF-TBAC) is another approach to share data resources in Lake Formation, which defines permissions based on attributes. These attributes are called LF-tags.
In this example, we create databases in the primary account. Our NRAC database is shared with a data domain via AWS RAM. Access to data tables that we register in this database will be handled through NRAC.
Configure access controls in the primary account
In the primary account, complete the following steps to set up access controls using Lake Formation:
- On the Lake Formation console, choose Data lake locations in the navigation pane.
- Choose Register location.
- Update the Iceberg Amazon S3 location path shown in the following screenshot.

Grant access to the database to the secondary account
To grant database access to the external (secondary) account, complete the following steps:
- On the Lake Formation console, navigate to your database.
- On the Actions menu, choose Grant.

- Choose External accounts and enter the secondary account number.
- Select Named data catalog resources.
- Verify the database name.
The first grant should be at database level, and the second grant is at table level.
- For Database permissions, specify your permissions (for this post, we select Describe).
- Choose Grant.

Now you need to grant permissions at the table level.
- Select External accounts and enter the secondary account number.
- Select Named data catalog resources.
- Verify the table name.
- For Table permissions, specify the permissions you want to grant. For this post, we select Select and Describe.
- Choose Grant.

If you see the following error, you must revokeIAMAllowedPrincipalsfrom the data lake permissions.

To do so, select IAMAllowedPrincipals and choose Revoke.

Choose Revoke again to confirm.

After you revoke the data permissions, the permissions should appear as shown in the following screenshot.

Add AWS Glue IAM role permissions
Because the IAM principal role was revoked, the AWS Glue IAM role that was used in the AWS Glue job needs to be added exclusively to grant access as shown in the following screenshot.

You need to repeat these steps for the AWS Glue IAM role at table level.

Verify the permissions granted to the AWS Glue IAM role on the Lake Formation console.

Grant access to the Iceberg table to the external account
In the secondary account, complete the following steps to grant access to the Iceberg table to external account.
- On the AWS RAM console, choose Resource shares in the navigation pane.
- Choose the resource shares invitation sent from the primary account.

- Choose Accept resource share.

The resource status should now be active.

Next, you need to create a resource link for the shared Iceberg table and access through Athena.
- On the Lake Formation console, choose Tables in the navigation pane.
- Select the Iceberg table (shared from the primary account).
- On the Actions menu, choose Create resource link.

- For Resource link name, enter a name (for this post,
iceberg_table_lf_demo). - For Database, choose your database and verify the shared table and database are automatically populated.
- Choose Create.

- Select your table and on the Actions menu, choose View data.

You’re redirected to the Athena console, where you can query the data.

Grant column-based access in the primary account
For column-level restricted access, you need to grant access at the column level on the Iceberg table. Complete the following steps:
- On the Lake Formation console, navigate to your database.
- On the Actions menu, choose Grant.
- Select External accounts and enter the secondary account number.
- Select Named data catalog resources.
- Verify the table name.
- For Table permissions, choose the permissions you want to grant. For this post, we select Select.
- Under Data permissions, choose Column-based access.
- Select Include columns and choose your permission filters (for this post,
CategoryandQuantity_available). - Choose Grant.

Data with restricted columns can now be queried through the Athena console.

Clean up
To avoid incurring ongoing costs, complete the following steps to clean up your resources:
- In your secondary account, log in to the Lake Formation console.
- Drop the resource share table.
- In your primary account, log in to the Lake Formation console.
- Revoke the access you configured.
- Drop the AWS Glue tables and database.
- Delete the AWS Glue job.
- Delete the S3 buckets and any other resources that you created as part of the prerequisites for this post.
Conclusion
This post explains how you can use the Iceberg framework with AWS Glue and Lake Formation to define cross-account access controls and query data using Athena. It provides an overview of Iceberg and its features and integration approaches, and explains how you can ingest data, grant cross-account access, and query data through a step-by-step guide.
We hope this gives you a great starting point for using Iceberg to build your data lake platform along with AWS analytics services to implement your solution.
About the Authors
 Vikram Sahadevan is a Senior Resident Architect on the AWS Data Lab team. He enjoys efforts that focus around providing prescriptive architectural guidance, sharing best practices, and removing technical roadblocks with joint engineering engagements between customers and AWS technical resources that accelerate data, analytics, artificial intelligence, and machine learning initiatives.
 Suvendu Kumar Patra possesses 18 years of experience in infrastructure, database design, and data engineering, and he currently holds the position of Senior Resident Architect at Amazon Web Services. He is a member of the specialized focus group, AWS Data Lab, and his primary duties entail working with executive leadership teams of strategic AWS customers to develop their roadmaps for data, analytics, and AI/ML. Suvendu collaborates closely with customers to implement data engineering, data hub, data lake, data governance, and EDW solutions, as well as enterprise data strategy and data management.