End-to-End Guide for Hosting a NodeJS App
This article was published as a part of the Data Science Blogathon.
Introduction on NodeJS App
Importance of Software Deployment
Software Deployment is the process of running the application on the server. It is the most critical aspect of the software development process. Deployment exposes the applications to the real world and delivers them to the end-users. The methods of deployment used by the developers can impact how fast our application is responding to the users.
Software deployment has innovated very much in the last couple of decades. Several paradigms and workflows are created, making this process faster, efficient, and more frequent deployment, leading to happier teams.
Cloud Software Deployment
Many development teams host their applications on their own IT infrastructure (known as the private cloud model). But some public cloud service providers like AWS (Amazon Web Services), GCP (Google Cloud Platform) and Microsoft Azure offer IT Infrastructure-as-a-Service (IaaS), Platform-as-a-Service (PaaS) and (SaaS), Software-as-a-Service solutions. These help developers deploy their applications into a live environment without having any hardware, as the cloud service providers provide all the resources. They charge a nominal amount based on the configurations of the resources, but this gives relief for the developers to get rid of the burden of managing their storage and virtualization servers.
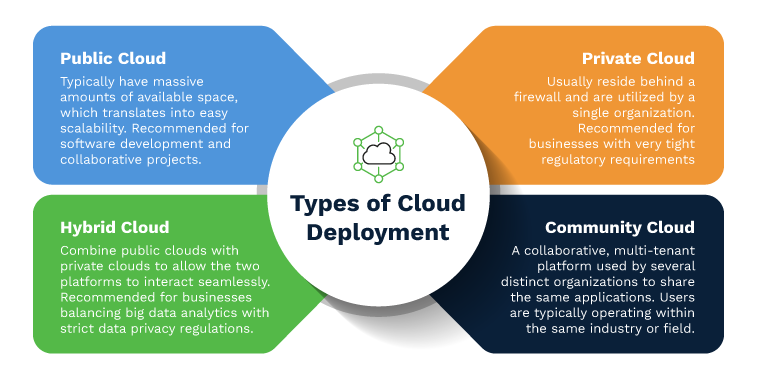
Types of Cloud Software Deployment
- Public Cloud
- Private Cloud
- Community Cloud
- Hybrid Cloud
The below image can help you to get a better understanding
This tutorial will see the end-to-end procedure of deploying a NodeJS app in AWS EC2 Instance.
Let’s get started, 😉
Launching EC2 Instance
1. Sign Up to AWS Management Console.
2. Create a Virtual Machine.
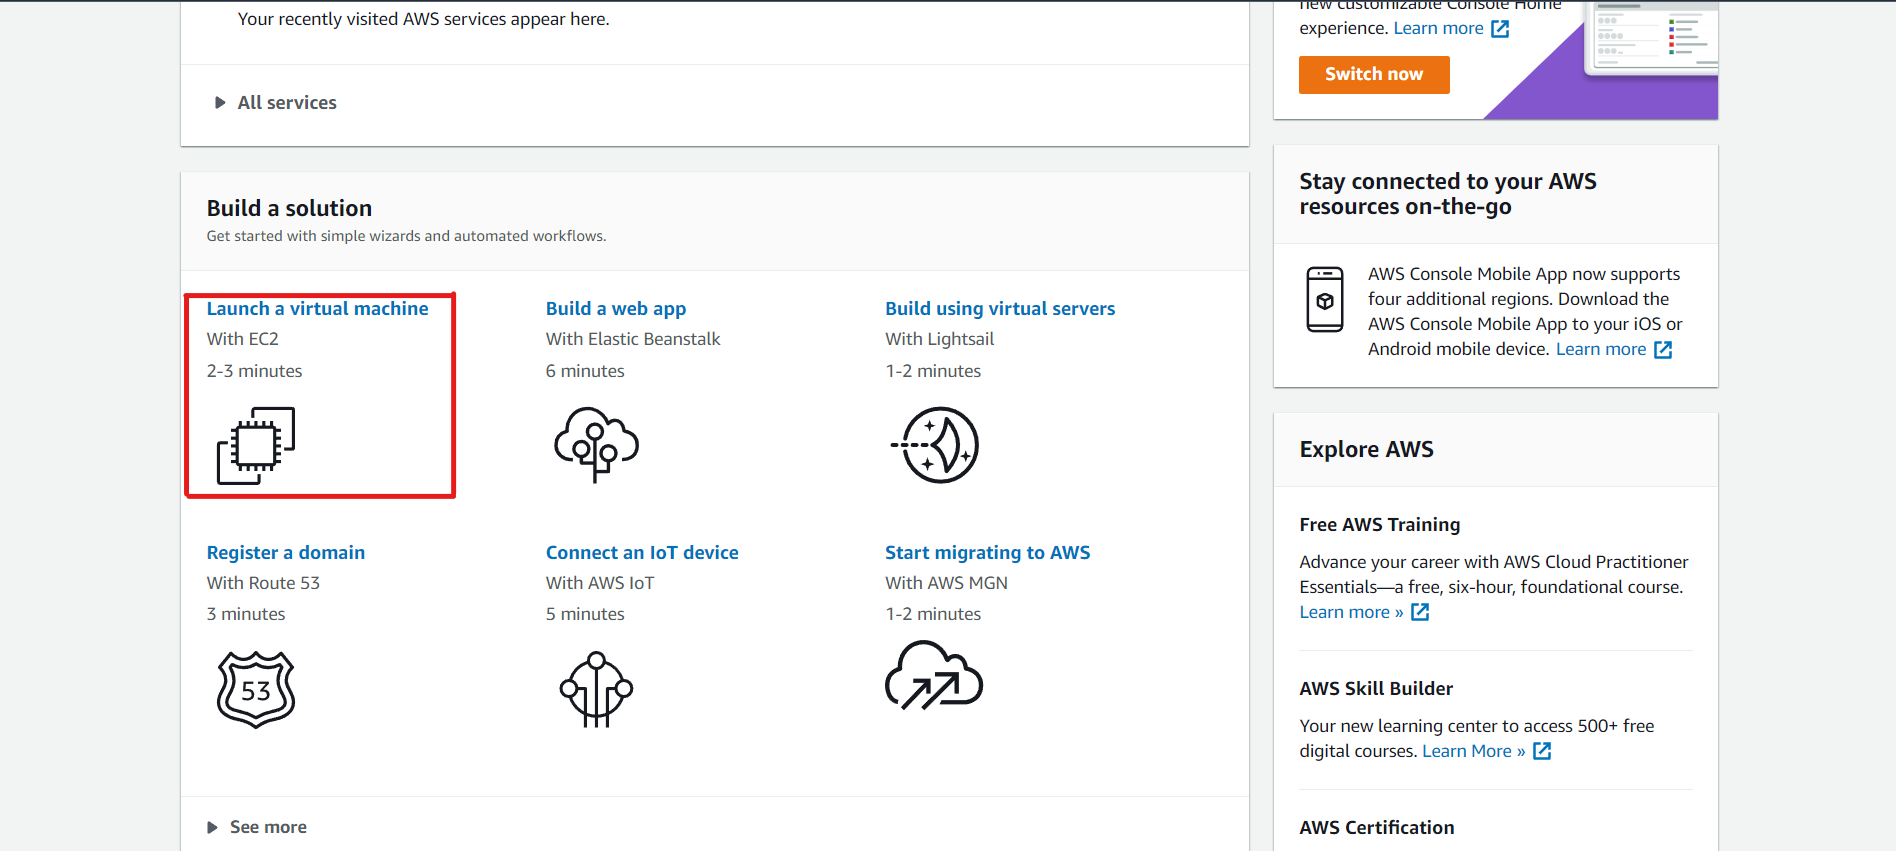
This tutorial is more focused on the Deployment part. We have not covered the steps of creating an EC2 instance. Refer to that article if you face any issues while creating an Instance.
After creating your Instance, we will launch it virtually from our local machine.
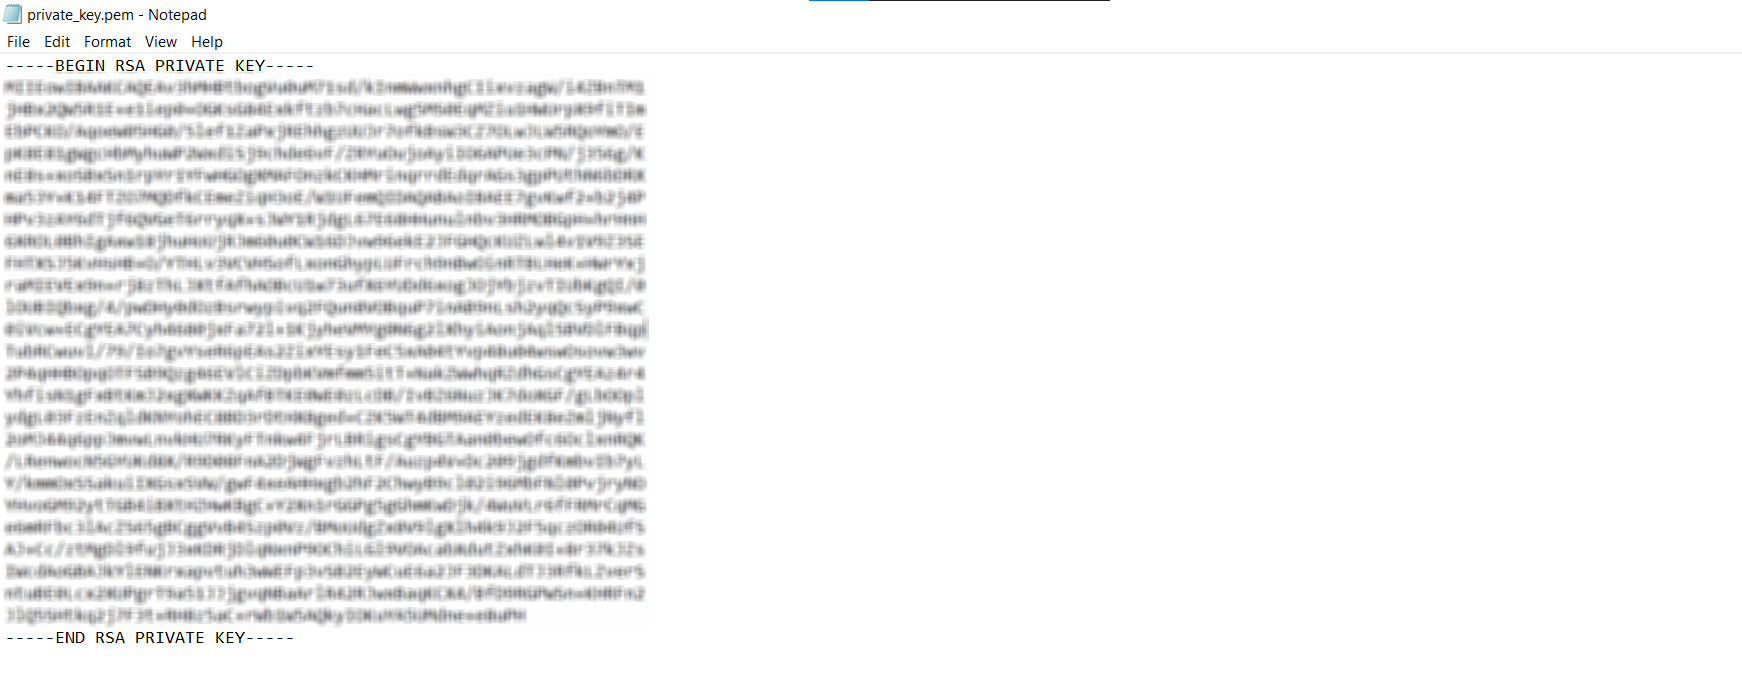
Note: Before moving forward, you must have these two things.
1. Your Private Key
Ex-
2. Your Instance ID
Ex-
[email protected]
Now, open your command prompt and type that command.
$ ssh -i ""
Ex-
$ ssh -i "private_key.pem" [email protected]
If you set a password for your private key previously, it would ask you for it. Otherwise, you will be logged into your Instance immediately.
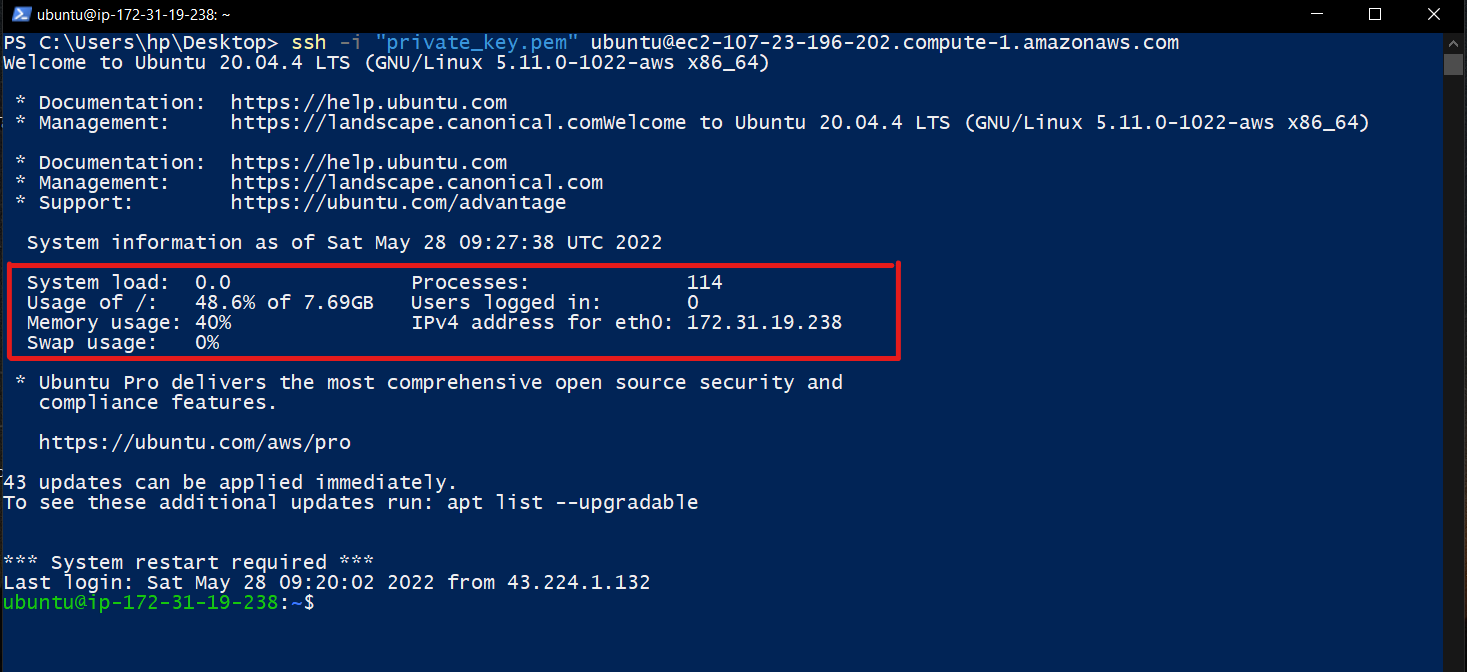
You can also monitor your VM’s details like storage, memory, processors, etc.
As this is a freshly created Instance, we have to install all the libraries in it.
Check whether Node and npm packages are already installed or not
$ node -v
$ npm -v
These commands can install these libraries if they are not installed.
$ sudo apt-get update
$ sudo apt install nodejs
$ sudo apt install npm
Check their versions now to see if they were correctly installed.
Creating NodeJS App
Create a directory named node_project. Inside it, we will create our basic NodeJS application.
$ mkdir node_project
$ cd node_project
Now, we initialize a new project in it.
$ npm init
Fill in the necessary details
Install express library
$ npm install express --save
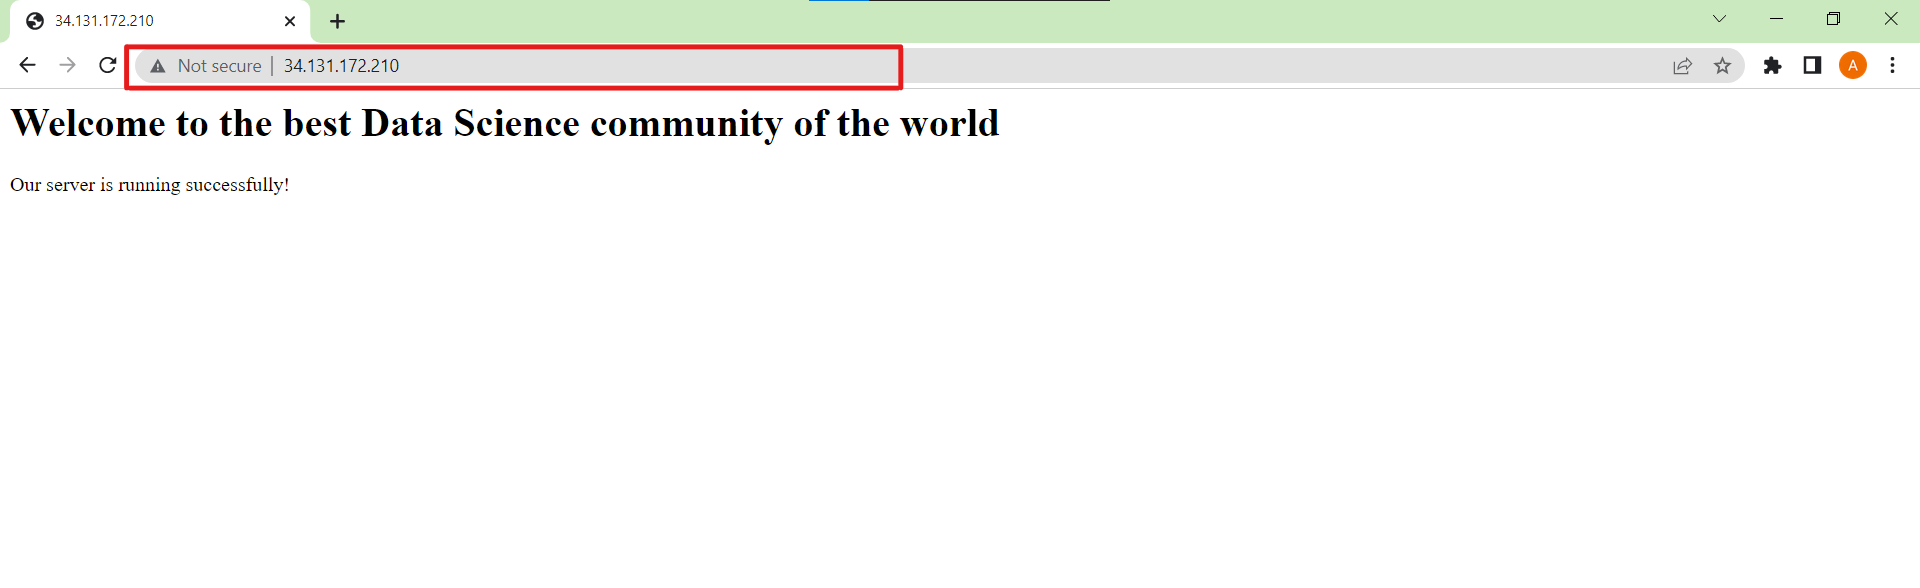
Now, create a javascript file named server.js.
$ nano server.js
Paste that code inside that file
app.get(‘/’, (req, res) => res.send(‘
Welcome to the best Data Science community of the world
Our server is running successfully!
‘))
We will run our application on default HTTP PORT 8000, but you can choose anyone you want.
Note: The PORT you enter here can not be used anywhere else, and it must be open in your AWS Console’s firewall settings.
Type that command to start your server.
$ sudo node server.js
The output of the terminal

Output at your web browser

If you can view the output in the web browser, then everything is OK. If you cannot see the output, go over all the steps again.
This webpage is only accessible until our server runs in the command window. So we want to keep the server running even we close our command prompt.
As a result, we will use a process manager known as PM2. It handles NodeJS apps and includes a load balancer. It keeps the applications running and restarts the server in the case of a failure without any downtime.
Installing PM2
$ sudo npm install pm2@latest -g
Starting the server using pm2
$ sudo pm2 start server.js

You can also kill the daemons using that command
$ sudo pm2 kill
To check the number of daemons currently running
$ sudo pm2 ls
Installing Nginx
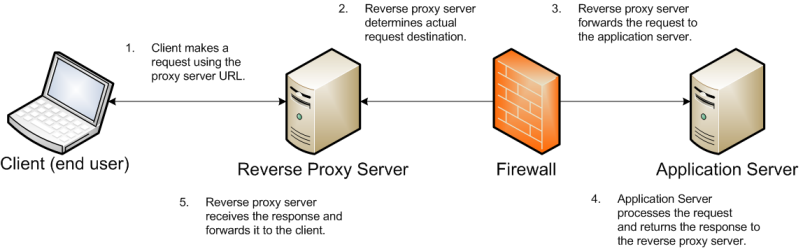
Nginx is a web server which provides reverse proxy, and it also acts as a load balancer.
We can install Nginx using the apt package manager
$ sudo apt update
$ sudo apt install nginx
Now we update our firewall settings so that Nginx can access the services.
Getting the list of applications that ufw knows how to work with
$ sudo ufw app list
ufw stands for uncomplicated firewall, a firewall management tool in ubuntu. It aims to make the firewall configurations uncomplicated.
The output of the above command looks like this
Available applications:
  Nginx Full
  Nginx HTTP
  Nginx HTTPS
  OpenSSH
The HTTP protocol runs on Port 80, and HTTPS runs on Port 443.
HTTP is an unencrypted web protocol, and HTTPS is a secure and encrypted web protocol.
Three options are available for Nginx-
1. Nginx Full – This opens both Port 80 and Port 443
2. Nginx HTTP – This opens only Port 80
3. Nginx HTTPS – This opens only Port 443
We will only require HTTP traffic, so we allow Nginx HTTP only.
$ sudo ufw allow 'Nginx HTTP'
Now, we check the status of our firewall
$ sudo ufw status
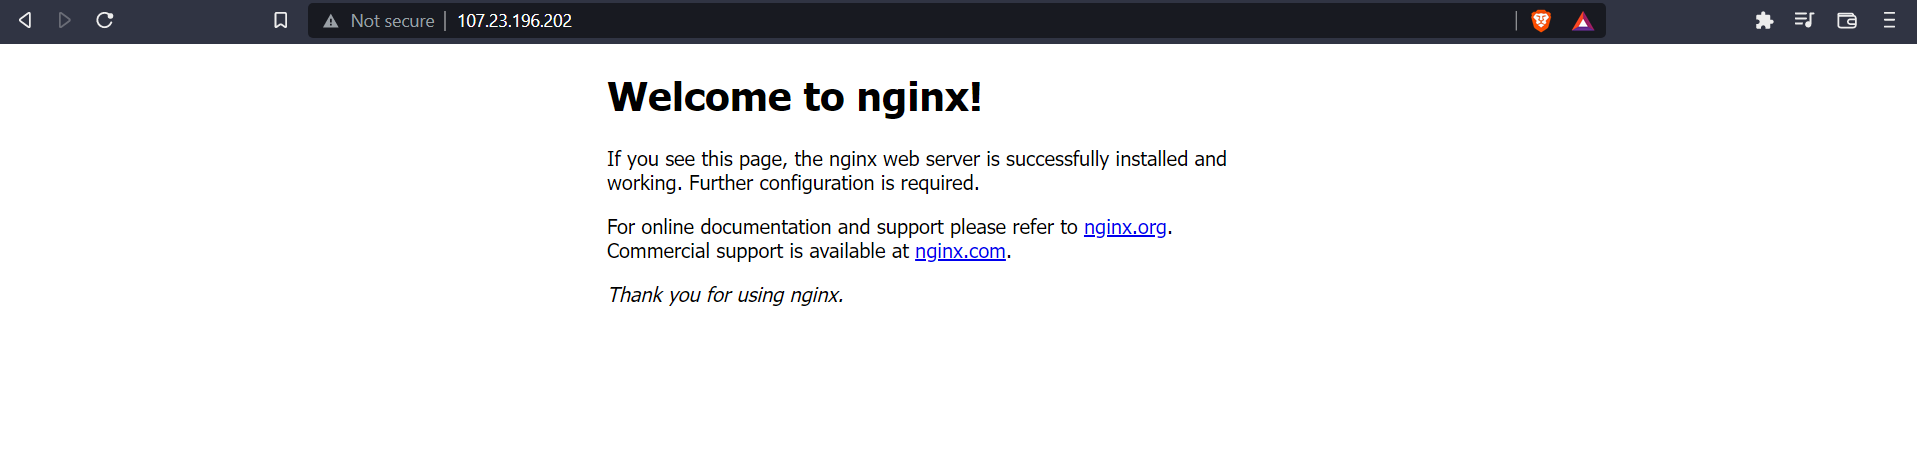
Checking Webserver
Type this command to check whether the webserver is running properly.
$ systemctl status nginx
The output looks like this
nginx.service - A high performance web server and a reverse proxy server
     Loaded: loaded (/lib/systemd/system/nginx.service; enabled; vendor preset: enabled)
     Active: active (running) since Sat 2022-05-28 15:18:06 UTC; 1h 53min ago
       Docs: man:nginx(8)
    Process: 74492 ExecStartPre=/usr/sbin/nginx -t -q -g daemon on; master_process on; (code=exited, status=0/>
    Process: 74493 ExecStart=/usr/sbin/nginx -g daemon on; master_process on; (code=exited, status=0/SUCCESS)
   Main PID: 74494 (nginx)
      Tasks: 2 (limit: 663)
     Memory: 3.4M
        CPU: 36ms
     CGroup: /system.slice/nginx.service
             ├─74494 nginx: master process /usr/sbin/nginx -g daemon on; master_process on;
             └─74495 nginx: worker process
Now, restart your webserver
$ sudo systemctl restart nginx
Check your Web Browser
Go to your web browser and type that URL
URL – http:///
If Nginx is working properly, then you should see that page
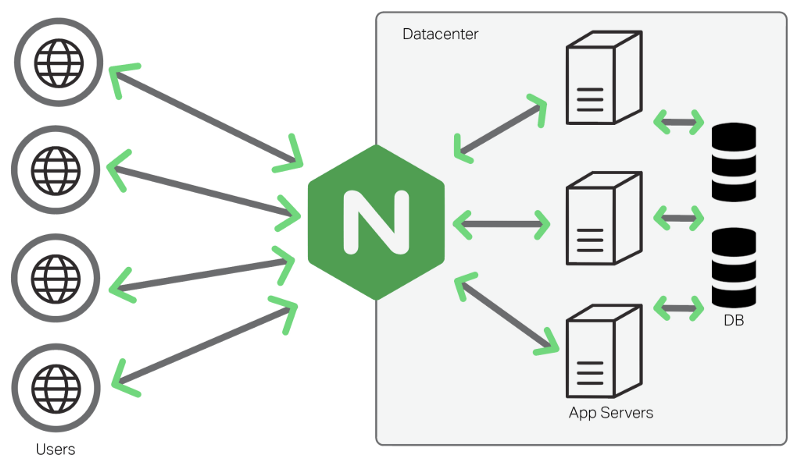
Configuring Nginx as a Reverse Proxy for the NodsJS App
Because our app is operating on localhost. We require a reverse proxy to route client requests to the appropriate backend server.
Reverse proxy servers operate behind a firewall, redirecting client requests to the appropriate backend. It adds an extra layer of protection while also smoothing network traffic.
Using an example can help you better understand this.
Assume our backend is on Port 8000 and our Nginx server is on Port 80. As a result, when a user requests Port 80, Nginx internally redirects the request to the backend, executing on Port 8000. Refer to the below image for more clarification.
I think this clarifies the functioning of Reverse Proxy. Let’s see how we can achieve it practically.
It is required to create a separate server block, in which we can add the configurations of the reverse proxy.
$ sudo nano /etc/nginx/sites-available/your_app
You can also change the name of your app.
Now, paste the following code into that file.
Note: Now have to add your IP address and you also have to change the port number if your backend application is running on a different port.
server{
  server_name ;
      location / {
        proxy_pass http://localhost:8000;
        proxy_http_version 1.1;
        proxy_set_header Upgrade $http_upgrade;
        proxy_set_header Connection 'upgrade';
        proxy_set_header Host $host;
        proxy_cache_bypass $http_upgrade;
    }
}
Now, save that file.
Disabling the Default Server Block
Now, you have two server blocks created. One is the default one and the one that you have created above.
You can also verify this by typing that command
$ sudo ls /etc/nginx/sites-available
These are your available sites
default
your_app
Default Server Block is responsible for rendering the default web page of the Nginx server that we have seen above.
We have to disable the default one so that your newly created server block can render our backend application.
The command to enable only our newly created server block is
$ sudo ln -s /etc/nginx/sites-available/your_app /etc/nginx/sites-enabled/
Command to disable the default server block is
$ sudo rm /etc/nginx/sites-enabled/default
Restart the Nginx server again
$ sudo systemctl restart nginx
Now, when you hit that URL – http///, you can see the web page of your application instead of the Nginx default page.
But currently, this is working on an IP address. The following section will point that IP address to a domain name.
Getting a Domain Name
Now we point or static IP address to a domain name so that when someone hits the domain name, it will redirect to our web page.
Buying a domain name
This section will show you how to buy a domain name from Go Daddy.
1. Go to Go Daddy’s official website.
2. Check the availability of your domain name.

3. Purchase the available domain.
4. You can purchase any domain of .com, .in, and .org according to your requirement.
5. After purchasing the domain, we have to the point that domain name to our IP address in DNS Servers.
6. Navigate to Manage DNS >> DNS Records.
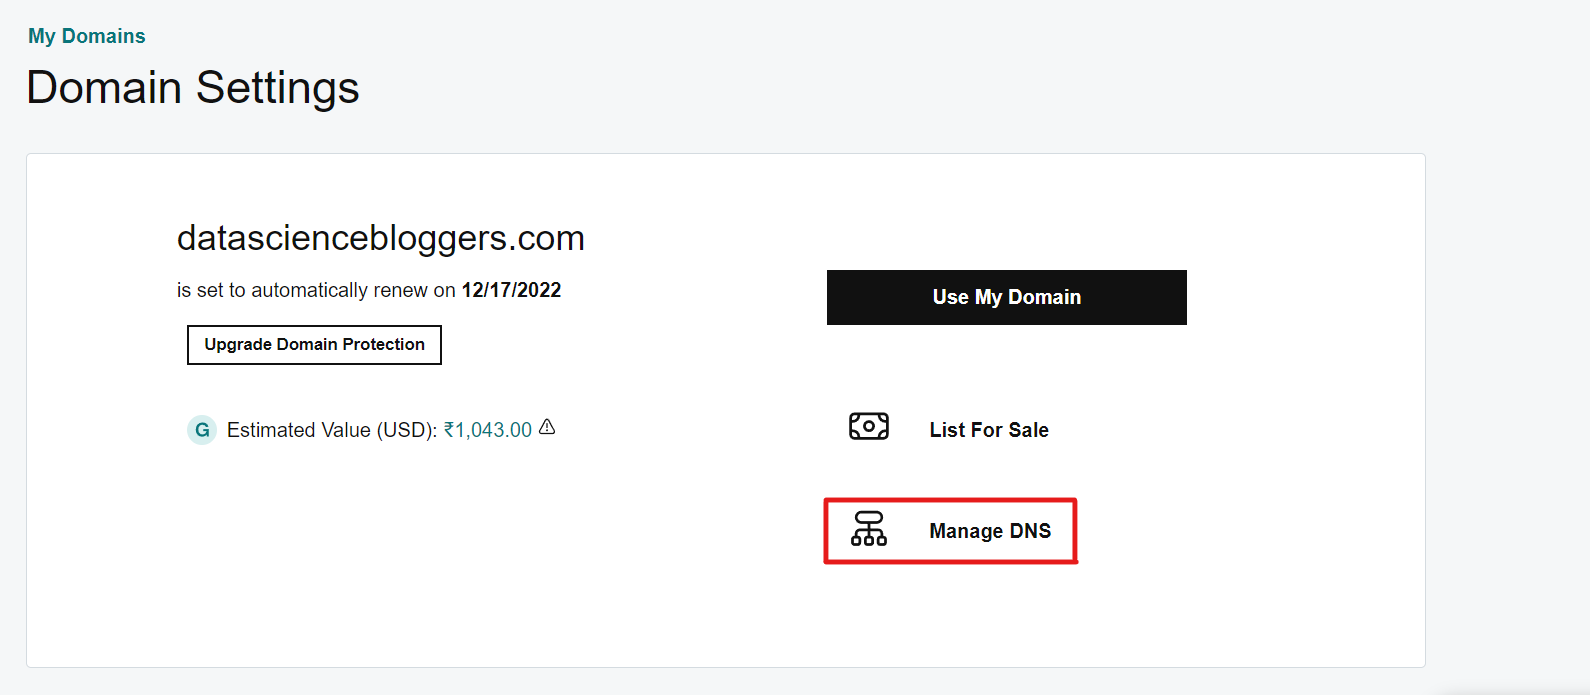
7. Enter your IP address with Type as A and Name as @, then click save.
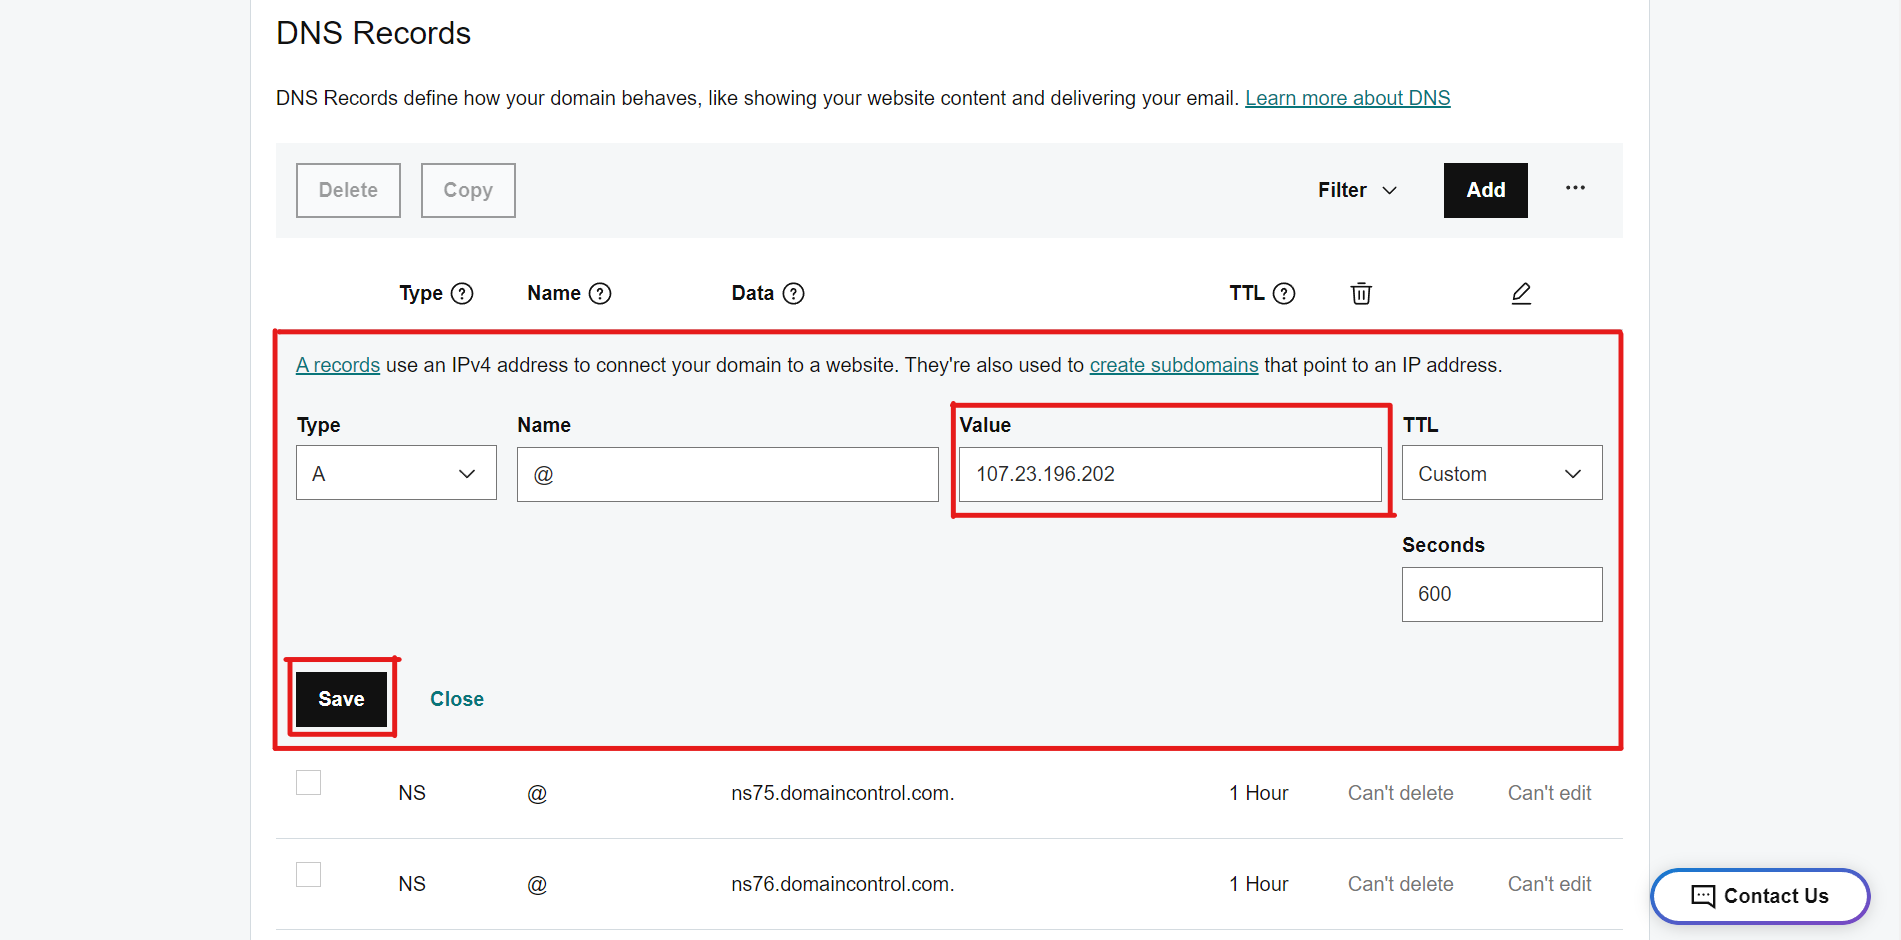
Mostly it will take about 10-15 mins to update the DNS Records.
Creating a Reverse Proxy for the Domain Name
Create a new Server Block for your domain name
sudo nano /etc/nginx/sites-available/example.com
Instead of example.com, you have to put your domain name.
Now, enter your domain name and the port number on which your nodejs application is running.
server{
  server_name example.com www.example.com;
      location / {
        proxy_pass http://localhost:8000;
        proxy_http_version 1.1;
        proxy_set_header Upgrade $http_upgrade;
        proxy_set_header Connection 'upgrade';
        proxy_set_header Host $host;
        proxy_cache_bypass $http_upgrade;
    }
}
Save the file.
Enabling the server block of the domain name
$ sudo ln -s /etc/nginx/sites-available/example.com /etc/nginx/sites-enabled/
Disabling the previous server block
$ sudo rm /etc/nginx/sites-enabled/your_app
Restart the Nginx Server
$ sudo systemctl restart nginx
Hurray 🎉, now you can access your web page by hitting your domain name.
If everything goes right, you will see that output on your web browser.
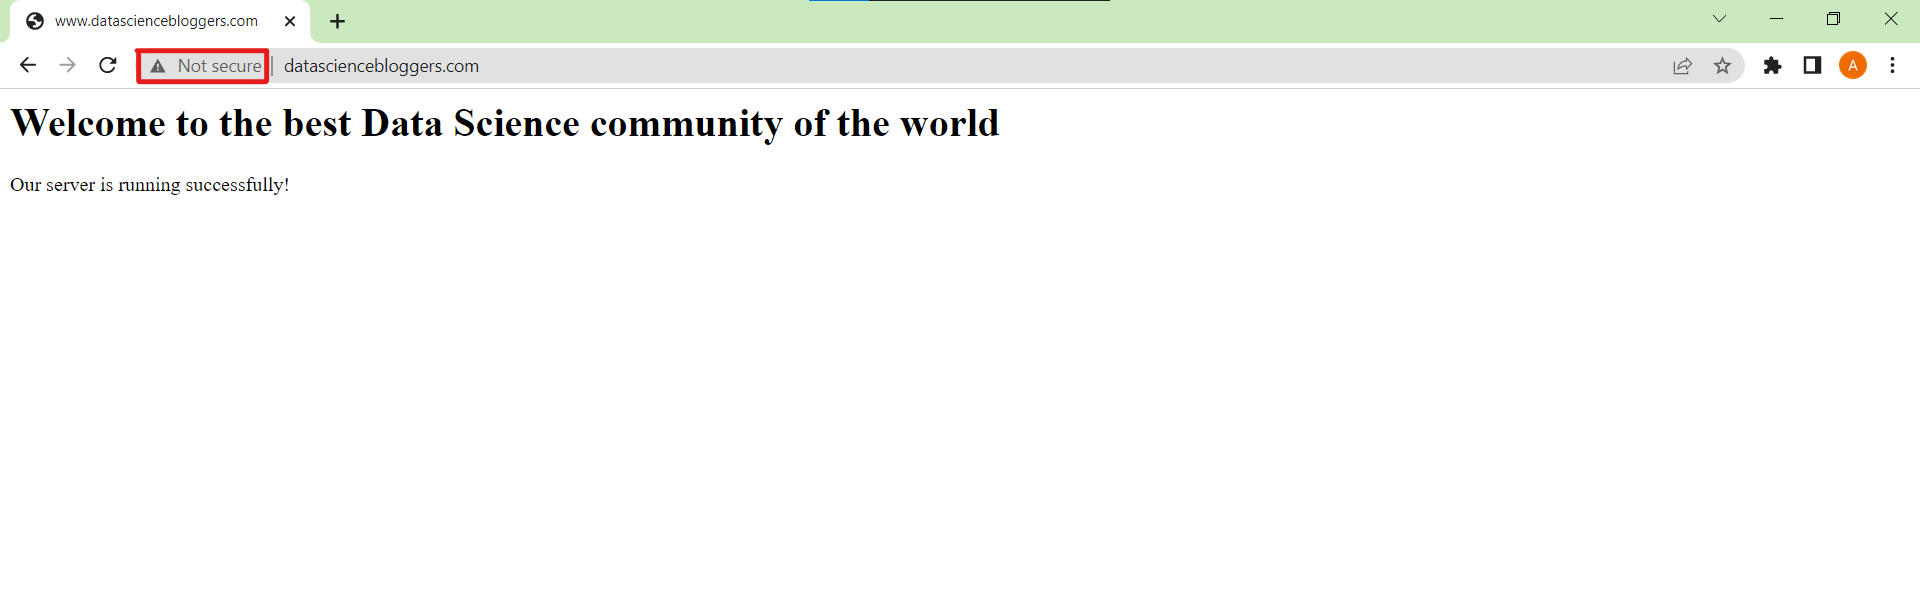
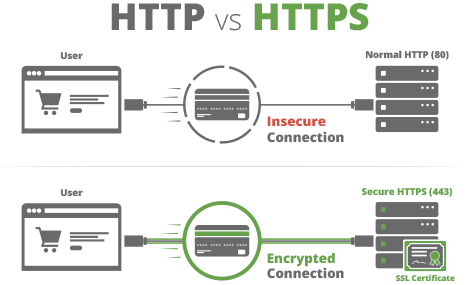
We have seen it written as (Not Secure) in the address bar. Currently, we are using HTTP (Hypertext Transfer Protocol) to handle the client’s requests. HTTP Protocol is unencrypted, and data can be stolen in the middleware by hackers.
On the other hand, HTTPS (Hypertext Transfer Protocol Secure) is also a web protocol used for data transmission. But HTTPS transmits data in an encrypted format, which cannot steal in the middleware.
You can also refer to the below diagram for more understanding.
The following section will secure the connection using an SSL Certificate (Secure Socket Layer).
Getting SSL Certificate
What is an SSL Certificate?
It stands for Secure Socket Layer. It is a digital certificate that authenticates the website identity and allows to transfer of the data in an encrypted format.
1. Opening HTTPS Port:
As you remembered, earlier, we have only allowed “Nginx HTTP”, which can only allow HTTP traffic. But now, we also have to allow HTTPS traffic on the webserver.
Type that command to allow HTTPS traffic
$ sudo ufw allow 'Nginx Full'
$ sudo ufw delete allow 'Nginx HTTP'
2. Installing Certbot
Certbot is a library used to fetch an SSL Certificate from Let’s Encrypt. Let’s Encrypt is an open certificate authority that provides SSL Certificates.
$ sudo apt install certbot python3-certbot-nginx
3. Getting an SSL Certificate
Now, we obtain an SSL Certificate from Let’s Encrypt through certbot.
$ sudo certbot --nginx -d example.com -d www.example.com
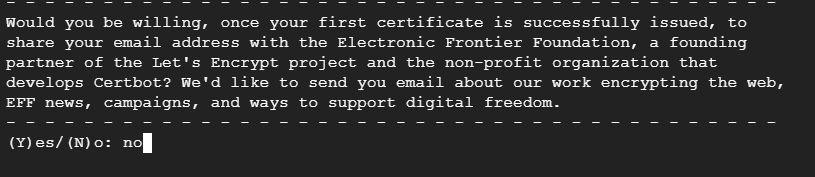
If you run certbot for the first time, it will ask you to enter your email address.

Then you have to accept the terms and conditions. You can also read them in the link given.

Further, it asks you to share your email address with a third party. It’s entirely your choice whether you want to share your email.
Now, it starts obtaining the certificate.
If everything goes fine, the success message looks like this.
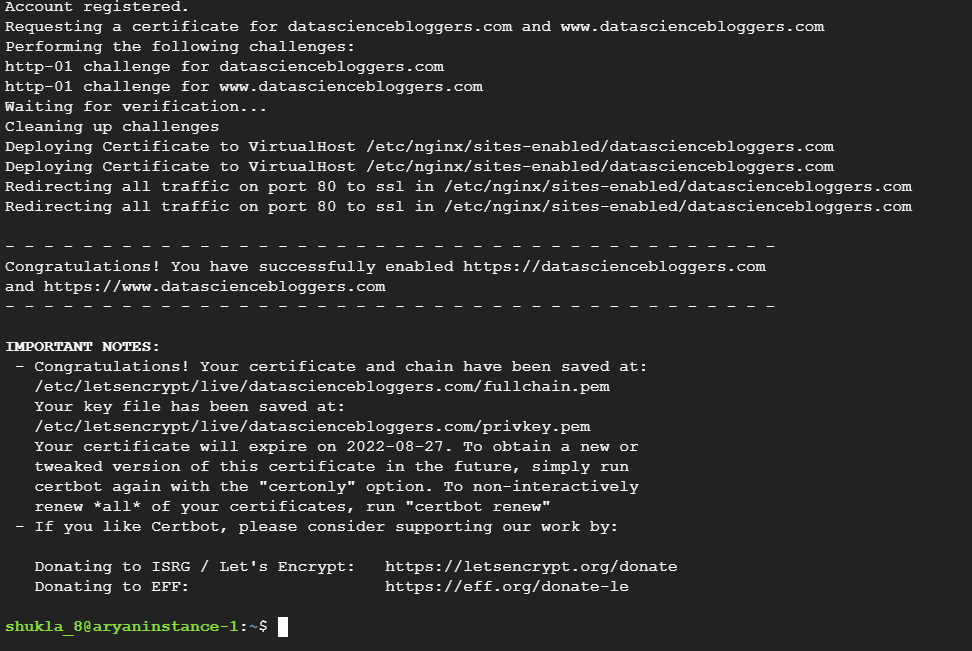
This SSL Certificate is valid only for the next 90 days. After that, it will get expired. But you can renew it also for free. Or, you can configure auto-renew, in which the certbot automatically renews the certificate when it gets expires.
It is recommended for the users to set up auto-renewal
4. Auto-Renewal of the SSL Certificate
Certbot comes with a timer, which runs twice a day to auto-renew the certificate in the last 30 days of expiration.
Type this command to set up the timer
$ sudo systemctl status certbot.timer
Type this command to test the renewal process
$ sudo certbot renew --dry-run
If you see no errors, then you are good to go.
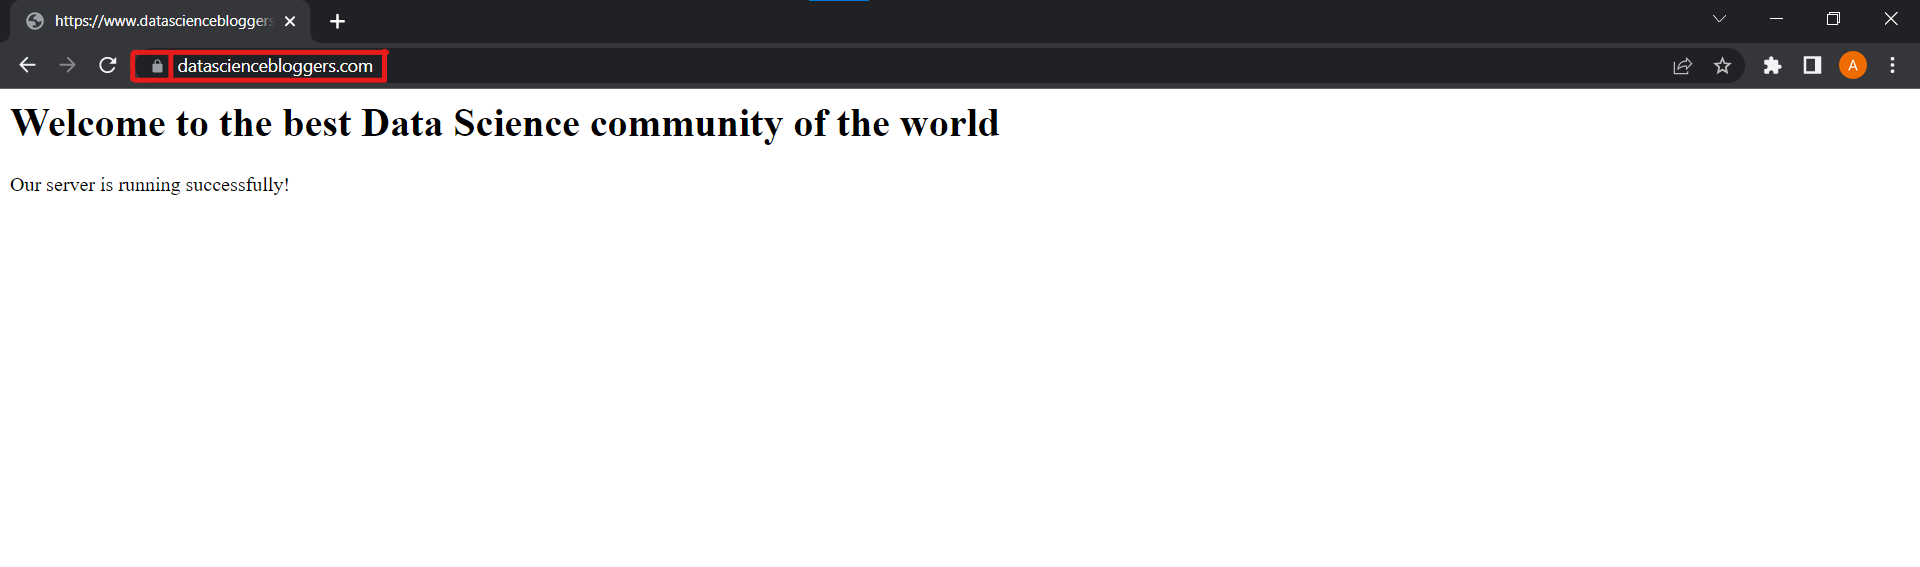
When you hit your domain name in the web browser, you will see a lock in the address bar instead of being written as not secure.
Conclusion on NodeJS App
Deployment is the most critical part of web development. You can also deploy the same application on multiple servers and connect them through a load balancer. A load balancer divides the traffic and reduces the load on individual servers.
Testing and monitoring are also an essential part of development. You can create two servers, one for testing & monitoring purposes and one for a production build.
The user can also containerize the whole app using Docker for better performance. Docker is software that is used to containerize the apps. It creates a virtual environment of the operating system on which the application is running, which simplifies the applications’ building, running, and managing. Docker container includes all the frameworks and libraries required to run that application.
It also created a read-only image and contained instructions for creating a Docker container to run that application. You can share these Docker images with other developers as well.
The key takeaways on Hosting NodeJS App are
1. Firstly, we have set up an AWS EC2 Instance and also launched it using the private key.
2. Then, we have installed all the required libraries in it that are necessary for our app.
3. After that, we have created a small NodeJS application, or you can use your application if you have any. You can also use web apps in other frameworks like Django or Flask. Most of the steps remain the same.
4. Then, we set up the Nginx web server, which is used for the reverse proxy and load balancing. You can also use other web servers like Apache.
5. Further, we purchased a domain name from Go Daddy for our application.
6. And finally, we have secured the connection by obtaining a free SSL Certificate from Let’s Encrypt.
It is all for today. I hope you have enjoyed the guide. If you have any doubts or suggestions, feel free to comment below. Or you can also connect with me on LinkedIn. I will be delighted to get associated with you.
The media shown in this article is not owned by Analytics Vidhya and is used at the Author’s discretion.


