AWS Big Data Blog
Integrate Identity Provider (IdP) with Amazon Redshift Query Editor V2 using AWS IAM Identity Center for seamless Single Sign-On
March 2024: This post was reviewed and updated to be more generic for IAM identity center supported Identity Providers (IdPs).
AWS IAM Identity Center allows you to manage single sign-on (SSO) access to all your AWS accounts and applications from a single location. We are pleased to announce that Amazon Redshift now integrates with AWS IAM Identity Center, and supports trusted identity propagation, allowing you to use third-party Identity Providers (IdP) such as Microsoft Entra ID (Azure AD), Okta, Ping, and OneLogin. This integration simplifies the authentication and authorization process for Amazon Redshift users using Query Editor V2 or Amazon Quicksight, making it easier for them to securely access your data warehouse. Additionally, this integration positions Amazon Redshift as an IAM Identity Center-managed application, enabling you to use database role-based access control on your data warehouse for enhanced security.
IAM Identity Center supports automatic provisioning of user and groups from your preferred identity provider (IdP) into IAM Identity Center using the System for Cross-domain Identity Management (SCIM) v2.0 protocol. This integration allows for seamless synchronization of information between two services, ensuring accurate and up-to-date information in AWS IAM Identity Center.
In this blog post, we will provide a comprehensive guidance on how to integrate IAM identity center with Amazon Redshift to manage your identity provider’s groups using Redshift RBAC strategy. We will also show you how to take advantage of this integration to query Redshift tables using Amazon Redshift Query Editor V2 (QEv2).
Solution overview
Using IAM Identity Center with Amazon Redshift can benefit your organization in the following ways:
- Users can connect to Amazon Redshift without requiring an administrator to set up AWS IAM roles with complex permissions.
- IAM Identity Center integration allows mapping of IAM Identity Center groups with Amazon Redshift database roles. Administrators can then assign different privileges to different roles and assigning these roles to different users, giving organizations granular control for user access.
- IAM Identity Center provides a central location for your users in AWS. You can create users and groups directly in IAM Identity Center or connect your existing users and groups that you manage in a standards-based identity provider like Okta, Ping Identity, or Microsoft Entra ID (i.e., Azure Active Directory [AD]).
- IAM Identity Center directs authentication to your chosen source of truth for users and groups, and it maintains a directory of users and groups for access by Amazon Redshift.
- You can share one IAM Identity Center instance with multiple Amazon Redshift data warehouses with a simple auto-discovery and connect capability. This makes it fast to add clusters without the extra effort of configuring the IAM Identity Center connection for each, and it ensures that all clusters and workgroups have a consistent view of users, their attributes, and groups. Note: Your organization’s IAM Identity Center instance must be in the same region as the Amazon Redshift data warehouse you’re connecting to.
- Because user identities are known and logged along with data access, it’s easier for you to meet compliance regulations through auditing user access in AWS CloudTrail authorizes access to data.
- IAM Identity Center allows you to make trusted identity propagation between Amazon Redshift with other AWS services such as AWS Lake Formation, Amazon QuickSight and supported third-party BI tools and applications.
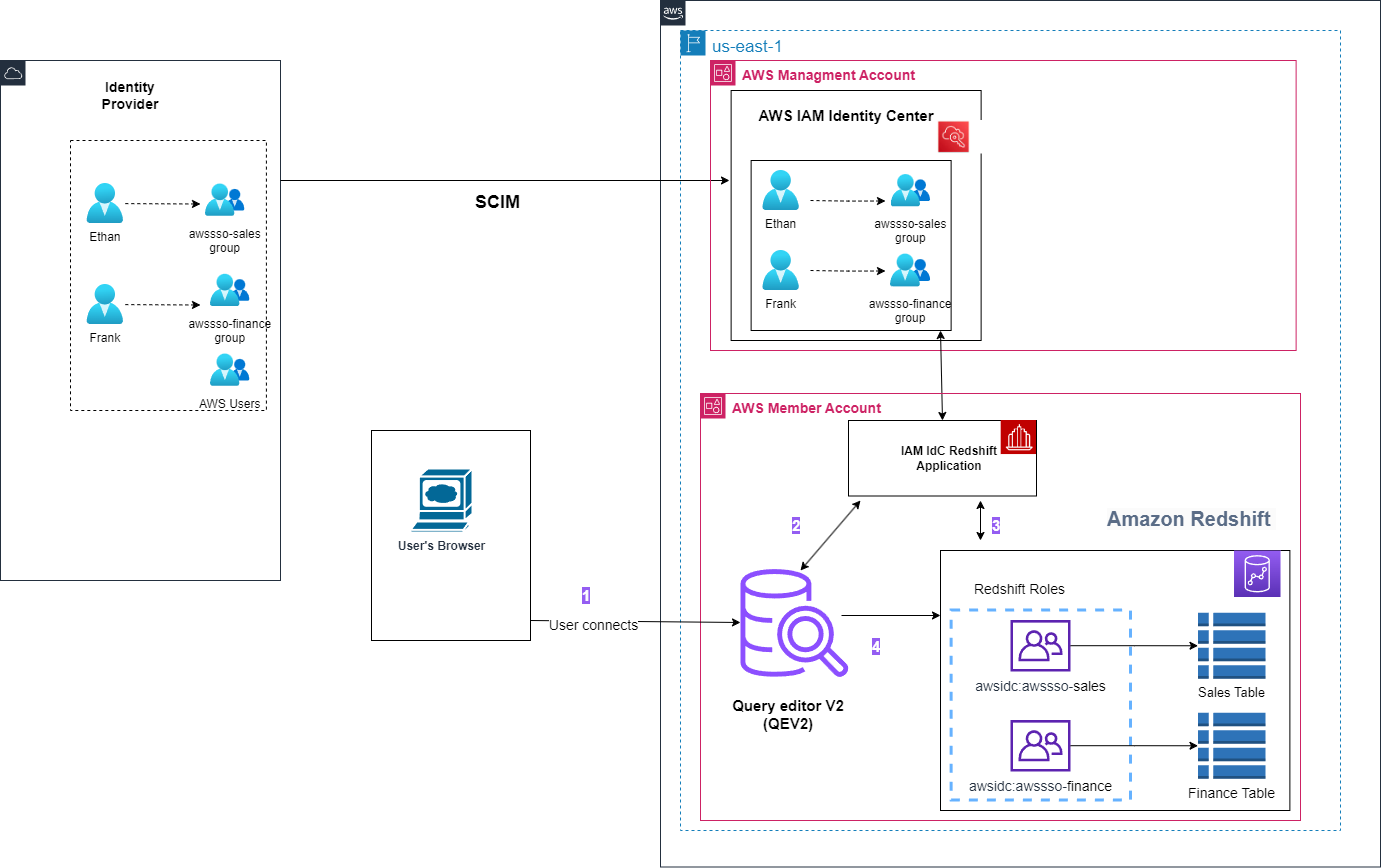
Figure 1: Amazon Query Editor V2 workflow with IAM Identity center and an external identity provider
Amazon Query Editor V2 workflow with IAM Identity center and an external identity provider:
- End user initiates the flow using AWS access portal URL (this URL would be available on IAM Identity Center dashboard console on Management Account). A browser pop-up triggers and takes you to your preferred IdP Login page where you enter IdP credentials. After successful authentication, you’ll be logged into the AWS Console as a federated user. Click on your AWS Account and choose the Amazon Redshift Query Editor V2 application. Once you federate to Query Editor V2, select the IAM Identity Center authentication method.
- QEV2 invokes browser flow where you re-authenticate, this time with your AWS IAM Identity Center credentials. Since you already entered your IdP credentials, which are already cached in browser. At this step, federation flow with IAM Identity Center initiates and at the end of this flow, the Session token and Access token is available to the QEv2 console in browser as cookies.
- Amazon Redshift retrieves your authorization details based on session token retrieved and fetches user’s group membership.
- Upon a successful authentication, you’ll be redirected back to QEV2, but logged in as an IAM Identity Center authenticated user.
This solution covers following steps:
- Create IAM policy for Amazon Redshift access
- Create IAM role
- Setting up IAM Identity Center integration with Amazon Redshift
- Assign Users or Groups from IAM Identity Center to Amazon Redshift Application.
- Amazon Redshift integration with IAM Identity Center
5.1 Integrate a new Amazon Redshift provisioned or Amazon Redshift serverless endpoint
5.2 Associating an IAM Identity Center application with an existing provisioned cluster or Serverless endpoint
- Configure Amazon Redshift role-based access
- Create a permission set
- Create account assignments
- Test your AWS IAM Identity center and Amazon Redshift integration with Redshift Query Editor V2
- Troubleshooting
Prerequisites
- An AWS account. If you don’t have one, you can sign up for one.
- Enable IAM Identity Center. For more information, see Enabling AWS IAM Identity Center.
- Connect IAM Identity Center with your preferred IdP and sync users and groups. Follow this link for the IdP setup.
Walkthrough
Step 1: Create IAM policy for Amazon Redshift access
To integrate Amazon Redshift with IAM Identity Center, you must create an IAM policy in the account where Amazon Redshift cluster/Serverless instance exists. In this blog post, we would be creating IAM policy in the member account where the Redshift cluster/Serverless instance exist. The specific policy permissions required are the following:
redshift:DescribeQev2IdcApplications– Used to detect capability for IAM Identity Center authentication from Redshift Query Editor V2.redshift-serverless:ListNamespaces– Grants permission to list namespaces in Amazon Redshift Serverless.redshift-serverless:ListWorkgroups– Grants permission to list workgroups in Amazon Redshift Serverless.redshift-serverless:GetWorkgroup– Grants permission to get information about a specific workgroup.sso:DescribeApplication– Required to create an identity provider (IdP) entry in the catalog.sso:DescribeInstance– Used to manually create IdP federated roles or users.
To create your IAM policy, complete the following steps:
- On the IAM console, choose Policies.
- Choose Create policy.
- On the Create policy page, choose the JSON tab.
- For the policy, enter the JSON in following format:
Replace <IAM Identity Center Instance ID> with your Identity Center instance and <AWS Account ID> with the account id where the cluster is going to be created. In this blog post, for <IAM Identity Center Instance ID> , we are using the ID that belongs to the organization instance of IAM Identity Center in the management account and similarly for <AWS Account ID> , we are using the management account ID.
- On the Review and create page, type a Policy Name and a Description (optional) for the policy that you are creating. Review Permissions defined in this policy to see the permissions that are granted by your policy.
- (Optional) Add metadata to the policy by attaching tags as key-value pairs. For more information about using tags in IAM, see Tagging IAM resources.
- Choose Create policy to save your new policy.
Step 2: Create the IAM role
To integrate Amazon Redshift with IAM Identity Center, you must create an IAM Role in the account where the cluster exists. In this blog post, we would be creating IAM role in the member account where the Redshift cluster/Serverless instance exist. Redshift administrator uses this IAM role to configure Redshift for use with IAM Identity Center. To create your IAM role, complete the following steps:
- On the IAM console, choose Roles in the navigation pane.
- Choose Create role.
- Choose AWS service as the trusted entity, and then choose Redshift as the use case.
- Under Use case for other AWS services, choose Redshift – Customizable and then choose Next.
- The Add permissions policy page appears. Choose the policy which you created earlier. For e.g. aws-idc-policy. Choose Next.
- For Role name, enter a name for your role, for example
IAMIDCRedshiftRole. - Review the information, and then choose Create role.
- Navigate to the role that you just created and choose Trust Relationships.
- Choose Edit trust policy and type SetContext under Add actions for STS. Select SetContext and choose Update policy.
- Below is the code from Trust Relationships:
Step 3: Setting up IAM Identity Center integration with Amazon Redshift
Amazon Redshift cluster administrator or Amazon Redshift Serverless administrator must perform steps to configure Redshift as an IAM Identity Center-enabled application in the account where Redshift endpoint/Serverless instance exist. In this blog post, we would be creating Amazon Redshift application in the member account where the Redshift cluster/Serverless instance exist. This enables Amazon Redshift to discover and connect to the IAM Identity Center automatically to receive sign-in and user directory services.
After this, when the Amazon Redshift administrator creates a cluster or workgroup, they can enable the new data warehouse to use IAM Identity Center and its identity-management capabilities. The point of enabling Amazon Redshift as an IAM Identity Center-managed application is so you can control user and group permissions from within the IAM Identity Center, or from a source third-party identity provider that’s integrated with it.
When your database users sign in to an Amazon Redshift database, for example an analyst or a data scientist, it checks their groups in IAM Identity Center and these are mapped to roles in Amazon Redshift. In this manner, a group can map to an Amazon Redshift database role that allows read access to a set of tables.
The following steps show how to make Amazon Redshift an AWS-managed application with IAM Identity Center:
- Select IAM Identity Center connection from Amazon Redshift console menu.

Figure 2: Redshift-IAM Identity Center connection
- Choose Create application

Figure 3: Create Redshift Application for IAM Identity Center Connection
- On IAM Identity Center connection, Choose Next.
- In IAM Identity Center integration setup section, for:
- IAM Identity Center display name – Enter a unique name for Amazon Redshift’s IAM Identity Center-managed application. The application display name appears in the IAM Identity Center console and APIs.
- Managed application name – You can enter the managed Amazon Redshift application name or use the assigned value as it is. This is a unique identifier for the managed application that’s integrated with IAM Identity Center. You can use it for multi-application identification.
- In Connection with third-party identity providers section, for:
- Identity Provider Namespace – Specify the unique namespace for your organization. This is typically an abbreviated version of your organization’s name. It’s added as a prefix for your IAM Identity Center-managed users and roles in the Amazon Redshift database.
- In IAM role for IAM Identity Center access – Choose an IAM role which you have created in section (Step 2. Create the IAM role). For e.g.
IAMIDCRedshiftRole - Select Enable the query editor v2 application to allow user to access the database and appropriate objects in the database through their IAM Identity Center-based, namespace-prefixed identity.
- If you want to leverage AWS Lake formation then select Enable AWS Lake Formation access grants under Trusted identity propagation. This will enable fine grained access control from AWS Lake Formation. Lake Formation use case is covered in the blog – Simplify access management with Amazon Redshift and AWS Lake Formation for users in an External Identity Provider.
- Choose Next.
 Figure 4: Configure Redshift Application for IAM Identity Center connection
 - In Configure client connections that use third-party IdPs section, choose Yes if you want to connect Amazon Redshift with a third-party application. Otherwise, choose No. In this blog post, we are using Amazon Redshift Query Editor V2 so thats why we are choosing option as No.

Figure 5: Configure client connections for third-party IdPs
- Choose Next.
- In the Review and create application section, review all the details you have entered before and choose Create application.

Figure 6: Review – Redshift Application for IAM Identity Center connection
After the Amazon Redshift administrator finishes the steps and saves the configuration, the IAM Identity Center properties appear in the Redshift Console. Completing these tasks makes Redshift an IAM Identity Center-enabled application.


Figure 7: Successful creation of Redshift Application
After you select the managed application name, the properties in the console includes the integration status. It says Success when it’s completed. This status indicates if IAM Identity Center configuration is completed.

Figure 8: General Configuration of Redshift Application
Step 4: Assigning users or groups from IAM Identity Center to Amazon Redshift application
In this step, users or groups synced to your Organization instance of IAM identity center in management account, and are available to assign to your Redshift application. Amazon Redshift administrator can now decide which users or groups from Management Account IAM Identity Center need to be included as part of Amazon Redshift application.
For example, if you have total 20 groups on your organization instance of IAM Identity Center and you don’t want all the groups to include as part of Amazon Redshift application in the member account, then you have options to choose which IAM Identity Center groups to include as part of Amazon Redshift-enabled IAM Identity Center application. In this section, we will be assigning two groups to the Redshift application. Later, you can create two Redshift database roles as part of IAM Identity Center integration in Amazon Redshift.
The following steps assign groups to Amazon Redshift-enabled IAM Identity Center application:
- On IAM Identity Center properties in the Amazon Redshift Console, select Assign under Groups tab.
- If this is the first time you’re assigning groups, then you’ll see a notification. Select Get started.
- Enter which groups you want to synchronize in the application. In this example, we chose the groups
awssso-salesandawssso-finance. - Choose Done.

Figure 9: Group Assignment in Amazon Redshift’s IAM Identity Center-managed application
Step 5: Amazon Redshift integration with IAM Identity Center
After completing above steps under section (Step 3: Setting up IAM Identity Center integration with Amazon Redshift) — Amazon Redshift database administrator have two options:
- Configure new Redshift cluster/serverless instance to work in alignment with IAM Identity Center by following section (Step 5.1 Integrate a new Amazon Redshift provisioned or Amazon Redshift serverless endpoint)
- Or, Admin can modify existing Redshift cluster or serverless workgroup to enable for IAM Identity Center integration by following section – (Step 5.2 Associating an IAM Identity Center application with an existing provisioned cluster or Serverless endpoint)
Step 5.1: Integrate a new Amazon Redshift provisioned or Amazon Redshift serverless endpoint
Amazon Redshift database administrator needs to configure new Redshift resources to work in alignment with IAM Identity Center to make sign-in and data access easier. Anyone with permissions to create Amazon Redshift resources can perform these IAM Identity Center integration tasks. When you create a provisioned cluster, you start by choosing Create Cluster in the Amazon Redshift Console. In this blog post, we would be creating Redshift cluster in the member account.
- Choose Enable for the cluster (recommended) in the section for IAM Identity Center connection in the create-cluster steps.
- From the drop down, choose the redshift application which you created in above steps.
Note that when a new data warehouse is created, the IAM role specified for IAM Identity Center integration is automatically attached to the provisioned cluster or Serverless Namespace. After you finish entering the required cluster metadata and create the resource, you can check the status for IAM Identity Center integration in the properties.

Figure 10: Create Redshift Cluster to enable IAM Identity Center connection
For more details on creating a cluster, refer to AWS documentation:
- For Redshift cluster setup instructions, see Create a sample Amazon Redshift cluster.
- For Redshift Serverless endpoint setup instructions, see Getting started with Amazon Redshift Serverless.
Step 5.2: Associating an IAM Identity Center application with an existing provisioned cluster or Serverless endpoint
If you have an existing provisioned cluster or serverless workgroup that you would like to enable for IAM Identity Center integration, then you can do that by running a SQL command. You run the following command to enable integration. It’s required that a database administrator run the query.
Example:
Below commands only need to be run if you want to make changes/drop existing Identity Provider.
To alter the IdP, use the following command:
Few of the examples are:
Note: If you update the IAM Identity Center-namespace value, then all the new cluster created afterwards will be using the updated namespace.
For existing clusters or serverless workgroups, you need to update the namespace manually on each Amazon Redshift cluster using the previous command. Also, all the database roles associated with identity provider will be updated with new namespace value.
You can disable or enable the identity provider using the following command:
Example:
You can drop an existing identity provider. The following example shows how CASCADE deletes users and roles attached to the identity provider.
Step 6: Configure Amazon Redshift role-based access
In this step, we pre-create the database roles in Amazon Redshift based on the groups that you synced in IAM Identity Center. Make sure the role name matches with the IAM Identity Center Group name.
Amazon Redshift roles simplify managing privileges required for your end-users. In this post, we create two database roles, sales and finance, and grant them access to query tables with sales and finance data, respectively. You can download this sample SQL Notebook and import into Redshift Query Editor v2 to run all cells in the notebook used in this example. Alternatively, you can copy and enter the SQL into your SQL client.
Below is the syntax to create role in Amazon Redshift:
For example:
Create the sales and finance database schema:
Creating the tables:
Below is the syntax to grant permission to the Amazon Redshift Serverless role:
Grant relevant permission to the role as per your requirement. In following example, we grant select permission to role sales on sales_schema and select permission to role finance on finance_schema.
For example:
Step 7: Create a permission set
In this step, we will be creating a permission set in the Management Account. This step is required to grant console access to Amazon Redshift Query Editor V2 application. This will allow federated users to access Redshift Query Editor V2 application.
For more information about permission set, please follow this document.
The following steps to create permission set:
- In the Management account, open the IAM Identity Center Console.
- In the navigation pane, under Multi-Account permissions, choose Permission sets.
- Choose Create permission set.

Figure 11: Create Permission Set
- Choose Custom permission set and then choose Next.
- Under AWS managed policies, choose AmazonRedshiftQueryEditorV2ReadSharing.
- Under Inline policy, add the below policy:
- Choose Next.
- Enter permission set name. For example,
Redshift-Query-Editor-V2. - Under Relay state – optional – set default relay state to the Query Editor V2 URL, using the format :
https://<region>.console.aws.amazon.com/sqlworkbench/home.
For this post, we use:https://us-east-1.console.aws.amazon.com/sqlworkbench/home. - Choose Next.
- On the Review and create screen, choose Create. The console displays the following message: The permission set Redshift-Query-Editor-V2 was successfully created.

Figure 12: Review – Permission Set


Step 8: Create account assignments
- In the Management Account, open the IAM Identity Center Console.
- In the navigation pane, under Multi-account permissions, choose AWS accounts.
- On the AWS accounts page, select AWS member account that you want to assign single sign-on access to.

Figure 13: Account Assignment
- Choose Assign users or groups.
- On the Assign users and groups to AWS-account-name, choose the groups that you want to create the permission set for. Then, choose Next.
- On the Assign permission sets to AWS-account-name, choose the permission set you created in the section – Step 7. Create a permission set. Then, choose Next.
- On the Review and submit assignments to AWS-account-name page, for Review and submit, choose Submit.

Figure 14: Review Account Assignment

Figure 15: Account Assignment Completed for Redshift Query Editor V2


Step 9: Test your AWS IAM Identity center and Amazon Redshift integration with Redshift Query Editor V2
Now you’re ready to connect Amazon Redshift Query Editor V2 with AWS IAM Identity Center authentication:
- In the Management Account, navigate to the IAM Identity Center console and copy the AWS access portal URL from the dashboard.
- Now sign out from the management account and paste the AWS access portal URL in a new browser window.
- A browser pop-up will trigger and takes you to preferred IdP login page where you enter your IdP credentials.
- After successful authentication, you’ll be logged into the AWS console as a federated user.
- Select the permission set named Amazon Redshift Query Editor V2.
- Once you federate to Query Editor V2, choose your Redshift instance (i.e., right-click) and choose Create connection.
- To authenticate using IAM Identity Center, choose the authentication method IAM Identity Center.
- It will show a pop-up and since your IdP credentials is already cached, it utilizes the same credentials and connects to Amazon Redshift Query Editor V2 using IAM Identity Center authentication.
The following demonstration shows a federated user (Ethan) from IdP used the AWS access portal URL to access Amazon Redshift using IAM Identity Center authentication. In below demonstration, we are taking Okta as the example for IdP. User Ethan accesses the sales_schema tables. If User Ethan tries to access the tables in finance_schema, then the user gets a permission denied error.

Step 10: Troubleshooting
- If you get the following error:
- If you get below error:
- If you get below error:
Please make sure that the user and group are added to the Amazon Redshift IAM Identity Center application.
- Your internet browser’s security and privacy settings, particularly those that control secure cookie settings, such as Firefox’s Total Cookie Protection feature, can result in blocked connection attempts from Query Editor V2 to your Redshift database. Please follow below steps to remediate this on your respective browser:
- For Firefox, currently 3rd party cookies are blocked by default. You will have to perform a one-click toggle on the “shield” symbol left of the address bar to disable Enhanced Tracking Protection only for the QEv2 website.

- For Chrome incognito mode, you can click on the “eye” symbol right to the address bar to allow third party cookies for Amazon Redshift Query Editor V2.Note: By default Chrome Incognito mode blocks third party cookies and if you have changed that setting to allow cookies then you may not see the “eye” symbol on the address bar. Below is the default setting of Chrome Incognito mode using which you will see the “eye” symbol on Amazon Redshift Query Editor V2.

Figure 16: Default setting of Chrome Incognito mode

- For Firefox, currently 3rd party cookies are blocked by default. You will have to perform a one-click toggle on the “shield” symbol left of the address bar to disable Enhanced Tracking Protection only for the QEv2 website.
Note: If you still see database couldn’t be listed error then:
- Delete your existing connection on Redshift Query Editor V2
- Close all Redshift Query Editor V2 sessions
- Re-open Query EditorV2 from IAM IDC console.
- Authenticate using IAM IDC option. (Make sure cookies are allowed as per above section).
Clean up
Complete the following steps to clean up your resources:
- Delete the IdP Applications which you have created to integrate with IAM Identity Center.
- Delete IAM Identity Center configuration.
- Delete the Redshift application and the Redshift provisioned cluster which you have created for testing.
- Delete the IAM role which you have created for IAM Identity Center and Redshift integration.
- Delete the Permission set from IAM Identity Center which you have created for Redshift Query Editor V2 in the management account.
Conclusion
In this post, we showed you a detailed walkthrough of how you can integrate your preferred IdP with the IAM Identity Center and Amazon Redshift Query Editor version 2 to simplify your SSO setup. This integration allows you to use role-based access control with Amazon Redshift. We encourage you to try out this integration.
To learn more about IAM Identity Center with Amazon Redshift, visit the documentation.
About the Authors
 Debu Panda is a Senior Manager, Product Management at AWS. He is an industry leader in analytics, application platform, and database technologies, and has more than 25 years of experience in the IT world.
 Maneesh Sharma is a Senior Database Engineer at AWS with more than a decade of experience designing and implementing large-scale data warehouse and analytics solutions. He collaborates with various Amazon Redshift Partners and customers to drive better integration.
 Harshida Patel is a Principal Solutions Architect, Analytics with AWS.
 Praveen Kumar Ramakrishnan is a Senior Software Engineer at AWS. He has nearly 20 years of experience spanning various domains including filesystems, storage virtualization and network security. At AWS, he focuses on enhancing the Redshift data security.
 Karthik Ramanathan is a Sr. Software Engineer with AWS Redshift and is based in San Francisco. He brings close to two decades of development experience across the networking, data storage and IoT verticals prior to Redshift. When not at work, he is also a writer and loves to be in the water.