

Data migration can be a daunting task, especially when dealing with large volumes of data. Snowflake is one of the leading cloud-based data warehouse that provides scalability, flexibility, and ease of use. It offers a range of features that make it an ideal platform for storing, managing, and analyzing large volumes of data.
In order to make the migration process less painful for you and your team, we have devised a comprehensive primer on data migration to Snowflake and how data lineage and impact analysis along with Octopai, can assist you in making the migration seamless and hopefully less of a headache.
Why Migrate to Snowflake in the first place?
Before we dive into the process of data migration, it’s essential to understand why you might want to migrate your data to Snowflake.
Here are some of the reasons why organizations are making the switch:
- Easy, straightforward implementation. Snowflake is offered as a software as a service (SaaS) which can be quickly implemented without affecting your day-to-day business operations.
- Built for the cloud. Snowflake data warehouse platform has been designed to leverage the power of modern-day cloud computing technology.
- Scalability: Snowflake’s architecture allows it to scale up or down quickly, depending on the volume of data being processed. This means you can easily accommodate growth and handle larger data sets.
- Performance: Snowflake is built to handle large volumes of data and complex queries. It can process queries in seconds or minutes, which can be critical for organizations that rely on real-time data analysis.
- Security: Snowflake is highly secure, with multiple layers of encryption and access controls. This makes it an ideal platform for organizations that handle sensitive data.
- Cost: Snowflake’s pricing model is based on usage, which means you only pay for what you use. This can be more cost-effective than traditional data warehousing solutions that require a significant upfront investment.
- Support for multiple data structures. Unlike traditional data warehouse platforms, snowflake supports both structured and semi-structured data. It allows users to combine all types of structured and unstructured data for analysis and load it into a database without demanding any transformations or conversions.
These are just a few benefits of Snowflake, and there are more, but now that we understand the benefits of Snowflake, let’s dive into the data migration process.
Data Migration to Snowflake: A Comprehensive Primer
Step 1: Assess Your Data
The first step in any data migration process is to assess the data you want to migrate. You need to understand the volume, complexity, and quality of your data to determine how to proceed with the migration. This is where data lineage and data discovery with Octopai can be helpful.
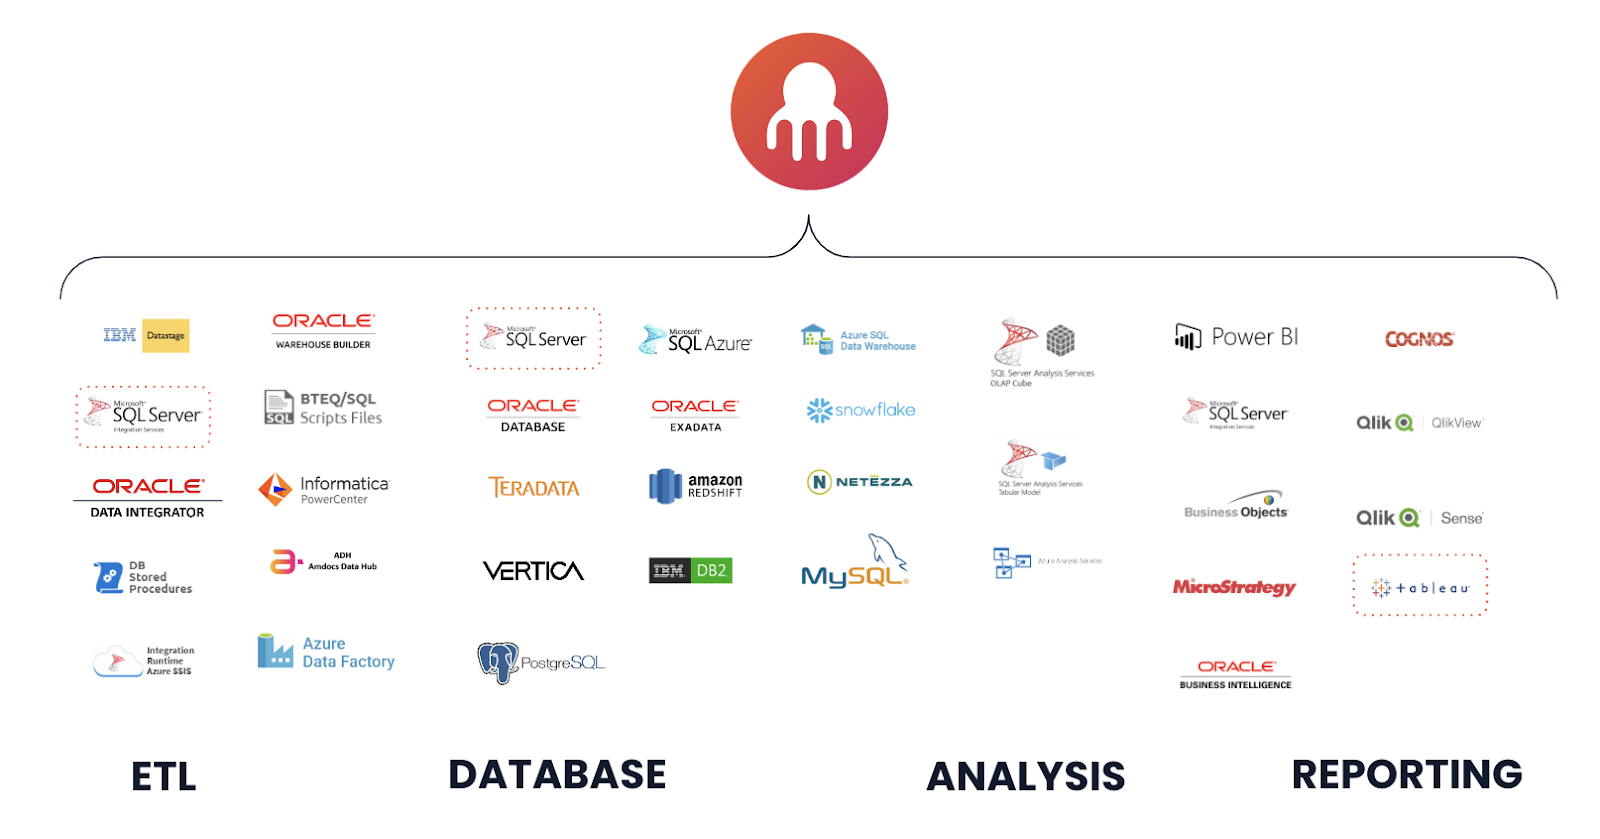
Octopai is an automated data lineage and impact analysis platform that can help you understand your data landscape.
It provides a comprehensive view of your data, including where it comes from, how it’s transformed, and where it’s stored. This can help you identify potential issues with your data that need to be addressed before migration.
Step 2: Choose Your Migration Method
Once you’ve assessed your data, you need to decide on the best migration method. There are several approaches to migrating data to Snowflake, including:
- Manual Migration: This involves exporting data from your current system and importing it into Snowflake manually. This can be time-consuming and error-prone, but it’s suitable for small data sets.
- ETL Migration: This involves using an ETL tool to extract data from your current system, transform it, and load it into Snowflake. This approach is more automated and suitable for larger data sets.
- Replication Migration: This involves replicating data from your current system to Snowflake using a replication tool. This approach is suitable for real-time data replication and can be automated.
Step 3: Prepare Your Data
This is the most important step that will affect the project quality over time. Make sure you don’t migrate mass to a new platform. You want to make sure that the new environment is efficient, trusted, and easy to use. Before migrating your data, you need to prepare it for the new platform.
This involves cleaning, transforming, and validating your data to ensure it’s compatible with Snowflake. This is where Octopai’s data mapping and insights can be powerful.
Octopai can help you identify potential issues with your data, such as data quality issues, duplication, or data inconsistencies. This can help you address these issues before migrating your data, reducing the risk of errors and data loss during the migration process.
Step 4: Migrate Your Data
During the migration, it is important to note several processes that can beneficial.
- Document changes and new assets and processes in a Catalog. This will also enable future team members to add to the project to understand the calculations and definitions of each step or data point.
- Keep a comparison between existing processes and new processes – can be done via the cross and inner system lineage.
- Transfer scripts and procedures from one format to another. With Octopai’s Live Lineage, you can simulate changes and see the errors in advance.
Once you’ve prepared your data, it’s time to migrate it to Snowflake. The migration process will depend on the method you’ve chosen, but it’s essential to ensure that the data is moved securely and without errors.
If you’re manually migrating your data, it’s crucial to ensure that you’ve exported and imported the data correctly and that the data is consistent with the original source. If you’re using an ETL tool, you need to ensure that the transformations are accurate and that the data is loaded correctly into Snowflake. If you’re using a replication tool, you need to ensure that the data is being replicated in real-time and that any changes made to the source system are reflected in Snowflake.
Step 5: Validate Your Data
Once the migration is complete, it’s essential to validate your data to ensure that everything has been moved correctly. This involves checking that the data is accurate, complete, and consistent with the original source. Octopai’s data lineage can be helpful here as it provides a clear view of how the data has been transformed and where it’s stored in Snowflake.
Step 6: Optimize Your Data
After migrating your data to Snowflake, it’s essential to optimize it for performance and cost-effectiveness. This involves tuning queries, partitioning tables, and setting up appropriate access controls.
Octopai’s impact analysis can be helpful here as it can identify areas of your data that are underutilized or over-utilized, helping you optimize your data for cost and performance.
Furthermore, it is paramount to adopt an ongoing validation methodology by making sure that before every future change, proper impact analysis is performed. This will keep the high quality of data consistent.
Conclusion
Data migration to Snowflake can be a complex process, but with the right tools like Octopai, and a methodical approach, it can be done successfully. Octopai’s data lineage and data discovery can be beneficial in assessing, preparing, and optimizing your data for the migration process. By following the steps outlined in this article, you can migrate your data to Snowflake securely, accurately, and cost-effectively.