Deploying a Streamlit WebApp to Heroku using DAGsHub
Transform your machine learning models into a web app and share them with your friends and colleagues.

Cover by author
As a beginner, it’s hard to realize how the end product of your project should look. You start with a basic machine learning pipeline, and as the project evolves, you adjust and enhance the components to meet your golden metric. But the journey doesn't stop here. To communicate your work with the world, you'd like to have a way for people to interact with the model and evaluate its performance. In this blog, we will be learning how to build a Streamlit application using only python and deploy it to a remote Heroku server. .
Example project - Pneumonia-Classification
We will use the Pneumonia-Classification project and showcase how to deploy its Streamlit app to the cloud. The project is divided into five tasks, data labeling, data processing, modeling, evaluation, and streamlit. We will be using the Chest X-Ray dataset that is available on Kaggle. The dataset contains 5,863 frontal-view check X-ray images. It is divided into three folders: train, test, val and each folder contains subfolders Pneumonia and Normal. Our dataset is under CC BY 4.0 license and can be used for commercial purposes. We will be focusing on creating a web app and deploying it to the cloud, but if you want to learn more about data preprocessing and model building, you check out the project.
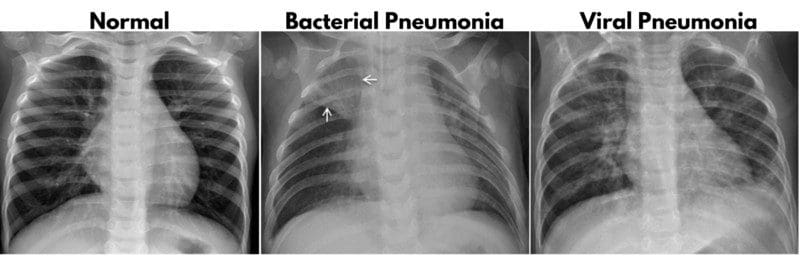
Image by Cell
What is Streamlit?
Streamlit is an open-source library that allows you to build web applications using ONLY Python. It provides customization options to design the application according to your needs without requiring any prior knowledge in web development. Using Streamlit, data science practitioners can easily communicate their work with technical colleagues or not-so-technical stakeholders by building an web application *for their model*.
How to create a Streamlit application
In this section we will focus on learning core components of Streamlit and briefly understand how other components help us create interactive Streamlit app. The core component consists of selecting or uploading images, loading Tensorflow models and running predictions to display the results.
The other component that we used in the application:
- Page setting: for header, favicon and application initial configuration.
- Markdown: for writing title, subheading, and description.
- Image: for displaying cover image.
- Expander: multi-element container that can be expanded/collapsed for Image pool.
- Columns: for creating an image pool table.
- Progress: display progress bar for running model inference.
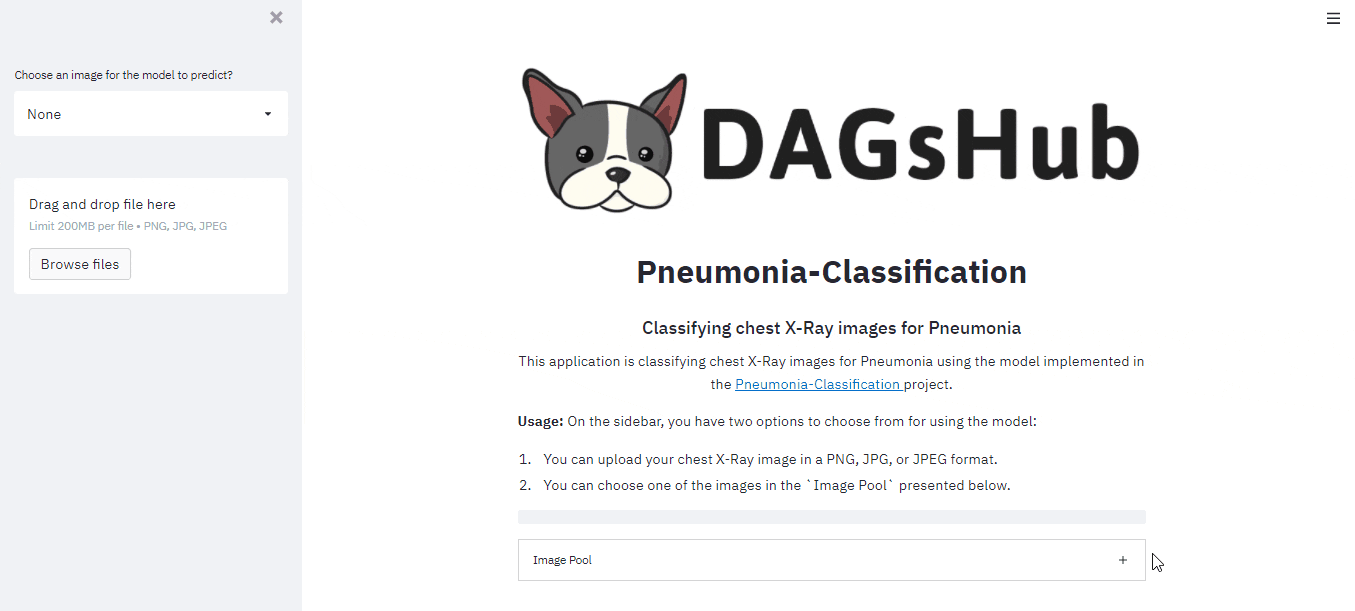
Selecting & Uploading
The streamlit sidebar function is quite handy as it allows us to add extra functionality into the app. The sidebar option adds additional interactivity of selectbox and file_uploader. The select box is a drop down option box, which allows us to select from healthy or sick xray images. The file_uploader allows us to upload the new Xray image for Pneumonia prediction.
- selectbox: drop down option for selecting single option.
- file_uploader: uploading X-ray image to application.
selectbox = st.sidebar.selectbox(SELECT_BOX_TEXT,
                       [None] + healthy_sidebar_list + sick_sidebar_list)

file_buffer = st.sidebar.file_uploader("", type=SUPPORTED_IMG_TYPE)
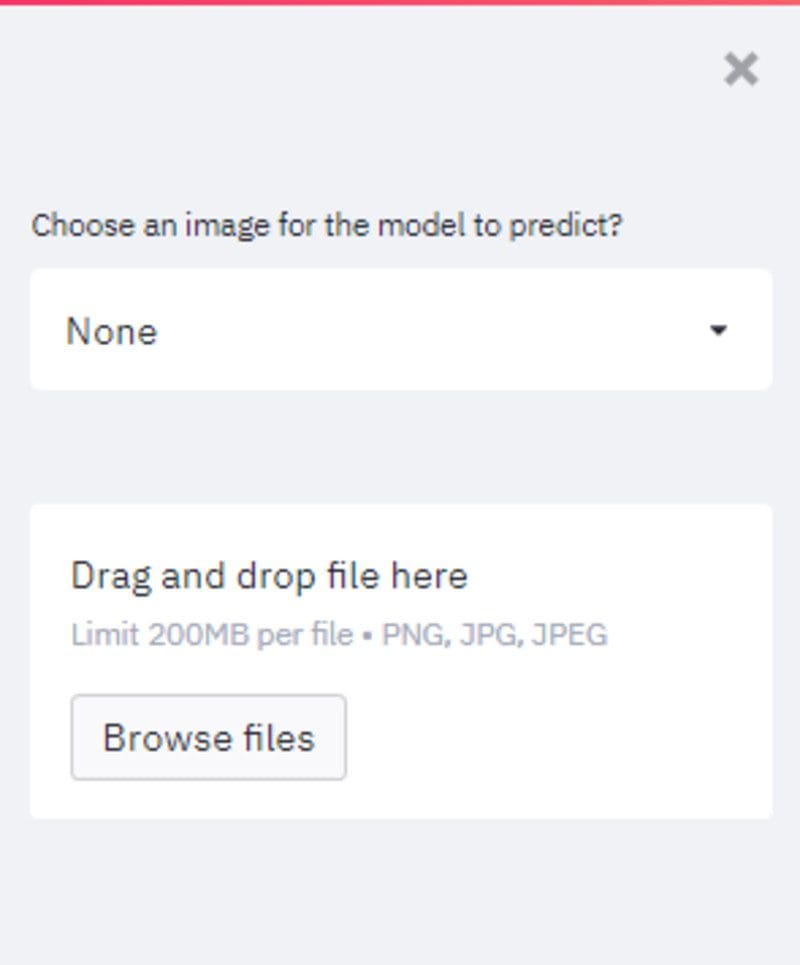
Image of sidebar with selectbox and file_uploader
Model Prediction
The model prediction uses tensorflow to load the model and predict the classification. The function below is activated if the option is selected or the image is uploaded.
if selectbox:
        predict_for_selectbox(selectbox, my_bar, latest_iteration)
        dict_of_img_lists = load_image_pool()

if file_buffer:
        predict_for_file_buffer(file_buffer, my_bar, latest_iteration)
The `get_prediction` function loads the Tensorflow model, predicts on the image (selected / uploaded) and displays the results.
@st.cache(suppress_st_warning=True)
def get_prediction(img):
    with open(CLASS_NAME_PATH, "r") as textfile:
        class_names = textfile.read().split(',')

    img_expand = np.expand_dims(img, 0)

    model = tf.keras.models.load_model(PROD_MODEL_PATH)
    predictions = model.predict(img_expand)
    display_prediction(class_names[np.rint(predictions[0][0]).astype(int)])
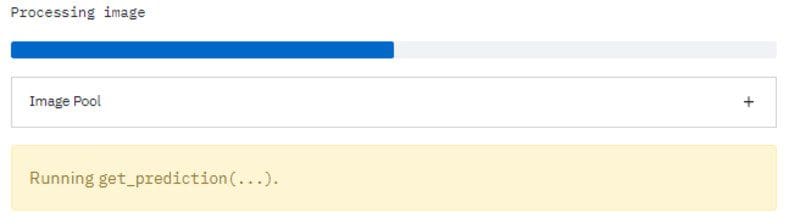
I have also used streamlit progress function to show progress bar. We have also used a streamlit success and warning function to display the prediction.
latest_iteration = st.empty()
my_bar = st.progress(0)

def display_prediction(pred):
    if pred == 'sick':
        st.warning(WARNING_MSG)
    else:
        st.success(SUCCESS_MSG)
The code below reads the option from the select box and runs the prediction on image.
def predict_for_selectbox(selectbox, my_bar, latest_iteration):
    img_class = selectbox.split()[0]
    img_position = int(selectbox.split()[-1]) - 1
    img = dict_of_img_lists[img_class][img_position]
    my_bar.progress(50)

    latest_iteration.text('Processing image')
    get_prediction(img)
    my_bar.progress(100)
Running prediction with the progress bar is at 50%
The function below reads the uploaded file and runs the prediction on image.
def predict_for_file_buffer(file_buffer, my_bar, latest_iteration):
    latest_iteration.text('Loading image')
    img = load_n_resize_image(file_buffer)
    markdown_format(MID_FONT, "Your chest X-ray")
    st.image(img, use_column_width=True)
    my_bar.progress(50)

    latest_iteration.text('Processing image')
    get_prediction(img)
    my_bar.progress(100)
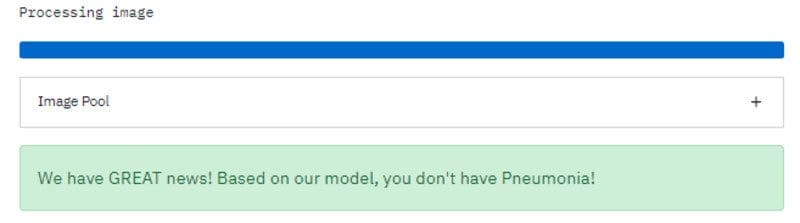
Image of successful Pneumonia prediction
What’s Next..
After creating a Streamlit application for your project and running it locally, it's time to deploy and share it with the world. For people who are not familiar with the process, deploying an application to the cloud can be very challenging. In the next section, we will cover the main issues you might face, explore the options to overcome them and choose the best one for the given task.
Choosing a deployment Server for a Streamlit application
Selecting a cloud provider to host the app can be frustrating and overwhelming due to the inflation of platforms and the unclarity of their advantages. To help you in the process, I compared three cloud services; AWS, Heroku, and Huggingface, which work well for machine learning applications designed with Streamlit.
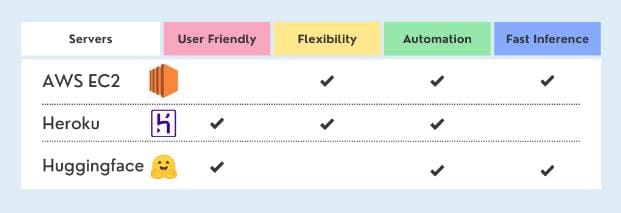
Cloud Server Comparison
AWS EC2
Amazon cloud service provides secure and resizable compute capacity. EC2 allows you to deploy the entire machine learning workflow and you can also configure it for a better machine. It is not user-friendly and the learning curve is quite steep. However, The EC2 provides faster inference by using GPU support. If you are interested in learning and deploying your Streamlit app using AWS, I suggest you read the great blog written by Nishtha Goswami.
Hugging Face
HuggingFace Spaces provides easy deployment and fast inference solutions but it has a drawback as you are restricted to using only Streamlit or Gradiao frameworks. The Spaces servers don’t provide flexibility in terms of DVC integration and developing MLOps solutions, but they do offer a paid enterprise solution called Infinity which comes with a lot of flexibility and faster inference.
Heroku
Salesforce Heroku comes with a user-friendly experience, automation, and flexibility of using multiple third-party integrations. Biases Alert: my first ever cloud experience was with Heroku and because the process was incredibly easy, I kept using their services.Heroku comes with two drawbacks; storage limitation (500MB) and slow model inference compared to other cloud services. These drawbacks can easily be resolved by using Docker deployment and adopting optimizing techniques.
How to Deploy a Streamlit Application on Heroku
Deploy the streamlit app in five steps; Project initialization, creating a web app(streamlit), setting up DVC, setting up a web app, and finally deploying it to the server. In this section, we will learn about Heroku GUI and Heroku CLI to initialize applications, setting up project for deployment and pushing the code to a cloud server.
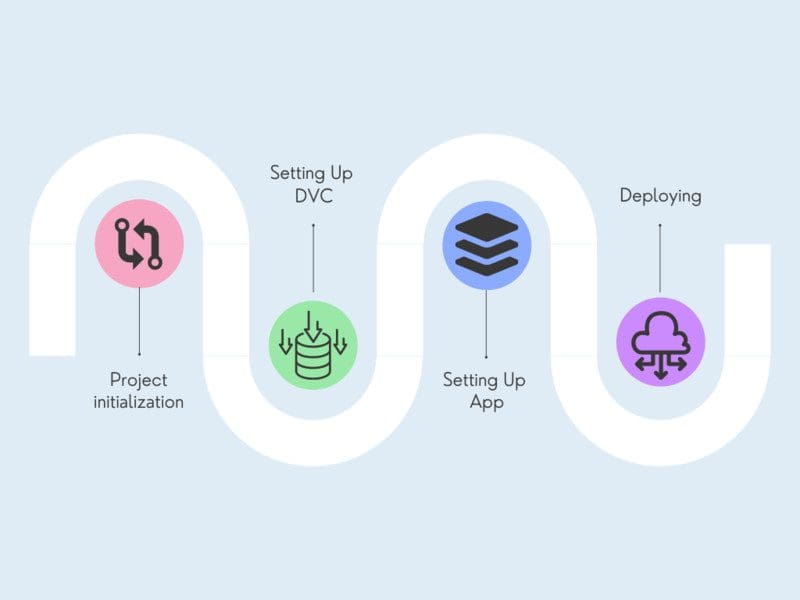
Steps involved in deploying webapp to Heroku server
Project Initialization
There are two methods of initializing the project; using Heroku website and Heroku CLI. If you are a beginner then you can use a website to perform all the tasks from creating an app to deploying the app.
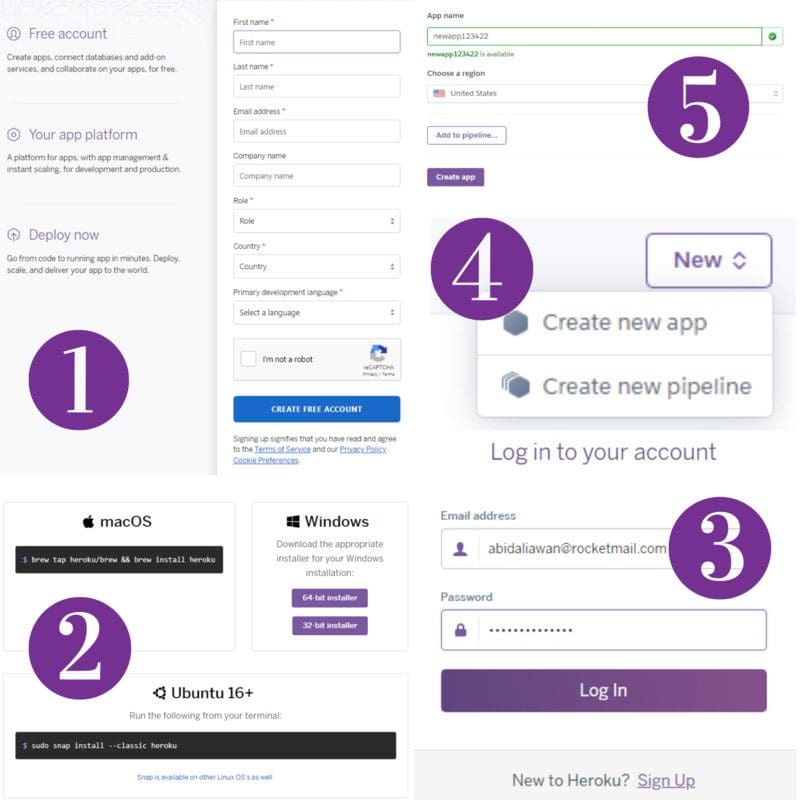
Initialize an Heroku project using GUI
- Signup for a free Heroku account.
- Download Heroku CLI and install it.
- Log in to your account.
- Go to the dashboard and create a new application.
- Type the application name and select the server’s region.
- From the command terminal type git clone https://git.heroku.com/<your-app-name>.git
Initializing Heroku app using GUI
Initialize an Heroku project using Heroku CLI
- Signup for a free Heroku account.
- From your command terminal, change directories to the project location and type: git init.
- Installing Heroku CLI: sudo snap install --classic heroku
- Login: heroku login. This will guide you to the login section in your browser.
- Creating the App: heroku create <your-app-name> .
Setting Up DVC
For data and model versioning I am using DVC and DAGsHub for remote storage. In this section, we will be automating DVC to pull data from a remote server using Heroku buildpack. Why buildpack? Why can’t we simply pull data directly? If we pull the dataset without a buildpack the webapp won't register new DVC files. In short, if you want DVC to work for you then you have to use the buildpack. It adds support for apt-based dependencies for both compile and runtime. Thanks to GuilhermeBrejeiro and his project deploy_ML_model_Heroku_FastAPI which has helped me automate DVC.
1. Install buildpack using shell: heroku buildpacks:add --index 1 heroku-community/apt or go to app settings and add buildpack as shown below.

Adding a build pack
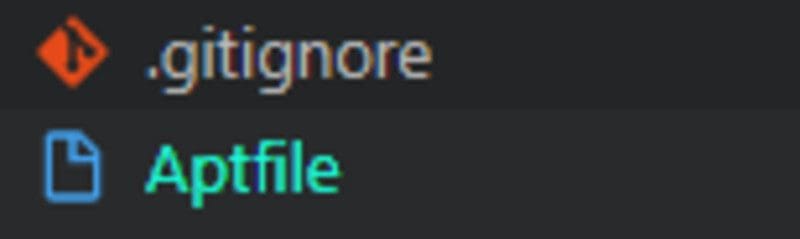
2. Create an Aptfile and add a link to DVC latest version: https://github.com/iterative/dvc/releases/download/2.8.3/dvc_2.8.3_amd64.deb. Make sure that its `.deb` file.
3. Add these lines of code in streamlit_app.py to pull 4 images and a model. This method is used to optimize storage and promote faster build. I have used dvc config to make it compatible with Heroku server environment. You can read more about configs here.
import os
if "DYNO" in os.environ and os.path.isdir(".dvc"):
    print("Running DVC")
    os.system("dvc config cache.type copy")
    os.system("dvc config core.no_scm true")
    if os.system(f"dvc pull {PROD_MODEL_PATH} {HEALTHY_IMAGE_ONE_PATH} {HEALTHY_IMAGE_TWO_PATH} {SICK_IMAGE_ONE_PATH} {SICK_IMAGE_TWO_PATH}") != 0:
        exit("dvc pull failed")
    os.system("rm -r .dvc .apt/usr/lib/dvc")
The code is checking the dyno and .dvc folder in the directory and then executing dvc configuration which will enable the Heroku server to pull dvc files. Lastly, it’s pulling only the model folder, sample images from DVC servers, and deleting unnecessary files.
Setting Up App
We need to make some changes so that Heroku can build and run apps smoothly without crashing. We will be setting up the PORT config variable, creating Profile and replacing python packages in requirement.txt. In most cases the heroku needs only requirement.txt to build an app and Procfile to run the app.
Setting Port
We can set up the PORT using Heroku CLI: heroku config:set PORT=8080 or we can go to the dashboard settings and add it manually as shown below. This part is optional but it’s preferred to set up a port number to avoid H10 error.
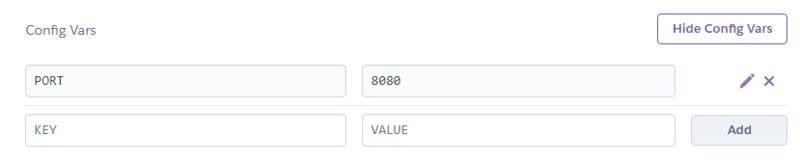
Config variables
Procfile
The Procfile contains a web initialization command: web: streamlit run --server.port $PORT streamlit_app.py. Without it the app won't run.
Requirements
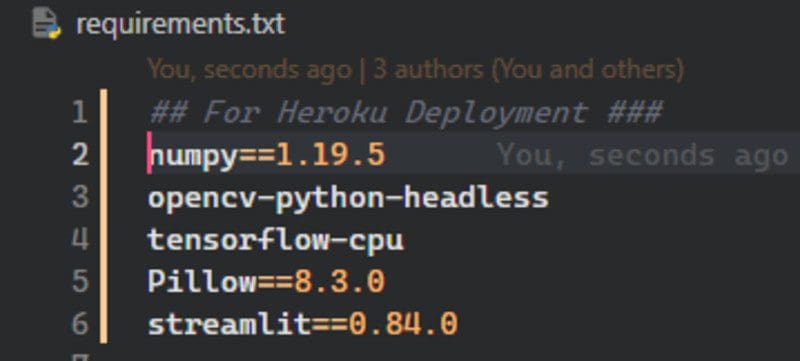
Finally, make changes in the requirements.txt file to avoid storage and dependencies issues. For example, we changed the dependencies in our project as follows:
- Replace tensorflow with tensorflow-cpu to reduce slug size from 765MB to 400MB.
- Replace opencv-python with opencv-python-headless to avoid installing extra C++ dependencies.
- Remove other packages except Numpy, Pillow, and Streamlit.
Heroku Deployment Packages
Tips
We only need a few folders and files, add other folders into the `.slugignore` file to optimize storage. The `.slugingore` file works similarly to `.gitingore` but it ignores files during build.
Deploying
Deploying is the most simple part of this guide as we need to commit all the changes and push our code to the Heroku remote server.
git add .
git commit -m "first deployment"
git push heroku master
The Streamlit Image classification web application is deployed on (dagshub-pc-app.herokuapp.com).
It will take less than five minutes to deploy your app to the Heroku server. If you are still facing issues in deployment, you can check out my DAGsHub repository for the reference.
Conclusion
In this blog we have learned how to integrate DVC and DAGsHub with Heroku servers. We have also learned various ways to optimize the storage and avoid dependency issues. Building your web app and then deploying it to the server is satisfying as you have now ability to share it with your colleagues and friends. We have built a pneumonia classification web app using DVC, streamlit, tensorflow, pillow and Heroku. If you want to reduce the slug size try using joblib to load the model and perform prediction. You can also use a docker file to deploy your web application as they are not subject to size restrictions.
Abid Ali Awan (@1abidaliawan) is a certified data scientist professional who loves building machine learning models. Currently, he is focusing on content creation and writing technical blogs on machine learning and data science technologies. Abid holds a Master's degree in Technology Management and a bachelor's degree in Telecommunication Engineering. His vision is to build an AI product using a graph neural network for students struggling with mental illness.