Introduction to Requests Library in Python
This article was published as a part of the Data Science Blogathon.
Introduction
Requests in Python is a module that can be used to send all kinds of HTTP requests. It is straightforward to use and is a human-friendly HTTP Library. Using the requests library; we do not need to manually add the query string to the URL. Throughout this article, we will learn about various features from the request library and how to make get and post requests.
Installation
First, install the pipenv in your system and then enter the below command:
$ pip install requests
Making GET Requests
HTTP GET requests are usually used to retrieve the server’s data. The content received from a request could be used to render a list of data retrieved from an API or filter a list of products based on a query string.
Syntax:
import requests
r=requests.get(url)
To create a get request, we first import the requests library and then create a response object ‘r’. We then pass the ‘URL’ to the get function. The response object ‘r’ will contain all the information received from the URL. For example,
Passing parameters in URL:
URL parameters are used to dynamically send additional information to a page.
To do so, we initially created a dictionary with key and value pairs. We then pass the dictionary to the params keyword as shown in the below example:
payload={"Name":"Harry","location":"USA"}
r=requests.get("https://httpbin.org/get", params=payload)
Making POST Requests
Requests for posts are most often used when sending data from forms or uploading files. Post requests are designed to make or update resources and allow more content to be sent in one request.
Syntax:
import requests
payload={key1:value1, key2:value2}
response=requests.post(url,data=payload)
First, we will import the request and then pass the data using Post () request method. Finally, we pass the data together with the URL. The dictionary we pass through post requests will be sent to the server.
Example:
payload={'title': "john",
  'body': "John is an engineer",
  'id': 101}
res2=requests.post('https://httpbin.org/post',data=payload)
print(res2.text)
{
"args": {},
"data": "",
"files": {},
"form": {
"body": "John is an engineer",
"id": "101",
"title": "john"
},
"headers": {
"Accept": "*/*",
"Accept-Encoding": "gzip, deflate",
"Content-Length": "42",
"Content-Type": "application/x-www-form-urlencoded",
"Host": "httpbin.org",
"User-Agent": "python-requests/2.23.0",
"X-Amzn-Trace-Id": "Root=1-62ea4ab9-0f517641690c12251f337283"
},
"json": null,
"origin": "34.75.8.147",
"url": "https://httpbin.org/post"
}
Posting a File:
You can easily upload files using requests.
import requests
files={'file':open('/content/data1.txt','rb')}
r=requests.post('https://httpbin.org/post',files=files)
The Response
Status Codes:
A status code lets us know about the status of the request. A server issues status codes in response to a client’s request made to the server. To access the status code, we use the keyword status_code as shown below:
r.status_code
HTTP Status codes
The status code in the range of 1xx indicates the response is informational. If it is in the range 2xx, it indicates the request is successful. In this range, if it is 200, it indicates OK, 201 indicates Created, 202 indicates Accepted, 203 indicates non-authoritative information, 204 indicates No Content, and so on. Similarly, 301 indicates it is Moved Permanently, 400 is for Bad Requests, 401 is unauthorized,500 is an internal server error, etc.
Binary Response Content
To access the response content in bytes (non-text), we use
print(r.content)
b'{n "args": {n "Name": "Harry", n "location": "USA"n }, n "headers": {n "Accept": "*/*", n "Accept-Encoding": "gzip, deflate", n "Host": "httpbin.org", n "User-Agent": "python-requests/2.23.0", n "X-Amzn-Trace-Id": "Root=1-62d53aa9-28ea914146efe4cb04727f3f"n }, n "origin": "34.73.170.219", n "url": "https://httpbin.org/get?Name=Harry&location=USA"n}n'
To view the response in the form of a String or text, we use
print(r.text)
{n "args": {n "Name": "Harry", n "location": "USA"n }, n "headers": {n "Accept": "*/*", n "Accept-Encoding": "gzip, deflate", n "Host": "httpbin.org", n "User-Agent": "python-requests/2.23.0", n "X-Amzn-Trace-Id": "Root=1-62d53aa9-28ea914146efe4cb04727f3f"n }, n "origin": "34.73.170.219", n "url": "https://httpbin.org/get?Name=Harry&location=USA"n}n
JSON (JavaScript Object Notation):
The requests library has a built-in JSON decoder to work with JSON content when it is sent in response from the server. The JSON decoder allows us to parse the JSON response into Python objects. Data in JSON format is stored in name and value pairs separated by commas. The use of curly braces denotes objects, and square brackets define arrays.
Example:
import requests
r=requests.get('https://api.coinbase.com/v2/currencies')
data=r.json()
print(data)
To print the first element, we use
print(data['data'][0])
{‘id’: ‘AED’, ‘min_size’: ‘0.01000000’, ‘name’: ‘United Arab Emirates Dirham’}
HTTP Headers
When a request is made to the server, the response object contains headers that pass additional information within the request. One common header is the content-type header, which indicates the resource’s media type. Let us look at the headers from the response object created in the previous example (JSON).
If we want to look further at the content type, we use the below code. Please note that you can also mention content type without capitalizing the first letters.
print(r.headers['Content-Type'])
application/json; charset=utf-8
We have observed that the media type for content-type was “application/JSON”. A few other common media types include “text/plain”, “text/javascript”, and “multipart/form-data”. When we call the headers function, it returns a dictionary of all the headers from the response object.
We can also create a custom header for the post request, as shown below:
headers={'content-type':'text/javascript'}
r=requests.post('https://httpbin.org/post',headers=headers)
print(r.request.headers)
{'User-Agent': 'python-requests/2.23.0', 'Accept-Encoding': 'gzip, deflate', 'Accept': '*/*', 'Connection': 'keep-alive', 'content-type': 'text/javascript', 'Content-Length': '0'}
HTTP Cookies
The requests library allows us to create and read HTTP cookies from the server. A cookie is a small piece of data that a server sends to the user’s web browser.
cookies={'Status':'Active'}
r=requests.get('https://httpbin.org/cookies',cookies=cookies)
print(r.text)
{
"cookies": {
"Status": "Active"
}
}
RequestsCookieJar is a special form of dictionary that allows us to customize where we send our cookies. Cookies are returned in the RequestsCookiesJar. Let us look at an example:
jar=requests.cookies.RequestsCookieJar()
jar.set('location','India',domain='httpbin.org',path='/cookies')
jar.set('Name','Harry',domain='httpbin.org',path='/profile')
r=requests.get('https://httpbin.org/cookies',cookies=jar)
print(r.text)
{
"cookies": {
"location": "India"
}
}
In this example, when we print r.text, we get only one cookie because we request the path ‘/cookies’. This is the way we can set cookies on multiple domains or paths.
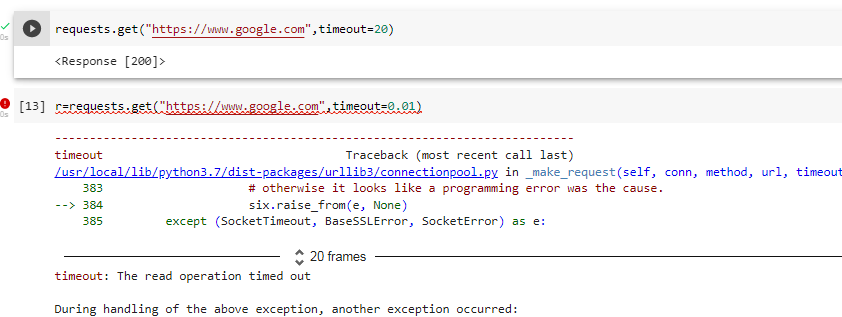
Error Handling
Sometimes the requests might go unsuccessful. We can look at the status_code to determine whether the response is successful. Another exception that is commonly raised is a Timeout exception which is why it is a good practice to define a timeout value for each request made as it prevents the program from hanging due to a non-responsive server.
The function response.raise_for_status() raises an HTTPError if an unsuccessful HTTP status code is returned.
For example,
HTTP Sessions
Sessions are used to store data for individual users.
We create a session object which can be used to set the cookies on the server. As long as this session object is alive, the cookies will persist the data across multiple requests.
Example:
import requests
#creating a session object
s=requests.Session()
cookis={'location':'India'}
r=s.get('https://httpbin.org/cookies/set',params=cookis)
#getting all the cookies
r=s.get('https://httpbin.org/cookies')
print(r.text)
{
"cookies": {
"location": "India"
}
}
Conclusion
This article is a complete guide to the requests library in Python. We have learned how to make basic requests to the servers by using different HTTP methods such as GET and POST. We have also learned how to customize headers and pass different cookies. Finally, we learned about using requests with Sessions. In short,
- The requests library makes it extremely easy for humans to work with HTTP requests.
- The GET request is used to get the content from the server.
- The POST request is used to submit/update content to the server.
- HEADERS are used to pass additional information along with the request.
- The timeout parameter can tell the requests to wait for a particular number of seconds.
I hope this will be helpful for you to build awesome applications. To learn more advanced concepts, please refer to the documentation https://requests.readthedocs.io.
The media shown in this article is not owned by Analytics Vidhya and is used at the Author’s discretion.


