Understanding the Basics of Docker Container Networking’s Basic
This article was published as a part of the Data Science Blogathon.
Introduction on Docker Containers Networking
The concept of DevOps culture in an IT-driven organization seeks to bring synergy between the development part of the application and operations. Docker is one of the critical tools being used by the DevOps community for providing complete isolation to the application environment, and Docker containers Networking enables the user to let Docker Containers in the application communicate with each other. This article explores some basic concepts related to Docker Networking through the Command Line Docker commands.
Why Docker Containers Networking is Essential?
Docker is one of the frequent terminology alerts in software development and it is an integral aspect of DevOps. A Docker Container encloses the application software into a virtual container along with all dependencies for the application to run like application code, system tools, libraries, etc. A Docker image is a template for building a Docker Container and we can build multiple Docker Containers from a single image.

One of the problems faced during the development cycle of a software application is when the application which is running fine on the developer’s system, faces hurdles when ported to, say, a production server. This creates protracted discussions between developers and the deployment team related to what OS version were you using during development or what version of dependencies were you using etc. Here is where Docker comes in as a solution to the DevOps team to wrap your application and dependencies and ship to wherever you want. I had written an article on the Analytics Vidhya platform about designing a simple data pipeline to ingest data from a website into a PostgreSQL database. Instead of installing the PostgreSQL database, one of the easier solutions I adopted was to use a Docker Container with a PostgreSQL image. The installation of a PostgreSQL database varies from OS to OS and it would have been cumbersome. But with Docker, the application got going without much problem.
The subject of Docker is quite intensive and I will focus on exploring one particular aspect, viz, Docker networking. Rather than dealing with plain theory, it is intended to explore this aspect of Docker Containers by playing around with Docker CLI. As a pre-requisite, the readers need to install Docker-Desktop on their machines. The relevant link is provided in the references below.
Exploring Docker Basic Commands
If we have Docker Desktop installed on our system, we are good to go! Let’s open the Terminal and write some introductory Docker commands. We can confirm the installation of Docker with the following command,
docker --version

Let’s now spin up a Docker Container with an Ubuntu image from the Docker Repository (https://hub.docker.com).
docker run ubuntu

If we run the docker ps command to check if the Docker Container is running, it returns a nil result.
docker ps

This is because the Docker Container is running till the time the processes inside the Docker Container are alive. The Docker Container exited the terminal as no process is being executed inside the Docker Container. This can be confirmed by the docker ps -a command.
docker ps -a

Now let’s run a Docker Container with a ubuntu image and provide a bash command to the Docker Container to run,
docker run ubuntu sleep 20
Now the Docker Container stops after executing the sleep 20 command which puts the DC into sleep mode for 20 seconds. Now let’s run the Ubuntu Container with sleep 200 and now the Docker Container is alive for 200 seconds. This can be confirmed by running the docker ps command in another terminal on our system.
docker ps

We can run a bash command on the live Docker Container in the following manner,
docker exec bash_cmd
docker exec 356 cat /etc/hosts/

Docker Container Networking
Now that we have seen basic Docker commands, let’s explore our main topic of interest, viz, docker networking. Run the following command,
docker network ls

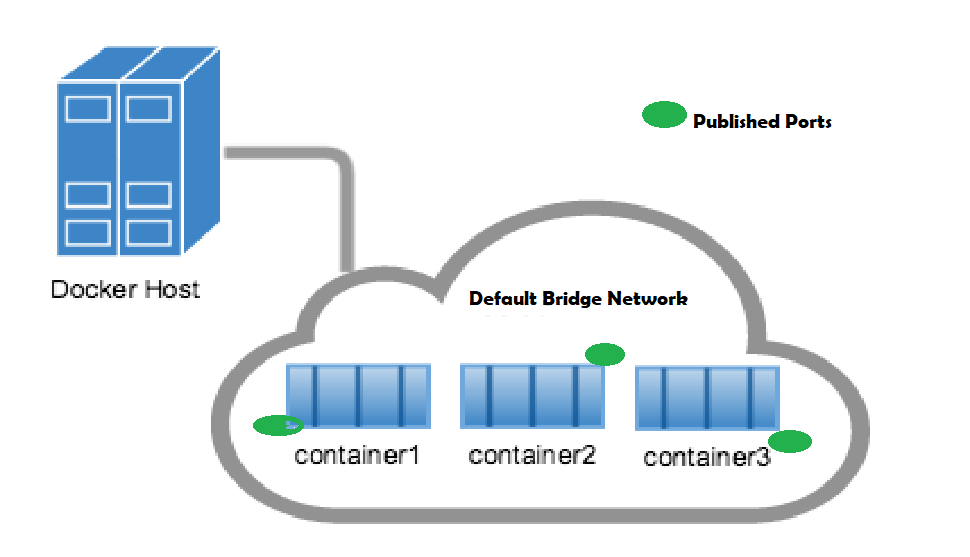
It is seen that 3 types of Networks are created by default by the Docker Engine when a Docker Container is spun up. These are Bridge, Host, and None. The Bridge Network is the default Network to which the Container gets attached when it is run. We can use the –network flag in the docker run command to attach the Container to a particular Network.
Remove all stopped Container using docker rm command. Now run a Ubuntu Container again with the following command (we will use the -d flag to run the Container in detached mode ),
docker stop 356
docker rm 356

docker run -d ubuntu sleep 2000

Run docker ps to check the status of the Container,

docker ps

We can run the following command to check the configuration of the Container,
docker inspect
docker inspect fcd
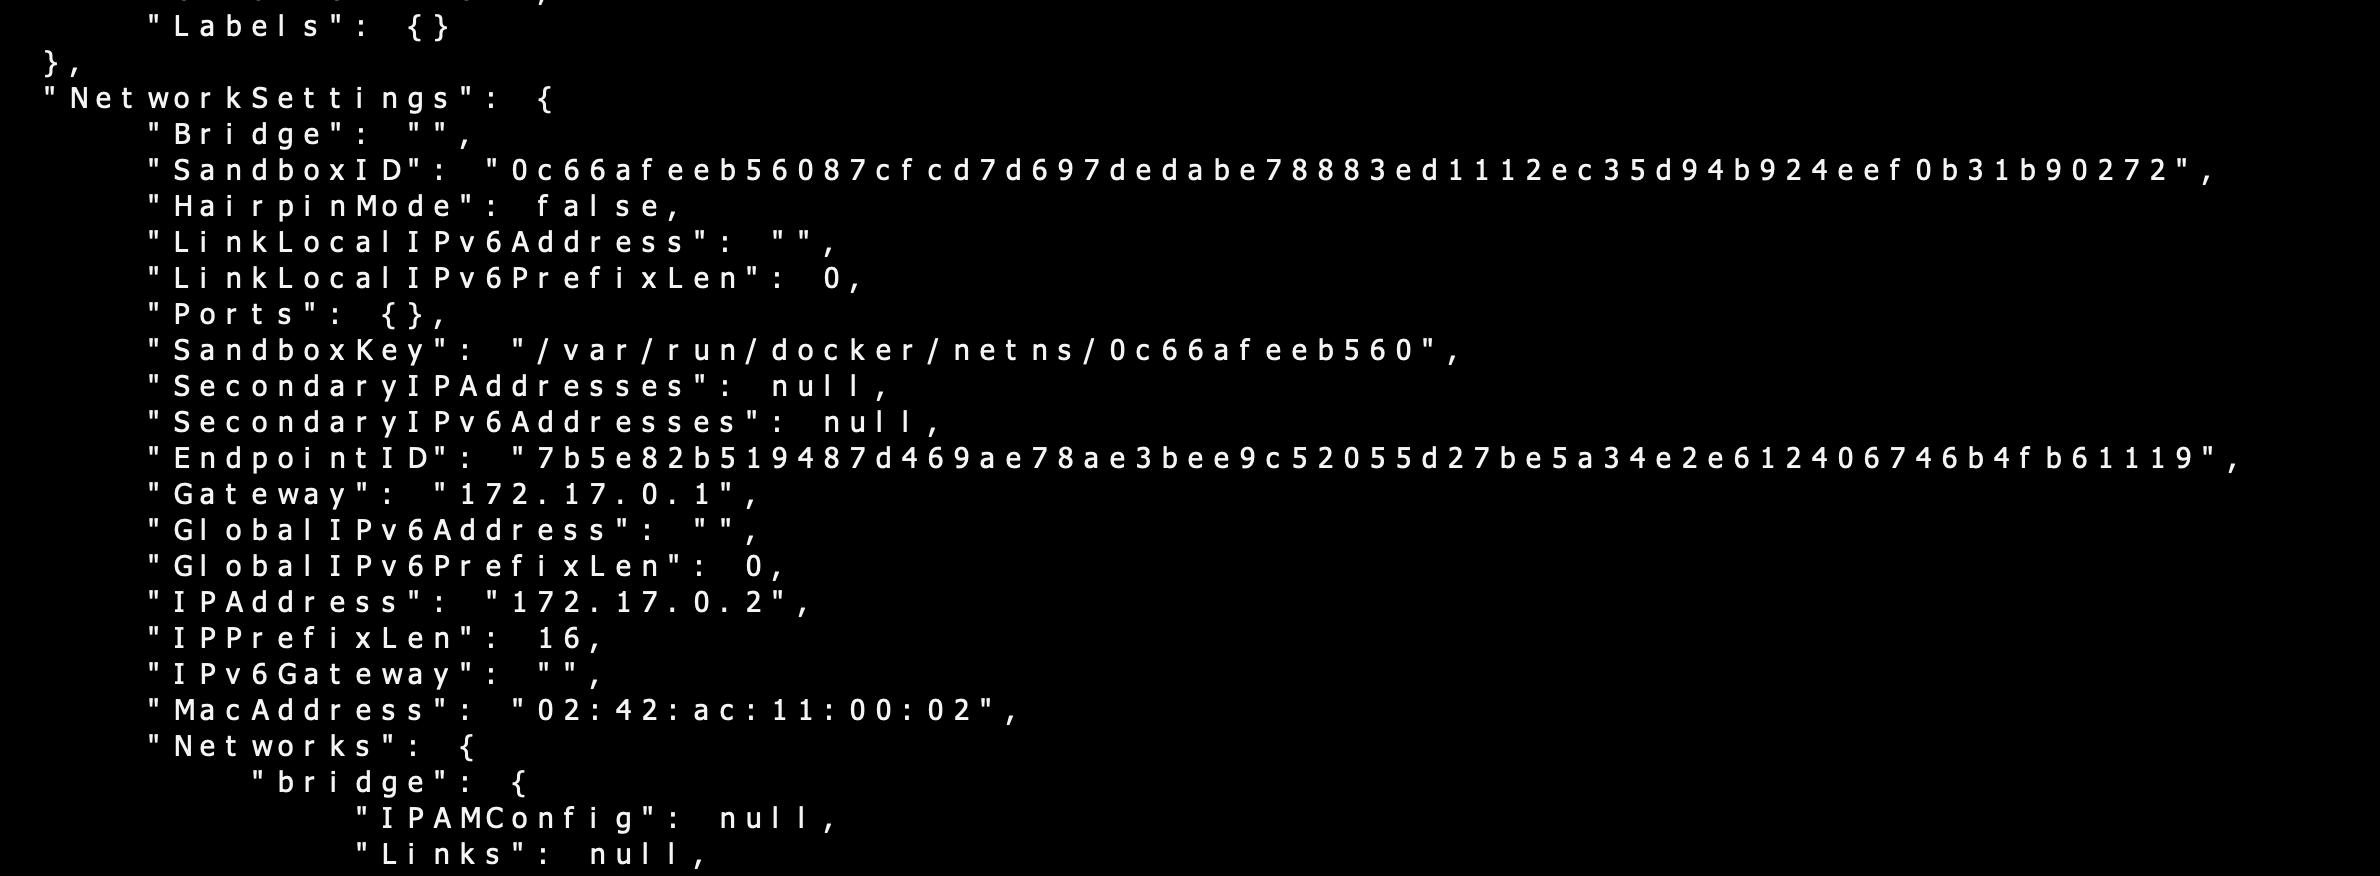
docker inspect fcd | grep IPAddress

The docker inspect command throws up a lot of information and one of interest to us under Network settings. It is seen that the Docker Container is attached to the Bridge Network in default mode. The IP address of the Container can also be fetched using a grep command piped with docker inspect. Note that I have used only the first three letters of Container id for Docker inspect command, which works perfectly well.
As seen from the screenshot, the Bridge Network assigns an IP Address in the range of 172.17.x.x. to the Containers within the network. The network type Host removes any network isolation between the host and the Container. Finally, None type of Network keeps the Container in complete isolation; they are not connected to any Network or Container. The docker engine has an inbuilt DNS running on 127.0.0.1 which facilitates the Containers communicating with each other using the Container names.
It is noted that to access the Docker Container from outside the host, we need to map the port on the DC to a port on the host.
Communication Between Two Containers
Now that we have a basic understanding of Docker Networking, let’s move ahead and create a scenario where two Containers are communicating with each other with a simple use case. We will have two Containers running on the local host. One Container will run a python application to create a REST API using the Flask- Restful library. We will run another utility Container and connect to this first Container on the IP Address and the port.
Creating a REST API with Python
An API(Application Programming Interface) is a software intermediary that helps two applications to talk to each other. REST stands for Representational State Transfer and includes rules for a web application to send and receive data. Flask is an easy-to-use popular Python micro framework for building web applications. In the beginning, create a project folder. Then go ahead and activate the Python virtual environment. The virtual environment gives us an isolated project environment where we will keep only the requisite dependencies ( we don’t want a whole bunch of reference books, but only selected ones required for our project !). There are multiple ways to create a virtual environment, and for the readers who are not familiar with the virtual environment, I would suggest looking at resources available on the internet (my other articles in the Analytics Vidhya also have a good reference to the virtual environment). I have used conda to create a virtual environment called av_blog.
conda create -n av_blog anacondasource activate av_blog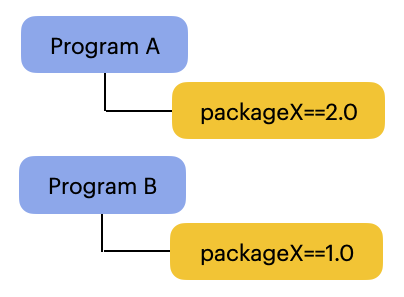
Once the virtual environment is ready, use pip install to install the following dependencies,
pip3 install flask flask-restful Now we can head over to an editor of our choice to write our Python script. I have used vscode, but you can use alternatives like Pycharm, etc. We create our application named app.py in the project folder. We will use Flask Restful, an extension of Flask for building pour REST API and it is quite easy to write the code if you are a little familiar with Flask. The documentation for the library (link given in reference ) is excellent and I have based my code on the example given in the documentation. The script, app.py is as follows,
# using flask_restful

from flask import Flask

from flask_restful import Resource, Api


# creating the flask app

app = Flask(__name__)

# creating an API object

api = Api(app)
# making a class for a particular resource

class connect_container(Resource):

# corresponds to the GET request.

# this function is called whenever there

# is a GET request for this resource

def get(self):

return {'MESSAGE': 'YOU ARE CONNECTED TO REST API RUNNING ON CONTAINER1 '}

# adding the defined resources along with their corresponding urls

api.add_resource(connect_container, '/')

# driver function

if __name__ == "__main__":

app.run(host ='0.0.0.0',port=8000, debug = True)
In the above script, the main building block is the Resource (a class that inherits from the Resource class of flask_restful ) and each Resource we create can have several methods like GET, POST, PUT, DELETE, etc. I have used only a GET request in the script and the Resource returns a message whenever another application sends a request to it. Then we add the Resource to the api and also the URL path to connect to that Resource. We are binding the API to our local host at 0.0.0.0 and the flask app will run at port 8000. We can head over to the terminal and run the script,
python3 app.py
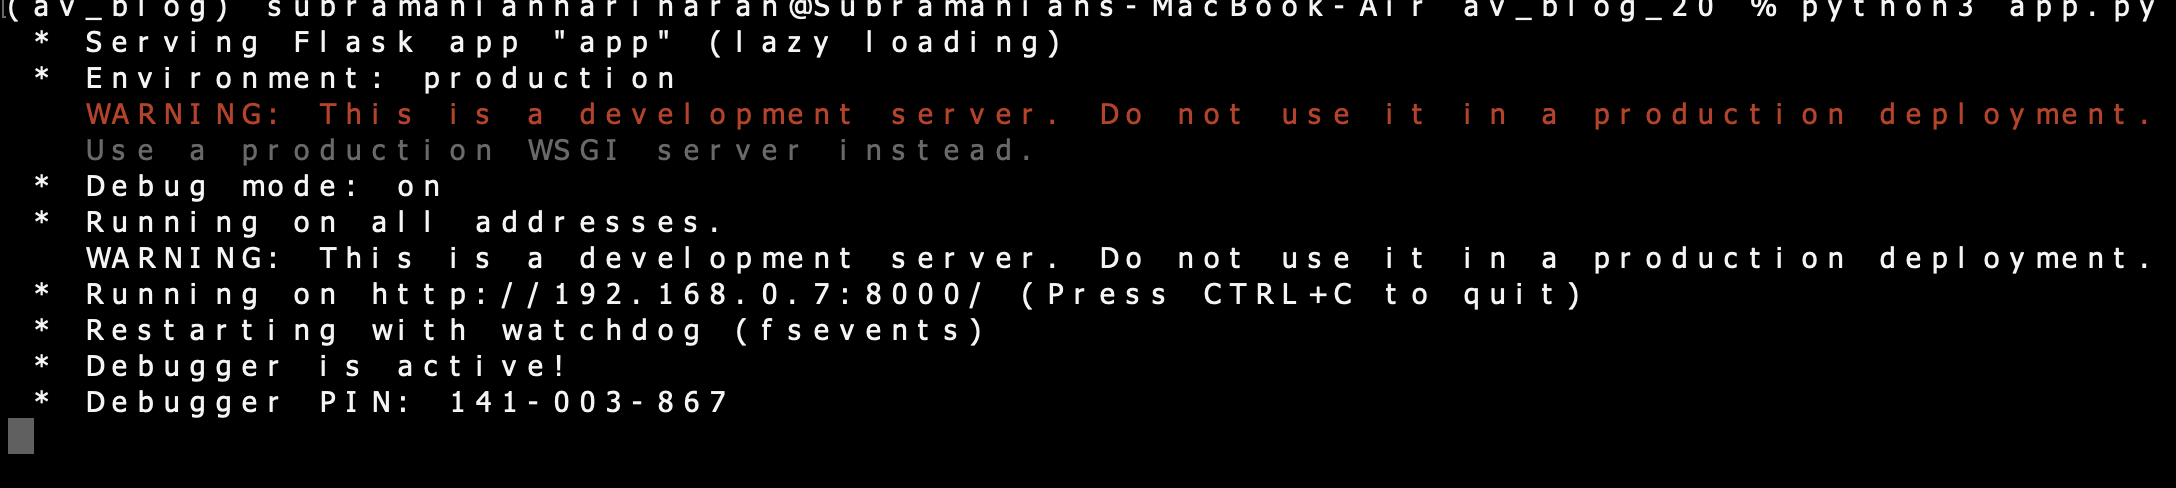
We can see that our application is running on the localhost. Open another terminal and use the following command to connect to the API.
curl http://192.168.0.7:8000/

The message received says we have successfully connected to the API. Exit the application in the terminal. It is time to package our application in a Docker Container using a Dockerfile. A Dockerfile is used to create a custom image and in our case, we need to develop an image to package our app.py with its dependencies. The Dockerfile is as follows,
FROM python:3.10

RUN pip3 install flask flask-restful

COPY . .

CMD [ "python3", "app.py"]
We are using the base image python:3.10 to build our custom image and have used pip3 to install dependencies. The COPY command uses source-destination format to copy our application to the container. Finally, the CMD command will run the python script. To create our image, we need to build it from Dockerfile and we will tag our image with a name container and tag v1.
docker build . -t container1:v1
Confirm the image build with the docker images command,
docker images

We can run the Docker Container from our build image,
docker run -d --name container1 -p 8000:8000 container1:v1
We are running the container in detached mode using the -d flag and the name of our container is container1. We can see the container running using the docker ps command,
docker ps

We can check the IP Address of our container using the docker inspect command,
docker inspect 089

The IP Address of the Container is 172.17.0.2 (default Bridge Network). The docker inspect command will also reveal that the Container is running on the default Bridge Network. Let’s spin up another simple utility Container and try and communicate with container1.
docker run -it busybox sh
This opens the bash prompt on the terminal as we are running the Container in an interactive model. We will use a bash command to connect with Container 1 using the IP Address and port 8000.
wget -q -O - 172.17.0.2:8000

As both Containers are hooked on to the default Bridge Network, we can communicate with container1 from the second Container. We will reconfigure the above exercise by connecting the Containers to a user-defined network and then reaching the Container1 from the second Container. Remove old container and image and create a Custom Docker Network user_network using the following command,
docker stop 089
docker rm 089
docker system prune -a
docker network create user_network
Now the docker network ls will reveal the list of docker networks,

We see that our Custom Network has been created. Now we run the earlier Containers (please remember to stop and remove old Containers) again and connect to user_network.
docker build. -t container1:v1
docker run -d --name container1 -p 8000:8000 --net user_network container1:v1

We can run the busy box container in the user_network and connect to container1 with the wget command,
docker run -it --net user_network busybox sh
wget -q -O - 172.18.0.2:8000

Again, we are successfully able to connect to container1 from the second Container (Container with busybox image ) as both of them are connected to the same Network. The Network the Container is connected to can be confirmed using the docker inspect command and by looking at the Container Network configuration.
It is interesting to note that as a slightly advanced concept, we talk about Docker-Compose, which is used for running multiple Containers as a single service. Docker-Compose files are written in a scripting language called YAML, which stands for Yet Another Markup Language. Another great thing about docker-compose is that all the Containers in the service can be activated using a single docker-compose up command. It is noted that by default Docker-Compose sets up a single Network for the service and each Container joins the default Network and can communicate with other Containers on that Network.
Conclusion on Docker Containers Networking
In our application, we can have more than one Docker Container, and the Docker Networking enables the communication between the Docker Containers. The Docker Containers can be connected to the default Bridge Network for communication, and the Docker also provides us with the facility to create a custom network. We can use the Docker-Compose YAML files as an efficient methodology to package multiple services and by design, the Docker Containers inside the Docker-Compose file can communicate with each other.
The key learnings from Docker Containers Networking can be summarized as:-
- The Docker Containers Networking creates a default Bridge Network and the containers are connected to this Network.
- For two Containers to communicate with each other, they have to be on the same Network.
- We can define a user-defined Network and connect the Docker Containers to this Network.
- Packaging multiple services using a docker-compose file enables the Docker Containers inside to communicate with each other.
The media shown in this article is not owned by Analytics Vidhya and is used at the Author’s discretion.


