Make Amazing Data Science Projects using PyScript.js
This article was published as a part of the Data Science Blogathon.
Introduction on PyScript.js

Source – https://betterdatascience.com/pyscript-intro/
What is PyScript.js?
It is a front-end framework that enables the use of Python in the browser. It is developed using Emscripten, Pyodide, WASM, and other modern web technologies.
Using Python in the browser does not mean that it can replace Javascript. But it provides more convenience and flexibility to the Python Developers, especially Machine Learning Engineers.
What PyScript Offers?
1. Programs can communicate between Python and Javascript Objects.
2. It does not require any servers or dedicated hardware for hosting.
3. We can include any required files or packages in the python environment.
4. It supports the use of popular python libraries like Numpy and Pandas.
5. It provides flexibility to the developers. Now they can quickly build their python programs with the existing UI components such as buttons and containers.
This tutorial shows you how we can create our machine learning model with a web GUI using PyScript.
We will use the famous Car Evaluation Dataset to predict the car’s condition based on the six categorical features. We will discuss the dataset later but first, start with setting up the pysscript.js library.
Setting Up PyScript.js
This section will set up our HTML Template and include the pyscript.js library.
We will use VSCode here, but you can choose any IDE.
1. Create a directory named as PyscriptTut.
$ mkdir PyscriptTut
$ cd PyscriptTut
2. Creating an HTML Template
Create an HTML template inside it named index.html
Inside this template, place the starter HTML code
<!doctype html>

<html lang="en">

<head>

<!-- Required meta tags -->

<meta charset="utf-8">

<meta name="viewport" content="width=device-width, initial-scale=1, shrink-to-fit=no">
<!-- Bootstrap CSS -->

<link rel="stylesheet" href="https://cdn.jsdelivr.net/npm/[email protected]/dist/css/bootstrap.min.css" integrity="sha384-ggOyR0iXCbMQv3Xipma34MD+dH/1fQ784/j6cY/iJTQUOhcWr7x9JvoRxT2MZw1T" crossorigin="anonymous">


<title>Pyscript Tutuorial</title>

</head>

<body>
<!-- Optional JavaScript -->

<!-- jQuery first, then Popper.js, then Bootstrap JS -->

<script src="https://code.jquery.com/jquery-3.3.1.slim.min.js" integrity="sha384-q8i/X+965DzO0rT7abK41JStQIAqVgRVzpbzo5smXKp4YfRvH+8abtTE1Pi6jizo" crossorigin="anonymous"></script>

<script src="https://cdn.jsdelivr.net/npm/[email protected]/dist/umd/popper.min.js" integrity="sha384-UO2eT0CpHqdSJQ6hJty5KVphtPhzWj9WO1clHTMGa3JDZwrnQq4sF86dIHNDz0W1" crossorigin="anonymous"></script>

<script src="https://cdn.jsdelivr.net/npm/[email protected]/dist/js/bootstrap.min.js" integrity="sha384-JjSmVgyd0p3pXB1rRibZUAYoIIy6OrQ6VrjIEaFf/nJGzIxFDsf4x0xIM+B07jRM" crossorigin="anonymous"></script>

</body>

</html>
Bootstrap CDN is used for Styling the Web Page
PyScript Installation
We will not install the library on our machine, we will directly import the library from the PyScript website.
Add the below code in the <head> section of your HTML template.
<!-- Pyscript Library -->

<link rel="stylesheet" href="https://pyscript.net/alpha/pyscript.css" />

<script defer src="https://pyscript.net/alpha/pyscript.js"></script>
Important Note:
You have to use a Local Server to run the HTML Code. Otherwise, you may face issues in importing several libraries in a python environment.
If you try to open the webpage by double-clicking the index.html file (like this file:///home/../…/JavaScript/src/index.js), you may get an error of CORS Policy while importing the libraries, as the ES6 modules are subject to the same-origin policy.
If you are using VSCode, then you can use its Live Server Extension.
Or you can also create a python server writing the below command in the terminal
$ python3 -m http.server
You can access your HTML Page on that URL – http://127.0.0.1:8080/index.html
Sample Code
You can try this sample code to check whether PyScript is successfully imported or not.
<!doctype html>
<html lang="en">
  <head>
    <!-- Required meta tags -->
    <meta charset="utf-8">
    <meta name="viewport" content="width=device-width, initial-scale=1, shrink-to-fit=no">

    <!-- Pyscript Library -->
    <link rel="stylesheet" href="https://pyscript.net/alpha/pyscript.css" />
    <script defer src="https://pyscript.net/alpha/pyscript.js"></script>

    <!-- Bootstrap CSS -->
    <link rel="stylesheet" href="https://cdn.jsdelivr.net/npm/[email protected]/dist/css/bootstrap.min.css" integrity="sha384-ggOyR0iXCbMQv3Xipma34MD+dH/1fQ784/j6cY/iJTQUOhcWr7x9JvoRxT2MZw1T" crossorigin="anonymous">

    <title>Pyscript Tutuorial</title>
  </head>
  <body>

    <py-script>
        print("Welcome to puscript tutorial")
        for i in range(1, 10):
            print(i)
    </py-script>

    <!-- Optional JavaScript -->
    <!-- jQuery first, then Popper.js, then Bootstrap JS -->
    <script src="https://code.jquery.com/jquery-3.3.1.slim.min.js" integrity="sha384-q8i/X+965DzO0rT7abK41JStQIAqVgRVzpbzo5smXKp4YfRvH+8abtTE1Pi6jizo" crossorigin="anonymous"></script>
    <script src="https://cdn.jsdelivr.net/npm/[email protected]/dist/umd/popper.min.js" integrity="sha384-UO2eT0CpHqdSJQ6hJty5KVphtPhzWj9WO1clHTMGa3JDZwrnQq4sF86dIHNDz0W1" crossorigin="anonymous"></script>
    <script src="https://cdn.jsdelivr.net/npm/[email protected]/dist/js/bootstrap.min.js" integrity="sha384-JjSmVgyd0p3pXB1rRibZUAYoIIy6OrQ6VrjIEaFf/nJGzIxFDsf4x0xIM+B07jRM" crossorigin="anonymous"></script>
  </body>
</html>
This is a simple program that prints the number from 1 to 9 using a for-loop.
If everything goes fine, the output looks like that
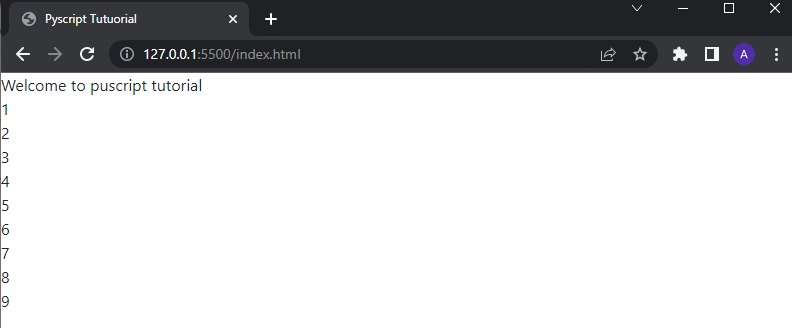
Hurray 🎉, our PyScript library is installed successfully in our template.
Creating GUI
This section will create a web GUI to use our machine learning model for training and testing.
As mentioned above, we will use Bootstrap Library for creating custom styling. I have also used inline CSS in some places.
1. Add Google Fonts CDN
Add the below code in the <head> section of your HTML template. This will add Montserrat font to our web page.
<!-- Google Fonts CDN -->
<link rel="preconnect" href="https://fonts.googleapis.com">
<link rel="preconnect" href="https://fonts.gstatic.com" crossorigin>
<link href="https://fonts.googleapis.com/css2?family=Montserrat&display=swap" rel="stylesheet">
2. Some CSS Configuration
Add the below code to your template. It will enable smooth scrolling on our web page and apply the above font.
<style>
    * {
        margin: 0;
        padding: 0;
    }
    html {
        scroll-behavior: smooth;
    }
    body {
        font-family: 'Montserrat', sans-serif;
    }
</style>
3. Adding Bootstrap Navbar Component
Add this code in the <body> section to apply a navbar.
<!-- Navbar -->

<nav class="navbar navbar-expand-lg navbar-dark bg-primary">

<a class="navbar-brand" href="#">PyScript Tutorial</a>

<button class="navbar-toggler" type="button" data-toggle="collapse" data-target="#navbarSupportedContent"

aria-controls="navbarSupportedContent" aria-expanded="false" aria-label="Toggle navigation">

<span class="navbar-toggler-icon"></span>

</button>

<div class="collapse navbar-collapse" id="navbarSupportedContent">

<ul class="navbar-nav mr-auto">

<li class="nav-item active">

<a class="nav-link" href="/">Home <span class="sr-only">(current)</span></a>

</li>

<li class="nav-item active">

<a class="nav-link" href="#trainModel">Train Model <span class="sr-only">(current)</span></a>

</li>

<li class="nav-item active">

<a class="nav-link" href="#testModel">Test Model <span class="sr-only">(current)</span></a>

</li>

</ul>

</div>

</nav>
4. Adding Heading Content
We will create a small landing page with some texts and images.
<!-- Heading Content -->
<div style="width: 75%; margin: 20px auto; box-shadow: 0 2px 4px 0 rgba(0, 0, 0, 0.2), 0 6px 6px 0 rgba(0, 0, 0, 0.12); border-radius: 4px; text-align: center; padding: 10px;">
   <h1>Car Evaluation Dataset</h1>
   <p>A choice to buy or not buy an automobile based on its physical qualifications.</p>
   <img src="images/homeImg.png" style="margin: 20px auto; width: 90%; height: 450px;" class = "img-fluid" alt="">
</div>

The Source of the image used in this component can be found here.
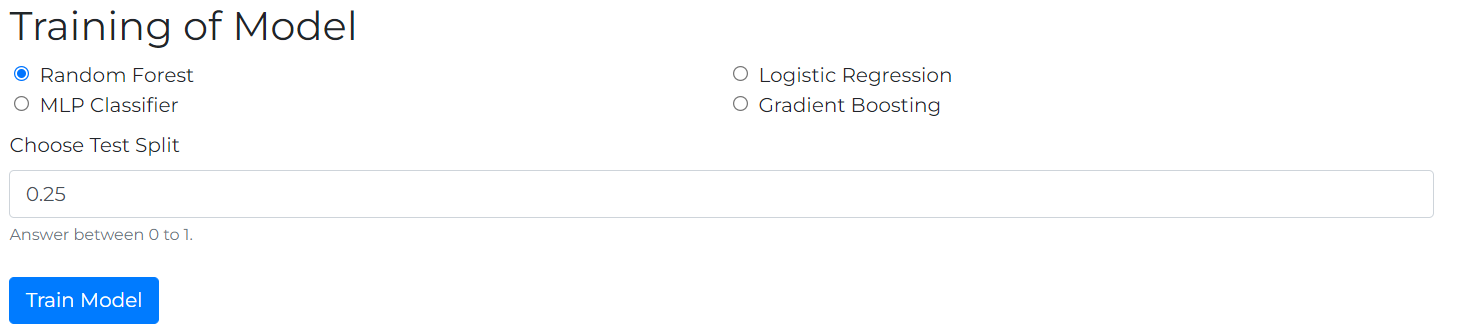
5. Component to Train the Model
In this component, we will create some radio buttons and input texts, so that users can select which classifier they want to train and by how many tests split.
<!-- Training Parameters -->
<div style="width: 75%; margin: 30px auto;" id="trainModel">
    <h2>Training of Model</h2>
    <div>
        <form>
            <div class="row ml-1">
                <div class="form-check col-lg-6">
                    <input class="form-check-input" type="radio" name="modelSelection" id="rf_model"
                        value="rf" checked>
                    <label class="form-check-label" for="rf_model">
                        Random Forest
                    </label>
                </div>
                <div class="form-check col-lg-6">
                    <input class="form-check-input" type="radio" name="modelSelection" id="lr_model"
                        value="lr">
                    <label class="form-check-label" for="lr_model">
                        Logistic Regression
                    </label>
                </div>
                <div class="form-check col-lg-6">
                    <input class="form-check-input" type="radio" name="modelSelection" id="mlp_model"
                        value="mlp">
                    <label class="form-check-label" for="mlp_model">
                        MLP Classifier
                    </label>
                </div>
                <div class="form-check col-lg-6">
                    <input class="form-check-input" type="radio" name="modelSelection" id="gb_model"
                        value="gb">
                    <label class="form-check-label" for="gb_model">
                        Gradient Boosting
                    </label>
                </div>
            </div>
            <div class="form-group mt-2">
                <label for="test_split">Choose Test Split</label>
                <input type="number" class="form-control" id="test_split" aria-describedby="testSplitHelp" value="0.25">
                <small id="testSplitHelp" class="form-text text-muted">Answer between 0 to 1.</small>
            </div>
            <button class="btn btn-primary mt-2" id="trainModelBtn" type="button">Train Model</button>
        </form>
    </div>
</div>
6. Component for Alert Messages
This component is used for alerts and success messages.
<!-- Heading Bar -->
<div style="width: 75%; margin: 10px auto; background-color: #0275d8; border-radius: 3px; text-align: center;">
    <p style="color: white; font-size: 1.3rem; font-weight: 600;" id="headingText"></p>
</div>
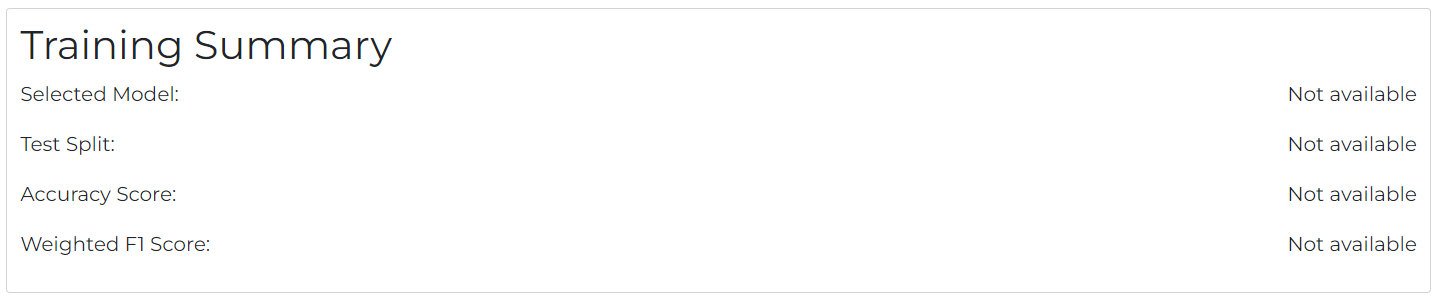
7. Component for checking the Training Results
In this, we can see the Accuracy and Weighted F1 Score of the selected model after training.
<!-- Training Summary -->
<div style="width: 75%; margin: 20px auto; border: 1px solid rgb(211, 211, 211); border-radius: 3px; padding: 10px;">
    <h2>Training Summary</h2>
    <div style="display: flex;">
         <p style="flex-grow: 1;">Selected Model: </p>
         <p id="selectedModelContentBox">Not available</p>
     </div>
     <div style="display: flex;">
          <p style="flex-grow: 1;">Test Split: </p>
          <p id="testSplitContentBox">Not available</p>
     </div>
     <div style="display: flex;">
          <p style="flex-grow: 1;">Accuracy Score: </p>
          <p id="accuracyContentBox">Not available</p>
      </div>
      <div style="display: flex;">
           <p style="flex-grow: 1;">Weighted F1 Score: </p>
           <p id="f1ContentBox">Not available</p>
       </div>
  </div>
8. Component for selecting Car Parameters
We can select the six parameters to check the performance of the car.
<!-- Car Parameters -->
<div id="testModel" style="width: 75%; margin: 20px auto;">
    <h2>Car Parameters</h2>
    <form>
        <div class="row">
            <div class="col-lg-4">
                <div class="form-group">
                    <label for="buying_price">Buying Price</label>
                    <select class="form-control" id="buying_price">
                        <option value="3">Very High (above 15lakh)</option>
                        <option value="2">High (around 10lakh)</option>
                        <option value="1">Meduim (around 7.5lakh)</option>
                        <option value="0">Low (below 5lakh)</option>
                    </select>
                </div>
            </div>
            <div class="col-lg-4">
                <div class="form-group">
                    <label for="maintanence_price">Maintanence Price</label>
                    <select class="form-control" id="maintanence_price">
                        <option value="3">Very High (2-3 LPA or above)</option>
                        <option value="2">High(around 1.5 LPA)</option>
                        <option value="1">Meduim(around 1 LPA)</option>
                        <option value="0">Low(below 50k per annum)</option>
                    </select>
                </div>
            </div>
            <div class="col-lg-4">
                <div class="form-group">
                    <label for="doors">No. of doors</label>
                    <select class="form-control" id="doors">
                        <option value="0">2</option>
                        <option value="1">3</option>
                        <option value="2">4</option>
                        <option value="3">>=5</option>
                    </select>
                </div>
            </div>
        </div>
        <div class="row">

            <div class="col-lg-4">
                <div class="form-group">
                    <label for="persons">No. of Persons</label>
                    <select class="form-control" id="persons">
                        <option value="0">2</option>
                        <option value="1">4</option>
                        <option value="2">greater than 6</option>
                    </select>
                </div>
            </div>
            <div class="col-lg-4">
                <div class="form-group">
                    <label for="luggage">Luggage Space</label>
                    <select class="form-control" id="luggage">
                        <option value="2">High (around 450 litres) </option>
                        <option value="1">Medium (around 250 litres)</option>
                        <option value="0">Low (below 150 litres)</option>
                    </select>
                </div>
            </div>
            <div class="col-lg-4">
                <div class="form-group">
                    <label for="safety">Safety</label>
                    <select class="form-control" id="safety">
                        <option value="0">No Air Bags</option>
                        <option value="1">Front Air Bags</option>
                        <option value="2">Front & Back Air Bags</option>
                    </select>
                </div>
            </div>
        </div>
        <button class="btn btn-primary disabled" id="submitBtn" type="button" disabled>Submit</button>
    </form>
</div>
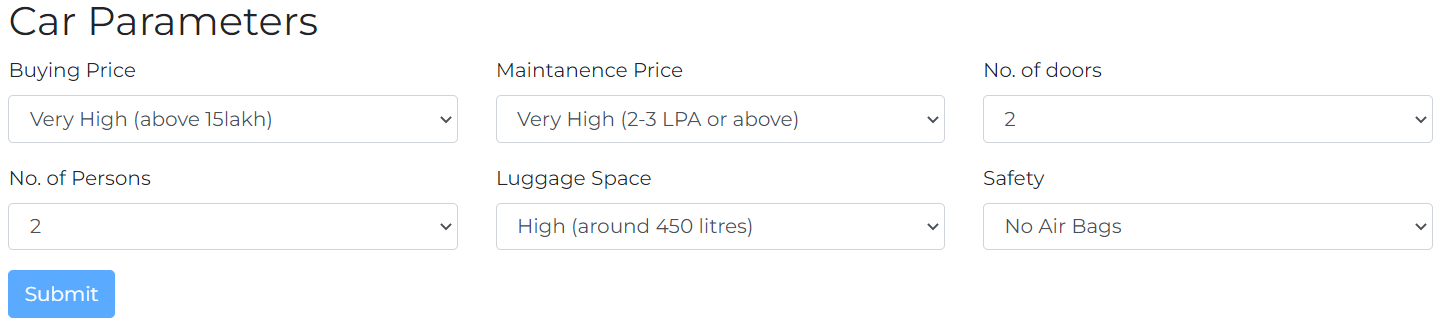
The Submit will remain disabled until you train the model.
9. Component to Output the Result
This component displays the predicted value.
<!-- Output Bar -->
<div style="width: 75%; margin: 10px auto; background-color: #5cb85c; border-radius: 3px; text-align: center;">
    <p style="color: white; font-size: 1.3rem; font-weight: 600;" id="resultText"></p>
</div>
10. Footer (Optional)
This is the footer for our web page
<footer style="background-color: #0275d8; bottom: 0; left: 0; text-align: center; color: white; padding: 3px;">
<p style="margin: 0;">Made with ❤ using PyScript.js</p>
</footer>
Our GUI is now created, ✌
Small Note
From now onwards, we will train our machine learning model. We need to add libraries in the Python Environment
Add the below code in the <head> tag of the HTML Template to import all the required non-standard libraries.
<py-env>
    - pandas
    - scikit-learn
    - numpy
</py-env>
Create a <py-script> </py-script> tag inside the <body> tag of the HTML Template. We will write all the python codes inside that py-script tag.
Importing Libraries
Firstly we will import all the necessary libraries
import pandas as pd

import pickle

from sklearn.model_selection import train_test_split, GridSearchCV

from sklearn.linear_model import LogisticRegression

from sklearn.ensemble import RandomForestClassifier, GradientBoostingClassifier

from sklearn.neural_network import MLPClassifier

from sklearn.metrics import accuracy_score, f1_score

from pyodide.http import open_url

import numpy as np
Dataset Preprocessing
As discussed earlier, we will use Car Evaluation Dataset from UCI ML Repository.
You can download the dataset from that link.
This dataset contains six categorical features, which are Buying Price, Maintenance Price, No. of Doors, No. of Persons, Luggage Capacity, and Safety Qualifications
1. Buying Price – low, mid, high, high
2. Maintenance Price – low, mid, high, high
3. No. of Doors – 2, 3, 4, more
4. No. of Persons – 2, 4, more
5. Luggage – small, med, big
6. Safety – low, mid, high
The Output is classified into four classes namely, unacc, acc, good, vgood
These are as follows:
1. unacc – Unaccepted
2. acc – Accepted
3. good – Good
4. vgood – Very Good
Function to Upsample the Dataset
def upSampling(data):
    from sklearn.utils import resample
    # Majority Class Dataframe
    df_majority = data[(data['score']==0)]
    samples_in_majority = data[data.score == 0].shape[0]

    # Minority Class Dataframe of all the three labels
    df_minority_1 = data[(data['score']==1)]
    df_minority_2 = data[(data['score']==2)]
    df_minority_3 = data[(data['score']==3)]

    # upsample minority classes
    df_minority_upsampled_1 = resample(df_minority_1,
                                    replace=True,
                                    n_samples= samples_in_majority,
                                    random_state=42)

    df_minority_upsampled_2 = resample(df_minority_2,
                                    replace=True,
                                    n_samples= samples_in_majority,
                                    random_state=42)

    df_minority_upsampled_3 = resample(df_minority_3,
                                    replace=True,
                                    n_samples= samples_in_majority,
                                    random_state=42)
    # Combine majority class with upsampled minority classes
    df_upsampled = pd.concat([df_minority_upsampled_1, df_minority_upsampled_2, df_minority_upsampled_3, df_majority])

    return df_upsampled
Function to read input data and return processed data.
def datasetPreProcessing():
    # Reading the content of CSV file.
    csv_url_content = open_url("https://raw.githubusercontent.com/AryanIITJ/pyscriptTut/main/car.csv")
    data = pd.read_csv(csv_url_content)

    pyscript.write("headingText", "Pre-Processing the Dataset...") # This is used to send messages to the HTML DOM.

    # Removing all the null values
    data.isna().sum()

    # Removing all the duplicates
    data.drop_duplicates()

    coloumns = ['buying', 'maint', 'doors', 'people', 'luggaage', 'safety', 'score']

    # Converting Categorical Data into Numerical Data
    data['buying'] = data['buying'].replace('low', 0)
    data['buying'] = data['buying'].replace('med', 1)
    data['buying'] = data['buying'].replace('high', 2)
    data['buying'] = data['buying'].replace('vhigh', 3)

    data['maint'] = data['maint'].replace('low', 0)
    data['maint'] = data['maint'].replace('med', 1)
    data['maint'] = data['maint'].replace('high', 2)
    data['maint'] = data['maint'].replace('vhigh', 3)

    data['doors'] = data['doors'].replace('2', 0)
    data['doors'] = data['doors'].replace('3', 1)
    data['doors'] = data['doors'].replace('4', 2)
    data['doors'] = data['doors'].replace('5more', 3)

    data['people'] = data['people'].replace('2', 0)
    data['people'] = data['people'].replace('4', 1)
    data['people'] = data['people'].replace('more', 2)

    data['luggaage'] = data['luggaage'].replace('small', 0)
    data['luggaage'] = data['luggaage'].replace('med', 1)
    data['luggaage'] = data['luggaage'].replace('big', 2)

    data['safety'] = data['safety'].replace('low', 0)
    data['safety'] = data['safety'].replace('med', 1)
    data['safety'] = data['safety'].replace('high', 2)

    data['score'] = data['score'].replace('unacc', 0)
    data['score'] = data['score'].replace('acc', 1)
    data['score'] = data['score'].replace('good', 2)
    data['score'] = data['score'].replace('vgood', 3)

    upsampled_data = upSampling(data)

    return upsampled_data
Let’s understand these above functions in more detail:
1. Firstly, we have read the CSV File using the Pandas library.
2. You may be confused by this line py script.write(“headingText”, “Pre-Processing the Dataset…”).
This code updates the messages component in the HTML DOM that we have created above.
You can write any message in any HTML Tag
py script.write(<component_id>, <your_message>)
3. Then, we have removed the null values and the duplicates. But luckily, this dataset does not contain any null values.
4. Further, we have converted all the categorical data into numerical data.
5. Finally, we have performed upsampling of the dataset.

You can observe that the number of samples in one particular class is far more than in the other classes. Our model will be biased towards a specific class because it has very little data to train on other classes.
So we have to increase the number of samples in other classes. It is also called Upsampling.
I have created a separate function named upSampling that will upsample the data.

Training the Model
Function to check which machine learning model is selected by the user for training.
def model_selection():
    selectedModel = document.querySelector('input[name="modelSelection"]:checked').value;
    if selectedModel == "rf":
        document.getElementById("selectedModelContentBox").innerText = "Random Forest Classifier";
        return RandomForestClassifier(n_estimators=100)
    elif selectedModel == "lr":
        document.getElementById("selectedModelContentBox").innerText = "Logistic Regression";
        return LogisticRegression()
    elif selectedModel == "gb":
        document.getElementById("selectedModelContentBox").innerText = "Gradient Boosting Classifier";
        return GradientBoostingClassifier(n_estimators=100, learning_rate=1.0, max_depth=1, random_state=0)
    else:
        document.getElementById("selectedModelContentBox").innerText = "MLP Classifier";
        return MLPClassifier()
Function to train the model on the chosen classifier.
def classifier(model, X_train, X_test, y_train, y_test):
    clf = model
    clf.fit(X_train, y_train)
    y_pred = clf.predict(X_test)
    y_score = clf.fit(X_train, y_train)
    acc_score = accuracy_score(y_test, y_pred)
    f1Score = f1_score(y_test, y_pred, average='weighted')
    return acc_score, model, f1Score
The below function triggers when the user clicks the train button.
def trainModel(e=None):
    global trained_model

    processed_data = datasetPreProcessing()
    # Take the Test Split as an input by the user
    test_split = float(document.getElementById("test_split").value)
    # If the test split is greater than 1 or less than 0 then we will throw an error.
    if test_split > 1 or test_split < 0:
        pyscript.write("headingText", "Choose Test Split between 0 to 1")
        return
    document.getElementById("testSplitContentBox").innerText = test_split;

    X = processed_data[['buying', 'maint', 'doors', 'people', 'luggaage', 'safety']]
    y = processed_data['score']
    # Splitting the Dataset into training and testing.
    X_train, X_test, y_train, y_test = train_test_split(X, y, test_size=test_split, random_state=42)

    # Below function can return the classification model choosen by the user
    model = model_selection()
    pyscript.write("headingText", "Model Training Started...")
    acc_score, trained_model, f1Score = classifier(model, X_train, X_test, y_train, y_test)
    pyscript.write("headingText", "Model Training Completed.")
    # Writing the value of accuracy and f1-score to the DOM
    document.getElementById("accuracyContentBox").innerText = f"{round(acc_score*100, 2)}%";
    document.getElementById("f1ContentBox").innerText = f"{round(f1Score*100, 2)}%";

    # Below code is to enable the Model Training Button when the Model is successfully trained.
    document.getElementById("submitBtn").classList.remove("disabled");
    document.getElementById("submitBtn").disabled = False;
    document.getElementById("trainModelBtn").classList.remove("disabled");
    document.getElementById("trainModelBtn").disabled = False;

    if e:
        e.preventDefault()
    return False
The above codes are self-explanatory, and I have also added some comments to the code.
Testing the Model
In this section, we will test our model on the six parameters that we have discussed above.
Below is the function to test the model.
def testModel(e=None):
    buying_price = int(document.getElementById("buying_price").value)
    maintanence_price = int(document.getElementById("maintanence_price").value)
    doors = int(document.getElementById("doors").value)
    persons = int(document.getElementById("persons").value)
    luggage = int(document.getElementById("luggage").value)
    safety = int(document.getElementById("safety").value)

    arr = np.array([buying_price, maintanence_price, doors, persons, luggage, safety]).astype('float32')
    arr = np.expand_dims(arr, axis=0)
    result = trained_model.predict(arr)
    condition = ""
    if result[0] == 0:
        condition = "Unaccepted"
    elif result[0] == 1:
        condition = "Accepted"
    elif result[0] == 2:
        condition = "Good"
    else:
        condition = "Very Good"

    pyscript.write("resultText", f"Predicted Value: {condition}")

    if e:
        e.preventDefault()
    return False
Firstly, we will take the input from the user and the feed that input to the model for prediction. Then finally, we output the results.
Our machine learning model is now trained.
Finally, add the below code to trigger the Python functions by clicking the HTML Buttons.
document.getElementById("submitBtn").onclick = testModel
document.getElementById("trainModelBtn").onclick = trainModel
Conclusion
GitHub Code – Link
Deployed Version – Link
Before PyScript, we don’t have any proper tool to use Python on the client-side. Frameworks such as Django or Flask can mainly use Python on the backend. In recent years, Python has grown its population immensely. It has been used in Machine Learning, Artificial Intelligence, Robotics, etc.
In this article, we have trained and tested a machine learning model completely in HTML language. You can increase the model’s accuracy by tuning some hyperparameters or searching for the best parameters using Grid Search CV or Randomized Search CV.
The main focus of this article is to use the PyScript.js library, not to achieve a high accuracy classification model.
The key takeaways of this tutorial are:
1. Firstly, we have imported the pyscript.js library in the HTML template and run a basic python code.
2. We have created all the required components in the HTML DOM.
3. Further, we have performed dataset pre-processing and trained the model according to user selection.
4. Finally, we have written the code to test the model based on the user’s input.
It is all for today. I hope you have enjoyed the article. If you have any doubts or suggestions, feel free to comment below. Or you can also connect with me on LinkedIn. I will be delighted to get associated with you.
Do check my other articles also.
Thanks for reading, 😊
The media shown in this article is not owned by Analytics Vidhya and is used at the Author’s discretion.


