


Across multiple industries and use cases, voice fingerprinting is increasingly becoming a viable option for speaker verification. From ATM cardholder validation in financial services to patient identification for telemedicine, accessing sensitive medical records or sensitive treatments (e.g., chemo or radiotherapy) in healthcare, being able to securely authorize and authenticate people for various services has benefits both for the customer and the business. In this blog post, we look at how the development of a text-independent speaker verification model using GPU-accelerated deep neural networks can be done using Dataiku.
 About the author: Mohamed Barakat (aka Samir Barakat) is an AI and data science consultant at Servian, a Dataiku partner consulting company with 11 offices around the world headquartered in Sydney specializing in data, AI, and cloud.
![]()
Mohamed’s background is in computer science and machine learning. He has wide experience building models for different industries, but recently, his focus has been on applied AI for medical applications, specially automatic diagnosis and prognosis in oncology. He has several publications in these areas.

Introduction to Speaker Verification
Speaker verification is a very challenging machine learning task. Let’s take patient identity verification (i.e., confirming that the right patient is receiving the intended sensitive treatment) as an example of what the process might look like:
- A few recordings of some text with the patient’s voice have to be collected and stored with the rest of the patient data in an earlier stage (e.g., during treatment planning or prescription). This recording is called the enrollment recording.
- On the day of the treatment, before getting started — likely when the treatment prescription is retrieved — the enrollment recording gets pulled along with the patient’s personal information.
- The patient gets asked to read a short sentence to a machine, which compares his voice to the enrollment recording for an output of “yes” or “no.”
The trick here is that the machine learning model is not a classification model trained on patients' voices. If this was the case, the model would have to be retrained with every new patient (and it would require very long recording samples from patients as well).
Instead, the model is a generative model that outputs a vector of discriminative features that are sensitive to the changes of speakers but resistant to changes in content or text. A simple similarity distance check between two feature vectors will easily tell us whether these vectors belong to the same speaker or not.
.png?width=515&name=generative-deep-neural-network(DNN).png) Figure 1: Generative Deep Neural Network (DNN)
Figure 1: Generative Deep Neural Network (DNN)
Deep Neural Networks (DNNs) have been used for extracting discriminative features from text, images and speech recently. Google has introduced a model based on DNNs to find and extract speaker-discriminative feature vectors in speech, calling these vectors the d-embedding vectors or d-vectors for short.
So, the trained DNN model generates embedding vectors from each recording that represent the speaker’s voice in a manner not sensitive to changes in text or speaking duration, but rather sensitive to changes in the speaker’s voice itself. The embedding vectors are generated from both the enrollment and visiting time recordings, and a similarity matrix with a threshold judges if the voice comes from the same speaker or not.
Training a Model for Speaker Verification
In this post, we’ll use a GPU-accelerated deep neural network to generate state-of-the-art d-vectors (a modern type of embedding vectors introduced by Google and leveraged by Google Assistant) from recordings. The Dataiku Python recipes are based on the Harry Volk PyTorch implementation of the embedding vectors, available here.
Figure 2 shows the steps for training the speaker verification model, which consisted of:
- Collecting a suitable dataset. Since the differentiation is between speakers, the dataset must have recordings of spoken text and a label for each speaker. The time borders of speech spoken by different speakers must be clearly set. Meaning with every recording file another text file must be provided containing speaker id with the start and end times of every segment spoken by this speaker. For this project, we used the famous TIMIT dataset where every utterance has only one speaker, and that speaker is specified in the folder name.
- Performing standard preprocessing, which includes applying framing, frequency domain transformation, and filtering.
- Training a long short-term memory (LSTM) network to produce the d-vectors, as explained in the Google paper referenced above.
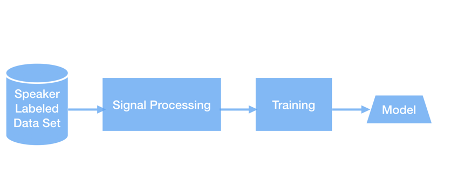 Figure 2: Steps of Embedding Vectors Model Training
The trained model was then used to generate d-vectors from two recordings to compare and confirm whether they were spoken by the same speaker or not, as shown in Figure 3. Both signal processing steps in the two paths (Figure 2 and Figure 3) are identical; the models in the two parallel lines in the figure are also the same ones produced in the training process.
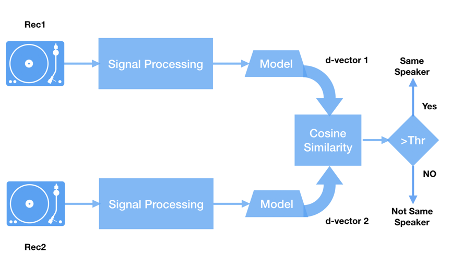 Figure 3: Using Trained Model for Speaker Verification.
Implementation in Dataiku
This project was implemented on a Dataiku instance virtual machine with a Cuda-enabled NVIDIA GPU running on Google Cloud Platform (GCP). The steps to reproduce the setup are as follows:
- Set up a Dataiku instance virtual machine (VM) on GCP. The easiest way to set up a Dataiku instance in GCP compute engine is to use the pre-configured Dataiku VM from the marketplace. (GCP > Compute Engine > Marketplace > Search for “Dataiku.”) You may select your region, zone, and hardware while creating your Dataiku instance from the marketplace. After your instance has been created, find the instance name in the Deployment Manager where you could click on VISIT THE SITE to enter dataiku.
- Install the NVIDIA GPU driver and CUDA on the VM.
- Create a Python environment and install the packages required by the Harry Volek repository. In the Dataiku environment, go to Packages > Install and add the list below in the REQUESTED PACKAGES (PIP) box:
tensorflow==1.8.0
keras==2.1.5
scikit-learn>=0.20,<0.21
scipy>=1.1,<1.2
statsmodels>=0.9,<0.10
jinja2>=2.10,<2.11
flask>=1.0,<1.1
h5py==2.7.1
pillow==5.1.0
torch==1.6
matplotlib
librosa
numba==0.48
webrtcvad
One major strength of Dataiku is the visual creation and representation capabilities of the Flow combined with the ability to write sophisticated code in Python recipes at the same time. We can see that the Dataiku Flow (Figure 4) resembles the conceptual flows in Figures 2 and 3.

Figure 4: The Dataiku Flow for the speaker verification project
The top part of the Flow starting from the custom_verification to verification_results is the running path performing comparison between two sets of recordings in the custom_verification folder to know whether they were spoken by the same person or not. The rest is the training process flow to build the d-vectors generating models using the TIMIT dataset. The route containing test_tisv folder is an optional testing one.
The two preprocessing recipes one above the other on the left are performing the same tasks described earlier, but the input in the training Flow is a folder containing the TIMIT dataset (which means it has a speaker-dependent subdirectories tree). In the running Flow, the input contains only two folders with recordings of only the two speakers to be compared.
The LSTM training recipe (the orange circle after train_tisv folder) uses the NumPy arrays saved from the preprocessing step to train the LSTM network for d-vector extraction. There is an optional recipe to test the model using the TIMIT test part, but in all cases, the trained model is passed to the final_model folder.
The d-vector and cosine similarity recipe on the top right takes the trained model as an input and the NumPy arrays of the preprocessed speech of the two speakers and compares them. The d-vectors of every speaker testing set are extracted using the training Flow’s LSTM model and compared with the cosine similarity, and the output is written to a text file in the results folder.
Conclusion: Results
The result is a statement determining whether the speakers of the recordings in the two subdirectories in the custom_verification folder are the same or different ones. The optional testing path in the Flow was used to test the model performance on the testing part of the TIMIT dataset. The Equal Error Rate (EER) of the model was 3.4%, which is very comparable to the performance in [3].
About Servian
Servian is a leading Dataiku partner headquartered in Australia with offices across New Zealand, Singapore, India, and the United Kingdom. Servian provides advisory, implementation, and managed services around AI and machine learning. Learn more about Servian.
References
[1] https://patents.google.com/patent/US8818810B2/en
[2] https://patents.google.com/patent/US9424845B2/en
[3] L. Wan, Q. Wang, A. Papir and I. L. Moreno, "Generalized End-to-End Loss for Speaker Verification," 2018 IEEE International Conference on Acoustics, Speech and Signal Processing (ICASSP), Calgary, AB, 2018, pp. 4879-4883, doi: 10.1109/ICASSP.2018.8462665.
[4] https://github.com/HarryVolek/PyTorch_Speaker_Verification