AWS Big Data Blog
Build event-driven architectures with Amazon MSK and Amazon EventBridge
Based on immutable facts (events), event-driven architectures (EDAs) allow businesses to gain deeper insights into their customers’ behavior, unlocking more accurate and faster decision-making processes that lead to better customer experiences. In EDAs, modern event brokers, such as Amazon EventBridge and Apache Kafka, play a key role to publish and subscribe to events. EventBridge is a serverless event bus that ingests data from your own apps, software as a service (SaaS) apps, and AWS services and routes that data to targets. Although there is overlap in their role as the backbone in EDAs, both solutions emerged from different problem statements and provide unique features to solve specific use cases. With a solid understanding of both technologies and their primary use cases, developers can create easy-to-use, maintainable, and evolvable EDAs.
If the use case is well defined and directly maps to one event bus, such as event streaming and analytics with streaming events (Kafka) or application integration with simplified and consistent event filtering, transformation, and routing on discrete events (EventBridge), the decision for a particular broker technology is straightforward. However, organizations and business requirements are often more complex and beyond the capabilities of one broker technology. In almost any case, choosing an event broker should not be a binary decision. Combining complementary broker technologies and embracing their unique strengths is a solid approach to build easy-to-use, maintainable, and evolvable EDAs.
Streaming applications enable stateful computations over unbounded data. This allows real-time analytics use cases, such as anomaly detection, computations, and much more. Streaming applications can be built using frameworks such as Apache Flink, Apache Spark, or Kafka Streams. Although some of those frameworks support sending events to downstream systems other than Apache Kafka, there is no standardized way of doing so across frameworks. It would require each application owner to build their own logic to send events downstream. Event brokers like EventBridge provide a consistent and secure integration for different downstream consumers to easily receive events across the organization and with external systems, such as 3rd party web APIs. To simplify the integration between Kafka and EventBridge, AWS offers EventBridge Pipes, a fully-managed point-to-point integration, and the open-source EventBridge sink connector for Kafka Connect.
There are two ways to send events from Apache Kafka to EventBridge: the preferred method using Amazon EventBridge Pipes or the EventBridge sink connector for Kafka Connect. In this post, we explore when to use which option and how to build an EDA using the EventBridge sink connector and Amazon Managed Streaming for Apache Kafka (Amazon MSK).
EventBridge sink connector vs. EventBridge Pipes
EventBridge Pipes connects sources to targets with a point-to-point integration, supporting event filtering, transformations, enrichment, and event delivery to over 14 AWS services and external HTTPS-based targets using API Destinations. This is the preferred and most easy method to send events from Kafka to EventBridge as it simplifies the setup and operations with a delightful developer experience.
Alternatively, under the following circumstances you might want to choose the EventBridge sink connector to send events from Kafka directly to EventBridge Event Buses:
- You are have already invested in processes and tooling around the Kafka Connect framework as the platform of your choice to integrate with other systems and services
- You need to integrate with a Kafka-compatible schema registry e.g., the AWS Glue Schema Registry, supporting Avro and Protobuf data formats for event serialization and deserialization
- You want to send events from on-premises Kafka environments directly to EventBridge Event Buses
Overview of solution
In this post, we show you how to use Kafka Connect and the EventBridge sink connector to send Avro-serialized events from Amazon Managed Streaming for Apache Kafka (Amazon MSK) to EventBridge. This enables a seamless and consistent data flow from Apache Kafka to dozens of supported EventBridge AWS and partner targets, such as Amazon CloudWatch, Amazon SQS, AWS Lambda, and HTTPS targets like Salesforce, Datadog, and Snowflake using EventBridge API destinations. The following diagram illustrates the event-driven architecture used in this blog post based on Amazon MSK and EventBridge.
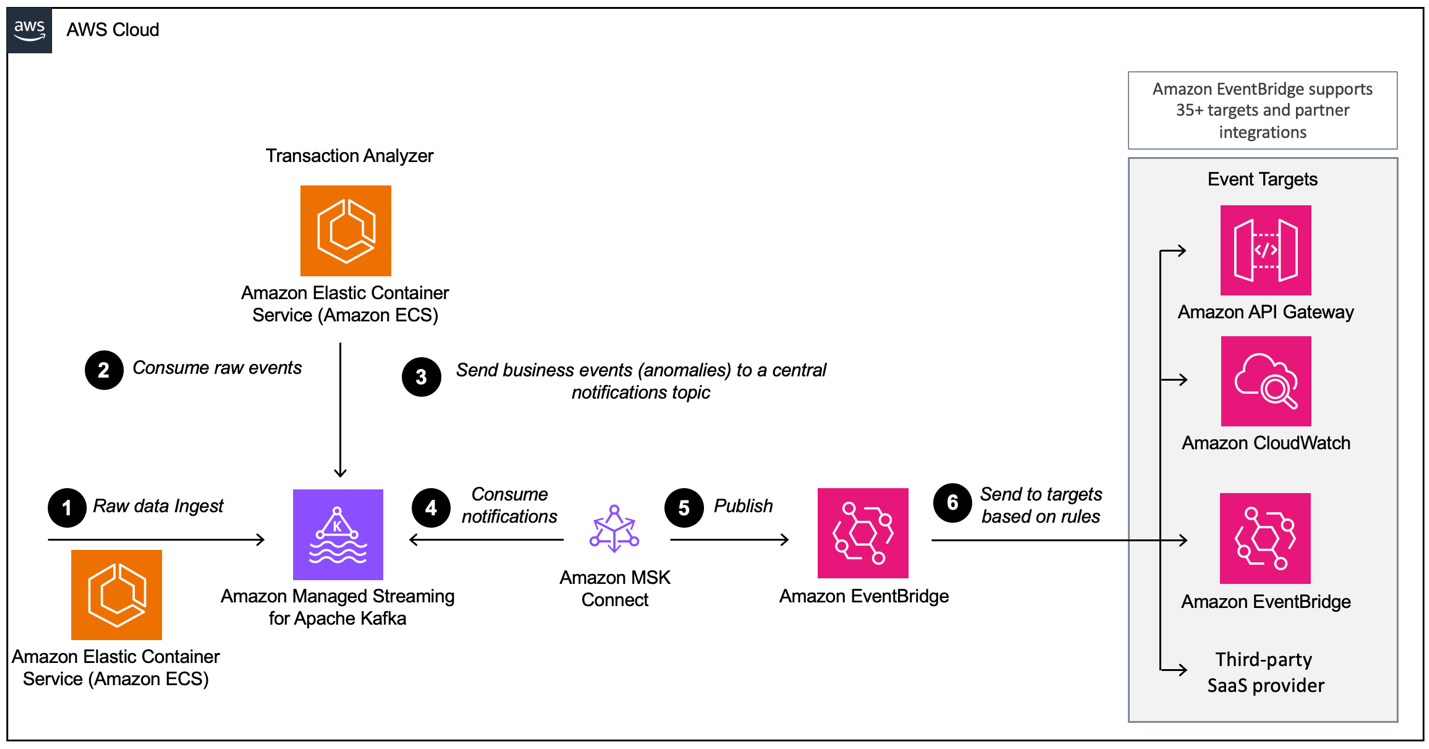
The workflow consists of the following steps:
- The demo application generates credit card transactions, which are sent to Amazon MSK using the Avro format.
- An analytics application running on Amazon Elastic Container Service (Amazon ECS) consumes the transactions and analyzes them if there is an anomaly.
- If an anomaly is detected, the application emits a fraud detection event back to the MSK notification topic.
- The EventBridge connector consumes the fraud detection events from Amazon MSK in Avro format.
- The connector converts the events to JSON and sends them to EventBridge.
- In EventBridge, we use JSON filtering rules to filter our events and send them to other services or another Event Bus. In this example, fraud detection events are sent to Amazon CloudWatch Logs for auditing and introspection, and to a third-party SaaS provider to showcase how easy it is to integrate with third-party APIs, such as Salesforce.
Prerequisites
For this walkthrough, you should have the following prerequisites:
- An AWS account.
- The AWS Cloud Development Kit (AWS CDK). For installation instructions, refer to Install the AWS CDK.
- node.js. Download your preferred version.
Deploy the AWS CDK stack
This walkthrough requires you to deploy an AWS CDK stack to your account. You can deploy the full stack end to end or just the required resources to follow along with this post.
- In your terminal, run the following command:
- Navigate to the cdk directory:
- Deploy the AWS CDK stack based on your preferences:
- If you want to see the complete setup explained in this post, run the following command:
- If you want to deploy the connector on your own but have the required resources already, including the MSK cluster, AWS Identity and Access Management (IAM) roles, security groups, data generator, and so on, run the following command:
Deploy the EventBridge sink connector on Amazon MSK Connect
If you deployed the CDK stack in FULL mode, you can skip this section and move on to Create EventBridge rules.
The connector needs an IAM role that allows reading the data from the MSK cluster and sending records downstream to EventBridge.
Upload connector code to Amazon S3
Complete the following steps to upload the connector code to Amazon Simple Storage Service (Amazon S3):
- Navigate to the GitHub repo.
- Download the release 1.0.0 with the AWS Glue Schema Registry dependencies included.
- On the Amazon S3 console, choose Buckets in the navigation pane.
- Choose Create bucket.
- For Bucket name, enter
eventbridgeconnector-bucket-${AWS_ACCOUNT_ID}.
As Because S3 buckets must be globally unique, replace ${AWS_ACCOUNT_ID} with your actual AWS account ID. For example, eventbridgeconnector-bucket-123456789012.
- Open the bucket and choose Upload.
- Select the .jar file that you downloaded from the GitHub repository and choose Upload.

Create a custom plugin
We now have our application code in Amazon S3. As a next step, we create a custom plugin in Amazon MSK Connect. Complete the following steps:
- On the Amazon MSK console, choose Custom plugins in the navigation pane under MSK Connect.
- Choose Create custom plugin.
- For S3 URI – Custom plugin object, browse to the file named
kafka-eventbridge-sink-with-gsr-dependencies.jarin the S3 bucketeventbridgeconnector-bucket-${AWS_ACCOUNT_ID}for the EventBridge connector. - For Custom plugin name, enter
msk-eventBridge-sink-plugin-v1. - Enter an optional description.
- Choose Create custom plugin.

- Wait for plugin to transition to the status Active.
Create a connector
Complete the following steps to create a connector in MSK Connect:
- On the Amazon MSK console, choose Connectors in the navigation pane under MSK Connect.
- Choose Create connector.
- Select Use existing custom plugin and under Custom plugins, select the plugin
msk-eventBridge-sink-plugin-v1that you created earlier. - Choose Next.
- For Connector name, enter
msk-eventBridge-sink-connector. - Enter an optional description.
- For Cluster type, select MSK cluster.
- For MSK clusters, select the cluster you created earlier.
- For Authentication, choose IAM.
- Under Connector configurations, enter the following settings (for more details on the configuration, see the GitHub repository):
- Make sure to
replace aws.eventbridge.eventbus.arn,aws.eventbridge.region, andvalue.converter.regionwith the values from the prerequisite stack. - In the Connector capacity section, select Autoscaled for Capacity type.
- Leave the default value of 1 for MCU count per worker.
- Keep all default values for Connector capacity.
- For Worker configuration, select Use the MSK default configuration.
- Under Access permissions, choose the custom IAM role
KafkaEventBridgeSinkStack-connectorRole, which you created during the AWS CDK stack deployment. - Choose Next.
- Choose Next again.
- For Log delivery, select Deliver to Amazon CloudWatch Logs.
- For Log group, choose
/aws/mskconnect/eventBridgeSinkConnector. - Choose Next.
- Under Review and Create, validate all the settings and choose Create connector.
The connector will be now in the state Creating. It can take up to several minutes for the connector to transition into the status Running.
Create EventBridge rules
Now that the connector is forwarding events to EventBridge, we can use EventBridge rules to filter and send events to other targets. Complete the following steps to create a rule:
- On the EventBridge console, choose Rules in the navigation pane.
- Choose Create rule.
- Enter
eb-to-cloudwatch-logs-and-webhookfor Name. - Select eventbridge-sink-eventbus for Event bus.
- Choose Next.
- Select Custom pattern (JSON editor), choose Insert, and replace the event pattern with the following code:
- Choose Next.
- For Target 1, select CloudWatch log group and enter
kafka-eventsfor Log Group. - Choose Add another target.
- (Optional: Create an API destination) For Target 2, select EventBridge API destination for Target types.
- Select Create a new API destination.
- Enter a descriptive name for Name.
- Add the URL and enter it as API destination endpoint. (This can be the URL of your Datadog, Salesforce, etc. endpoint)
- Select POST for HTTP method.
- Select Create a new connection for Connection.
- For Connection Name, enter a name.
- Select Other as Destination type and select API Key as Authorization Type.
- For API key name and Value, enter your keys.
- Choose Next.
- Validate your inputs and choose Create rule.

The following screenshot of the CloudWatch Logs console shows several events from EventBridge.

Run the connector in production
In this section, we dive deeper into the operational aspects of the connector. Specifically, we discuss how the connector scales and how to monitor it using CloudWatch.
Scale the connector
Kafka connectors scale through the number of tasks. The code design of the EventBridge sink connector doesn’t limit the number of tasks that it can run. MSK Connect provides the compute capacity to run the tasks, which can be from Provisioned or Autoscaled type. During the deployment of the connector, we choose the capacity type Autoscaled and 1 MCU per worker (which represents 1vCPU and 4GiB of memory). This means MSK Connect will scale the infrastructure to run tasks but not the number of tasks. The number of tasks is defined by the connector. By default, the connector will start with the number of tasks defined in tasks.max in the connector configuration. If this value is higher than the partition count of the processed topic, the number of tasks will be set to the number of partitions during the Kafka Connect rebalance.
Monitor the connector
MSK Connect emits metrics to CloudWatch for monitoring by default. Besides MSK Connect metrics, the offset of the connector should also be monitored in production. Monitoring the offset gives insights if the connector can keep up with the data produced in the Kafka cluster.
Clean up
To clean up your resources and avoid ongoing charges, complete the following the steps:
- On the Amazon MSK console, choose Connectors in the navigation pane under MSK Connect.
- Select the connectors you created and choose Delete.
- Choose Clusters in the navigation pane.
- Select the cluster you created and choose Delete on the Actions menu.
- On the EventBridge console, choose Rules in the navigation pane.
- Choose the event bus eventbridge-sink-eventbus.
- Select all the rules you created and choose Delete.
- Confirm the removal by entering delete, then choose Delete.
If you deployed the AWS CDK stack with the context PREREQ, delete the .jar file for the connector.
- On the Amazon S3 console, choose Buckets in the navigation pane.
- Navigate to the bucket where you uploaded your connector and delete the
kafka-eventbridge-sink-with-gsr-dependencies.jarfile.
Independent from the chosen deployment mode, all other AWS resources can be deleted by using AWS CDK or AWS CloudFormation. Run cdk destroy from the repository directory to delete the CloudFormation stack.
Alternatively, on the AWS CloudFormation console, select the stack KafkaEventBridgeSinkStack and choose Delete.
Conclusion
In this post, we showed how you can use MSK Connect to run the AWS open-sourced Kafka connector for EventBridge, how to configure the connector to forward a Kafka topic to EventBridge, and how to use EventBridge rules to filter and forward events to CloudWatch Logs and a webhook.
To learn more about the Kafka connector for EventBridge, refer to Amazon EventBridge announces open-source connector for Kafka Connect, as well as the MSK Connect Developer Guide and the code for the connector on the GitHub repo.
About the Authors
 Florian Mair is a Senior Solutions Architect and data streaming expert at AWS. He is a technologist that helps customers in Germany succeed and innovate by solving business challenges using AWS Cloud services. Besides working as a Solutions Architect, Florian is a passionate mountaineer, and has climbed some of the highest mountains across Europe.
 Benjamin Meyer is a Senior Solutions Architect at AWS, focused on Games businesses in Germany to solve business challenges by using AWS Cloud services. Benjamin has been an avid technologist for 7 years, and when he’s not helping customers, he can be found developing mobile apps, building electronics, or tending to his cacti.