OpenAI Assistant API:Implementing Interactive Chatbots
Introduction
With the introduction of ChatGPT and the GPT 3 models by OpenAI, the world has shifted towards using AI-integrated applications. In all the day-to-day applications we use, from e-commerce to banking applications, AI embeds some parts of the application, particularly the Large Language Models. One among them is the OpenAI Assistant API, i.e., chatbots. OpenAI recently released Assistants API under Beta, a tool designed to elevate user experience.
Learning Objectives
- Learn the process of creating purpose-built AI assistants with specific instructions.
- Explore the concept of persistent and infinitely long threads in the Assistants API.
- Demonstrate creating an AI assistant using the OpenAI library, specifying parameters like name, instructions, model, and tools.
- Learn the process of creating runs to execute AI assistants on specific threads.
- Understand the pricing structure of the Assistants API, considering factors like language model tokens, Code Interpreter sessions, and Retrieval tool usage.
This article was published as a part of the Data Science Blogathon.
Table of contents
What are OpenAI assistants API? What Can It Do?
OpenAI assistants API recently launched the Assistants API, which is currently in the Beta phase. This API allows us to build and integrate AI assistants into our applications using the OpenAI Large Language Models and tools. Companies tailor these assistants for a specific purpose and provide them with the relevant data for that particular use. Examples of this assistance include an AI Weather assistant that gives weather-related information or an AI Travel assistant that answers Travel-related queries.
These assistants are built with statefulness in mind. That is, they retain the previous conversations to a large extent, thus making the developers not worry about the state management and leaving it to the OpenAI. The typical flow is below:
- Creating an Assistant, where we select the data to ingest, what model to use, instructions to the Assistant and what tools to use.
- Then, we create a Thread. A thread stores a user’s messages and the LLM’s replies. This thread is responsible for managing the state of the Assistant and OpenAI takes care of it.
- After creating the Thread, we add messages to it. These are the messages that the user types to the AI Assistant or the Assistant replies.
- Finally, we run the Assistant on that thread. Based on the messages on that thread, the AI Assistant calls the OpenAI LLMs to provide a suitable response and may also contact some tools in between, which we will discuss in the next section.

All these Assistant, Thread, Message, and Run are called Objects in the Assistant API. Along with these objects, there is another object called Run Step, which provides us with the detailed steps that the Assistant has taken in Run, thus providing insights into its inner workings.
Tools – The Assistants API’s Arsenal
We have constantly mentioned the word tool, so what does it have to do with the OpenAI Assistant API? Tools are like weapons, which allow the Assistant API to do additional tasks. These include the OpenAI-hosted tools like the Knowledge Retrieval and the Code Interpreter. We can also define our custom tools using Function calling, which we will not discuss in this article.
So, let’s go through the remaining tools in detail.
- Code Interpreter: This interprets Python code within a sandboxed environment, enabling the Assistant API to execute custom Python scripts. Useful for scenarios like data analysis, where the Assistant can generate code to analyze CSV data, run it, and provide a user response.
- Function Calling: Developers can define custom tools, allowing the Assistant to iteratively build responses by utilizing these tools and their outputs.
- Retrieval: Essential for AI Assistants, it involves providing data for analysis. For instance, when creating an Assistant for a product, relevant information is chunked, embedded, and stored in a vector store. The Assistant retrieves this data from the knowledge base when responding to user queries.

Building Our Assistant
In this section, we will go through creating an Assistant, adding messages to a Thread, and Running the Assistant on that Thread. We will begin by downloading the OpenAI library.
# installs the openai library that contains the Assistants API
!pip install openai
Ensure you are using the latest version (v.1.2.3 is the latest when this article was written). Let’s start by creating our client.
# importing os library to read environment variables
import os
# importing openai library to interact with Assistants API
from openai import OpenAI

# storing OPENAI API KEY in a environment variable
os.environ["OPENAI_API_KEY"] = "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"

# creating our OpenAI client by providing the API KEY
client = OpenAI(api_key = os.environ['OPENAI_API_KEY'])
Creating an Assistant
So we import the OpenAI class from the openai library. Then, we store our OpenAI API Token in the environment variable. And then, instantiate an OpenAI class with the api_key as the variable. The client variable is the instance of the OpenAI class. Now it’s time to create our assistant.
# creating an assistant

assistant = client.beta.assistants.create(
    name="PostgreSQL Expret",
    instructions="You are a PostgreSQL expert and can answer any question in a \
    simple way with an example",
    model="gpt-4-1106-preview",
    tools=[{"type":"retrieval"}]
)
- To create an Assistant, we call the create() method from the assistants class and pass it the following parameters
- name: This is the name of our Assistant. In this example, we call it the PostgresSQL Expert
- instructions: This is the context/additional information given to the Assistant.
- model: The model that the assistant will use to generate the responses. In this case, we are using a newly launched GPT-4 preview model
- tools: These are the tools we discussed in the previous section, which the Assistant will use to generate responses. We pass the tools as a list of dictionaries. Here, we are using the retrieval tool for ingesting the data
Load the Documents
Thus, we created and assigned an assistant to the variable assistant. The next step will be loading the documents.
# upload the file
file = client.files.create(
    file=open(
        "/content/LearnPostgres.pdf",
        "rb",
    ),
    purpose="assistants",
)

# update Assistant
assistant = client.beta.assistants.update(
    assistant.id,
    file_ids=[file.id],
)- The above is code to create and ingest a document to the Assistant. Here, I have a PDF (click here to download the PDF)that contains learning information about PostgreSQL.
- We use the files class of the OpenAI to create a file out of it using the create() method and pass in “assistants” as a value to the purpose variable as this needs to be added to the Assistant.
- In the second step, we update our Assistant with the created file. For this, we call in the update() method and pass in the Assistant ID (we have already created an Assistant object, and this object contains a unique ID) and the file IDs (each file created will have its unique ID).
As we have included the retrieval tool in our Assistant configuration, it takes care of chunking our LearnPostres.pdf, converting it into embeddings, and retrieving the relevant information from it.
Creating a Thread and Storing Messages
In this section, we will create a Thread and add Messages to it. We will start by creating a new Thread.
# creating a thread
thread = client.beta.threads.create()
The create() method of the threads class is used to create a Thread. A Thread represents a conversation session. Similar to assistants, the Thread object will also have a unique ID associated with it. Also, note that we have not passed any Assitant ID to it, implying that the Thread is isolated and not coupled with the assistant. Now, let’s add a message to our newly created Thread.
# adding our first message to the thread
message = client.beta.threads.messages.create(
    thread_id=thread.id,
    role="user",
    content="How to create a table in PostgreSQL"
)- Messages are the blocks of conversation containing the user queries and responses. To add a message to a Thread, we use the create() method of the messages class, and it takes the following parameters
- thread_id: A unique ID that is associated with each created Thread. Here, we pass in the thread ID of the Thread we started earlier.
- role: Who is the sender / sending this message? In our case, it’s the user.
- content: This is the user’s query. In our example, we give it “How to create a table in PostgreSQL.”
Running Our Assistant
Now, we run the Assistant by creating a Run on the Thread that we want our Assistant to run on.
# Creating an Run

run = client.beta.threads.runs.create(
    thread_id=thread.id,
    assistant_id=assistant.id
)- To create a Run, we use the create() method of the runs class. And pass it the Thread ID, that is, on which Thread(that is, which conversation session) we want the Assistant to run and the Assistant ID(that is, which Assistant to Run) and pass it to the run variable.
- Creating a Run will not produce the response. Instead, we need to wait until the Run is completed. A Run can be considered an Asynchronous task, where we must poll the Run whether it has finished running.
Creating a Function
The Object provides a variable called status, which contains whether a particular Run is queued / in-progress / completed. For this, we create the following function.
import time

# creating a function to check whether the Run is completed or not
def poll_run(run, thread):
    while run.status != "completed":
        run = client.beta.threads.runs.retrieve(
            thread_id=thread.id,
            run_id=run.id,
        )
        time.sleep(0.5)
    return run

# waiting for the run to be completed
run = poll_run(run, thread)- Here, we create a function called poll_run(). This function takes in our Run and Thread objects that we created earlier.
- A Run is said to be processed when its status is “completed.” Hence, we poll the run to check its status if it has been completed or not in a loop.
- In this loop, we call the retrieve() method from the runs class and pass it the Run ID and Thread ID. The retrieve method will return the same Run object with an updated status.
- Now, we check whether the status has been updated to complete by retrieving the Run object every 0.5 seconds and polling its completion.
- If the Run status becomes completed, then we return the Run.
In this Run step, the Assistant we have created will utilize the Retrieval tool to retrieve the relevant information related to the user query from the available data call in the model we specified with the applicable data and generate a response. This generated response gets stored in the Thread. Now, our thread has two messages: one is the user query, and the other is the Assistant response.
How to Store Messages in the Thread?
Let’s get the messages stored in our Thread.
# extracting the message
messages = client.beta.threads.messages.list(thread_id=thread.id)

for m in messages:
print(f"{m.role}: {m.content[0].text.value}")- In the first step, we extract all the messages in the Thread by calling in the list() method of the messages class. To this, we pass the Thread ID to extract the messages of the Thread we want
- Next, we loop through all the messages in the list and print them out. The message we have uploaded to the Thread and the messages generated by the Assistant are stored in the message.content[0].text.value of the message object
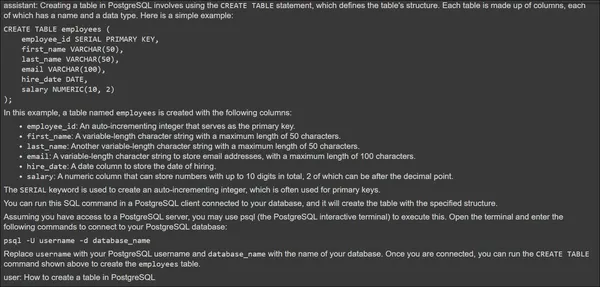
The above image shows the Assistant Response at the top and User Query at the bottom. Now, let’s give a second message and test if the Assistant can access the previous conversation.
# creating second message
message2 = client.beta.threads.messages.create(
    thread_id=thread.id,
    role="user",
    content="Add some value to the table you have created"
)

# creating an Run
run = client.beta.threads.runs.create(
    thread_id=thread.id,
    assistant_id=assistant.id
)

# waiting for the Run method to complete
run = poll_run(run, thread)

# extracting the message
messages = client.beta.threads.messages.list(thread_id=thread.id)

for m in messages:
print(f"{m.role}: {m.content[0].text.value}")- Here, we create another message called message2, and this time, we are passing the query “Add some value to the table you have created.” This query refers to the previous conversation and thus passes it to our Thread.
- Then we go through the same process of creating a Run, Running it with the Assistant, and polling it.
Finally, we are retrieving and printing all the messages from the Thread.
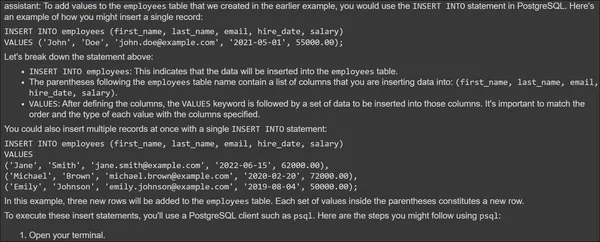
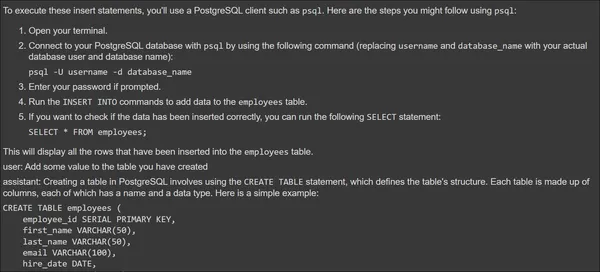
The Assistant could indeed access the information from the previous conversation and also use the Retrieval tool to generate a response for the query provided. Thus, through the OpenAI Assistant API, we can create custom Assistants and then integrate them in any form in our applications. OpenAI is also planning to release many tools that the Assistant API can use.
Assistant API Pricing
The Assistant API is billed based on the model selected and the tools used. The tools like the Retrieval and the Code Interpreter each have a separate cost of their own. Starting with the model, each model in the OpenAI has their separate cost based on the number of tokens used for the input and the number of output tokens generated. So, for the Model pricing, click here to check all the OpenAI Large Language Model prices.
Regarding the Code Interpreter, it is priced at $0.03 per session, with sessions active for one hour by default. One session is associated with one Thread, so if you have N Threads running, the cost will be N * $0.03.
On the other hand, Retrieval comes with a pricing of $0.20 per GB per assistant per day. If N Assistants access this Tool, it will be priced N * $0.2 / Day. The number of Threads does not affect the retrieval pricing.
Data Privacy and Ethical Concerns
Regarding the Ethical Concerns and the use of User Data, OpenAI puts Data Privacy on top of everything. The user will be the sole owner of the data sent to the OpenAI API and data received from it. Also, OpenAI does not train on the user data, and the data’s longevity is in the user’s control. Even the custom models trained in OpenAI only belong to the user who has created them.
OpenAI follows strict compliance. It enables data encryption at rest (via AES-256) and during transit (TLS 1.2+). OpenAI has been audited for SOC 2 compliance, meaning that OpenAI puts rigorous efforts into data privacy and security. OpenAI enables strict access control of who can access the data within the organization.
Conclusion
The OpenAI Assistants API offers a new approach for creating and integrating AI assistants into applications. These are the assistants developed to tackle a specific purpose/task. As we’ve explored the functionalities and tools of this API, including the code interpreter, retrieval, and the creation of custom tools, it becomes evident that developers now have a powerful arsenal. The stateful nature of assistants, managed seamlessly through Threads, reduces the burden on developers, allowing them to focus on creating tailored AI experiences.
Key Takeaways
- The Assistants API enables the development of purpose-built AI assistants tailored for specific tasks.
- Including tools like Code Interpreter and Retrieval broadens the scope of what AI assistants can accomplish, from running custom Python code to accessing external knowledge.
- The API introduces persistent and infinitely long threads, simplifying state management and providing flexibility for developers.
- The Threads and Assistants are isolated, allowing developers to utilize duplicate Threads and run other Assistants.
- The Function Calling Tool allows developers to use custom tools that the Assistant can use through the response generation process.
Frequently Asked Questions
A. OpenAI Assistants API is a tool for developers to create and integrate Assistants for specific application tasks.
A. The key objects include Assistant, Threads, Messages, Run, and Run Steps. These are the objects necessary for creating a specific Assistant from start to finish.
A. Runs can have statuses such as queued, in-progress, completed, requires_action, expired, canceling, canceled, and failed. We have to poll the Run object to check if it’s finished or not.
A. The data ingestion is taken care of by the OpenAI Retrieval Tool. This tool takes files of different formats, chunks them, and transforms them into embeddings. While querying, it will retrieve the relevant information related to the user’s query.
A. The Assistants API currently supports Retrieval and Code Interpreter Tools. It also includes Function Calling, which allows the developers to create their own tools for the assistant.
The media shown in this article is not owned by Analytics Vidhya and is used at the Author’s discretion.


