I’m an Innovation Evangelist for SAP. I typically spend this time of year on the road at conferences, but like many others I suddenly find myself spending more time in the virtual world!
After some requests from others, please find below a write-up of how I do interactive presentations (in Zoom, Skype, etc.) in front of PowerPoint slides.
First, a couple of examples (I got better at using the green screen tool after I did the second video — far less “halo” artifacts now).
Ingredients
Space
- I have my setup in a small attic room (oddly-shaped 8m2 / 86 sq ft.) It’s crowded, messy, and I’m very glad I don’t have to take it down and put it up again each time I present.
Green screen
- I have a piece of cheap stretched green fabric on the wall, that I also use to hang other backdrops (e.g. I have a fake brick wall for that “I’m in a loft” look). Were I to start again, I might go for a more practical option such as the Elgato collapsible green screen. Two metres width is minimum, go for much wider if you have the space.
- As much space as possible between the presenter and the green screen to avoid shadows from the presenter lights (see below). But the bigger the distance, the larger the green screen has to be.
Lighting
- In general, brighter lights translate directly into better video quality. I use older bright bulbs, because that’s what I have left over from my photography hobby, but modern LED lighting is much more practical and controllable (and not as hot!).
- First set of lighting: on the person. As broad and diffuse as possible (e.g. I don’t point the main lights directly at myself, but at the wall so it bounces back like a big softlight). I also added a ring light around the camera—not strictly necessary, but great for closeups, and it results in less annoying shadows on the green screen.
- Second set of lighting: as evenly as possible across the green screen. This is harder than it seems, and can require extra lights: e.g. one just behind the presenter, facing up and back towards the green screen, to compensate the shadows of the higher front lights.
- Points for style: a spotlight above and slightly behind the presenter, pointing down, helps create a crisp separation. I haven’t done this (yet?)
Camera and cables
- A camera that outputs a clean HDMI signal (720p is fine for live, up to 4K if you’re doing recordings). You can do it with just a webcam, but the quality is typically worse, it’s going to be harder to physically align things, and you’ll have less control over the exposure. I use a Sony RX100 VII, which is expensive and overkill for this (but it’s a great travel camera for conferences, etc.)
- A mini- or micro-HDMI to HDMI cable (depending on your camera)
- An HDMI-to-USB converter, e.g. the Elgato Camlink 4k (note this is required because it’s about HDMI in, not out)
- External power for the camera (you don’t want to have to worry about the batteries going dead)
Computer
- Powerful PC with lots of memory. You’re dealing with multiple video feeds. I have a 2018 15” MacBook Pro with 32Gb of memory, and the fan goes crazy. But a friend with a Asus Chromebook said that that actually worked a lot better for streaming than his MBP, so 🤷🏻♂️…
- Internet: wired ethernet is typically much faster and more reliable than wifi.
Second monitor
- The easiest way to get the presentation slides as a video feed is to use a separate monitor. It is theoretically possible to do it without, but harder (you’d have to reserve part of your laptop screen for the presentation, then stream just that part).
- Obviously requires an HDMI cable to the computer, and potentially a converter (e.g. for my MacBook Pro, I need to use an HDMI-to-USB-c converter).
Software
- Streaming-video-mixer software. E.g.
- OBS Studio Free, multiplatform, very powerful, but a bit geeky to use. If this works for you, then I recommend this! Unfortunately, I found that the green screen filter didn’t work well for me — and as open source software, it may be blacklisted in some organizations.
- ManyCam. Multi-platform, subscription, good already mix of power, quality, and ease of use. This is my go-to platform most of the time.
- Ecammlive, Mac-only, subscription, gives better quality/performance than ManyCam but a different set of features. I tend to use this when I need to present while also recording.
- Personify Multiplatform. Unlike the others, this is designed to put your video onto a screen share rather than sharing the screen over video. Video conferencing platforms use two different algorithms — video is optimized for frames per second, screen share is optimized for pixel quality. So personify is good for on-screen demos, but the video of the person is jerky. I typically present slides rather than doing demos, so this wasn’t a good option for me.
- Prezi video. Multiplatform, subscription. I think this is the best professional option if you don’t have a green screen: your slides are “on top of” your video, with transparency. But you have to put it into the prezi format in order to make the most of it.
- Chromacam. From the same company as Personify. Windows only — I haven’t tried it.
- Mimolive. Powerful, expensive, Mac-only. I haven’t tried it.
- Xsplit. Windows-only (for now). Recommended by one of the teams at SAP, but I haven’t tried it.
- Zoom. At the time of writing, it’s only in beta, but you can share slides as a virtual background in Zoom. The green-screen effect is bad.
- Video editing software if necessary (I use Adobe Premiere).
- Web conferencing software (Zoom currently has the reputation for the best video quality).
Audio
- You can theoretically not use a headset (just the microphone and speakers on the PC) but I find that it makes everything less clear (and my fan is LOUD).
- I use a separate microphone for presentations, clipped to my neckline, and I also have a discrete earpiece, like the ones they use on TV studios so I can hear the audience or producer if necessary.
Here’s what it looks like when I’m presenting (messy!)

And here’s the view of the green screen. If I had more space, I would have made it much wider…

Recipe 1: Pre-recorded video
- If you don’t have to do things live, these steps give the best quality (e.g. if you want 4K) and highest flexibility — and you don’t need a bunch of the ingredients above, like the ManyCam software or the HDMI camlink.
- You can’t see what you’re doing live, though — e.g. it’s harder to do weather-presenter-style pointing at things on the slide.
- Plug the microphone directly into the camera and record the video of yourself in front of the green screen directly onto the camera’s flash drive.
- Design the slides with the overlay in mind — e.g. put all the content on the left hand side, so that you can stand on the right hand side without blocking the content, and make sure you’re not using detailed diagrams or small fonts that will be illegible in a video feed.
- Set up the PowerPoint slides for recording: use a second monitor, move PowerPoint to that monitor. Go to “slide show / setup show” and choose “presented by an individual (window)”. Go into presentation mode, and maximize the window to take up the whole screen.
- Record the contents of the screen. I use SnagIt. Camtasia also works well, and I think you can even use Quicktime Player directly. Choose to also record the audio on the PC — this helps with synchronization below.
- Move the camera recording to your PC, and combine it with the screen recording using your video editing suite of choice. I use Adobe Premiere.
- Create two layers, put the green screen video layer on top of the slides layer.
- Synchronize the two videos using the audio feed (e.g. in Premiere, select the two layers, right-mouse-click, choose Synchronize)
- Add a green screen filter to the top layer (e.g. Adobe Premiere’s “ultra key” effect).
- Edit to your heart’s content.
Here’s a couple of examples of pre-recorded video in front of PowerPoint slides (that include embedded videos). You can see that the video quality is better than the interactive versions.
In this first one, the camera was very zoomed out, which meant that the raw image included junk from the room, beyond the edges of the green screen. I had to crop the output in Premiere (and be very careful when I was presenting not to reach out too far!)
This next one was done section by section, and I used the opportunity during editing to move myself around the screen. Since this one was in (bad) Spanish, I needed LOTS of takes to get it right…
Recipe 2: Live presentations
- Here are the steps for a full, interactive presentation. The idea is that my presentation is on a big screen in a conference room, with a laptop webcam pointing at the audience. I can see the audience and interact with them as closely as possible to actually being in the room.
- Set up the PowerPoint slides to play full screen on one of the monitors (see “recorded video” above).
- Plug the camera into the computer via the HDMI-to-USB adaptor. It should appear as a webcam available to any application. Set the camera zoom so you only have the green screen in the background, and at the right height so there’s just a little bit of room available above the presenter’s head. Try not to cut off the presenters hands if possible (hard if you don’t have that much space — the videos at the start of this post are examples where the cropping isn’t ideal). I manually set the image to slightly overexposed.
- Use live video mixing software to combine the green screen video feed with the PowerPoint slides. See above for the various software choices. I typically use ManyCam or EcammLive.
- Fire up the web conferencing software. Zoom has been a standout in terms of video quality recently, but all the standard platforms should work. Choose the “virtual webcam” from the video mixer software. Share your combined video feed and audio, and make it full screen for participants. If you are presenting to a room of people, use a separate laptop on the far end, with the webcam pointed towards the audience. the resolution is good enough to do things like ask them for a show of hands, etc.
- While presenting, the PowerPoint slides have to be the active application in order to move forward (I use a remote, which means almost running out of USB slots!). If you need to switch to the web conferencing software in order to scroll down the Q&A, for example, you have to remember to click back to the PowerPoint…
- Try to set up the physical space so that your eyes are as much on the camera as possible — but this is only possible up to an extent. For example, I set things up so that I am standing (better for presentations, I think), but this means having a pile of books on my desk to bring my PC up to the level of my hands. Since it’s better to have to have access to the keyboard, it’s not really possible to set everything up at eye-level, near the camera, and so one of the downsides is that I’m always having to look down to the screens to check Q&A etc.
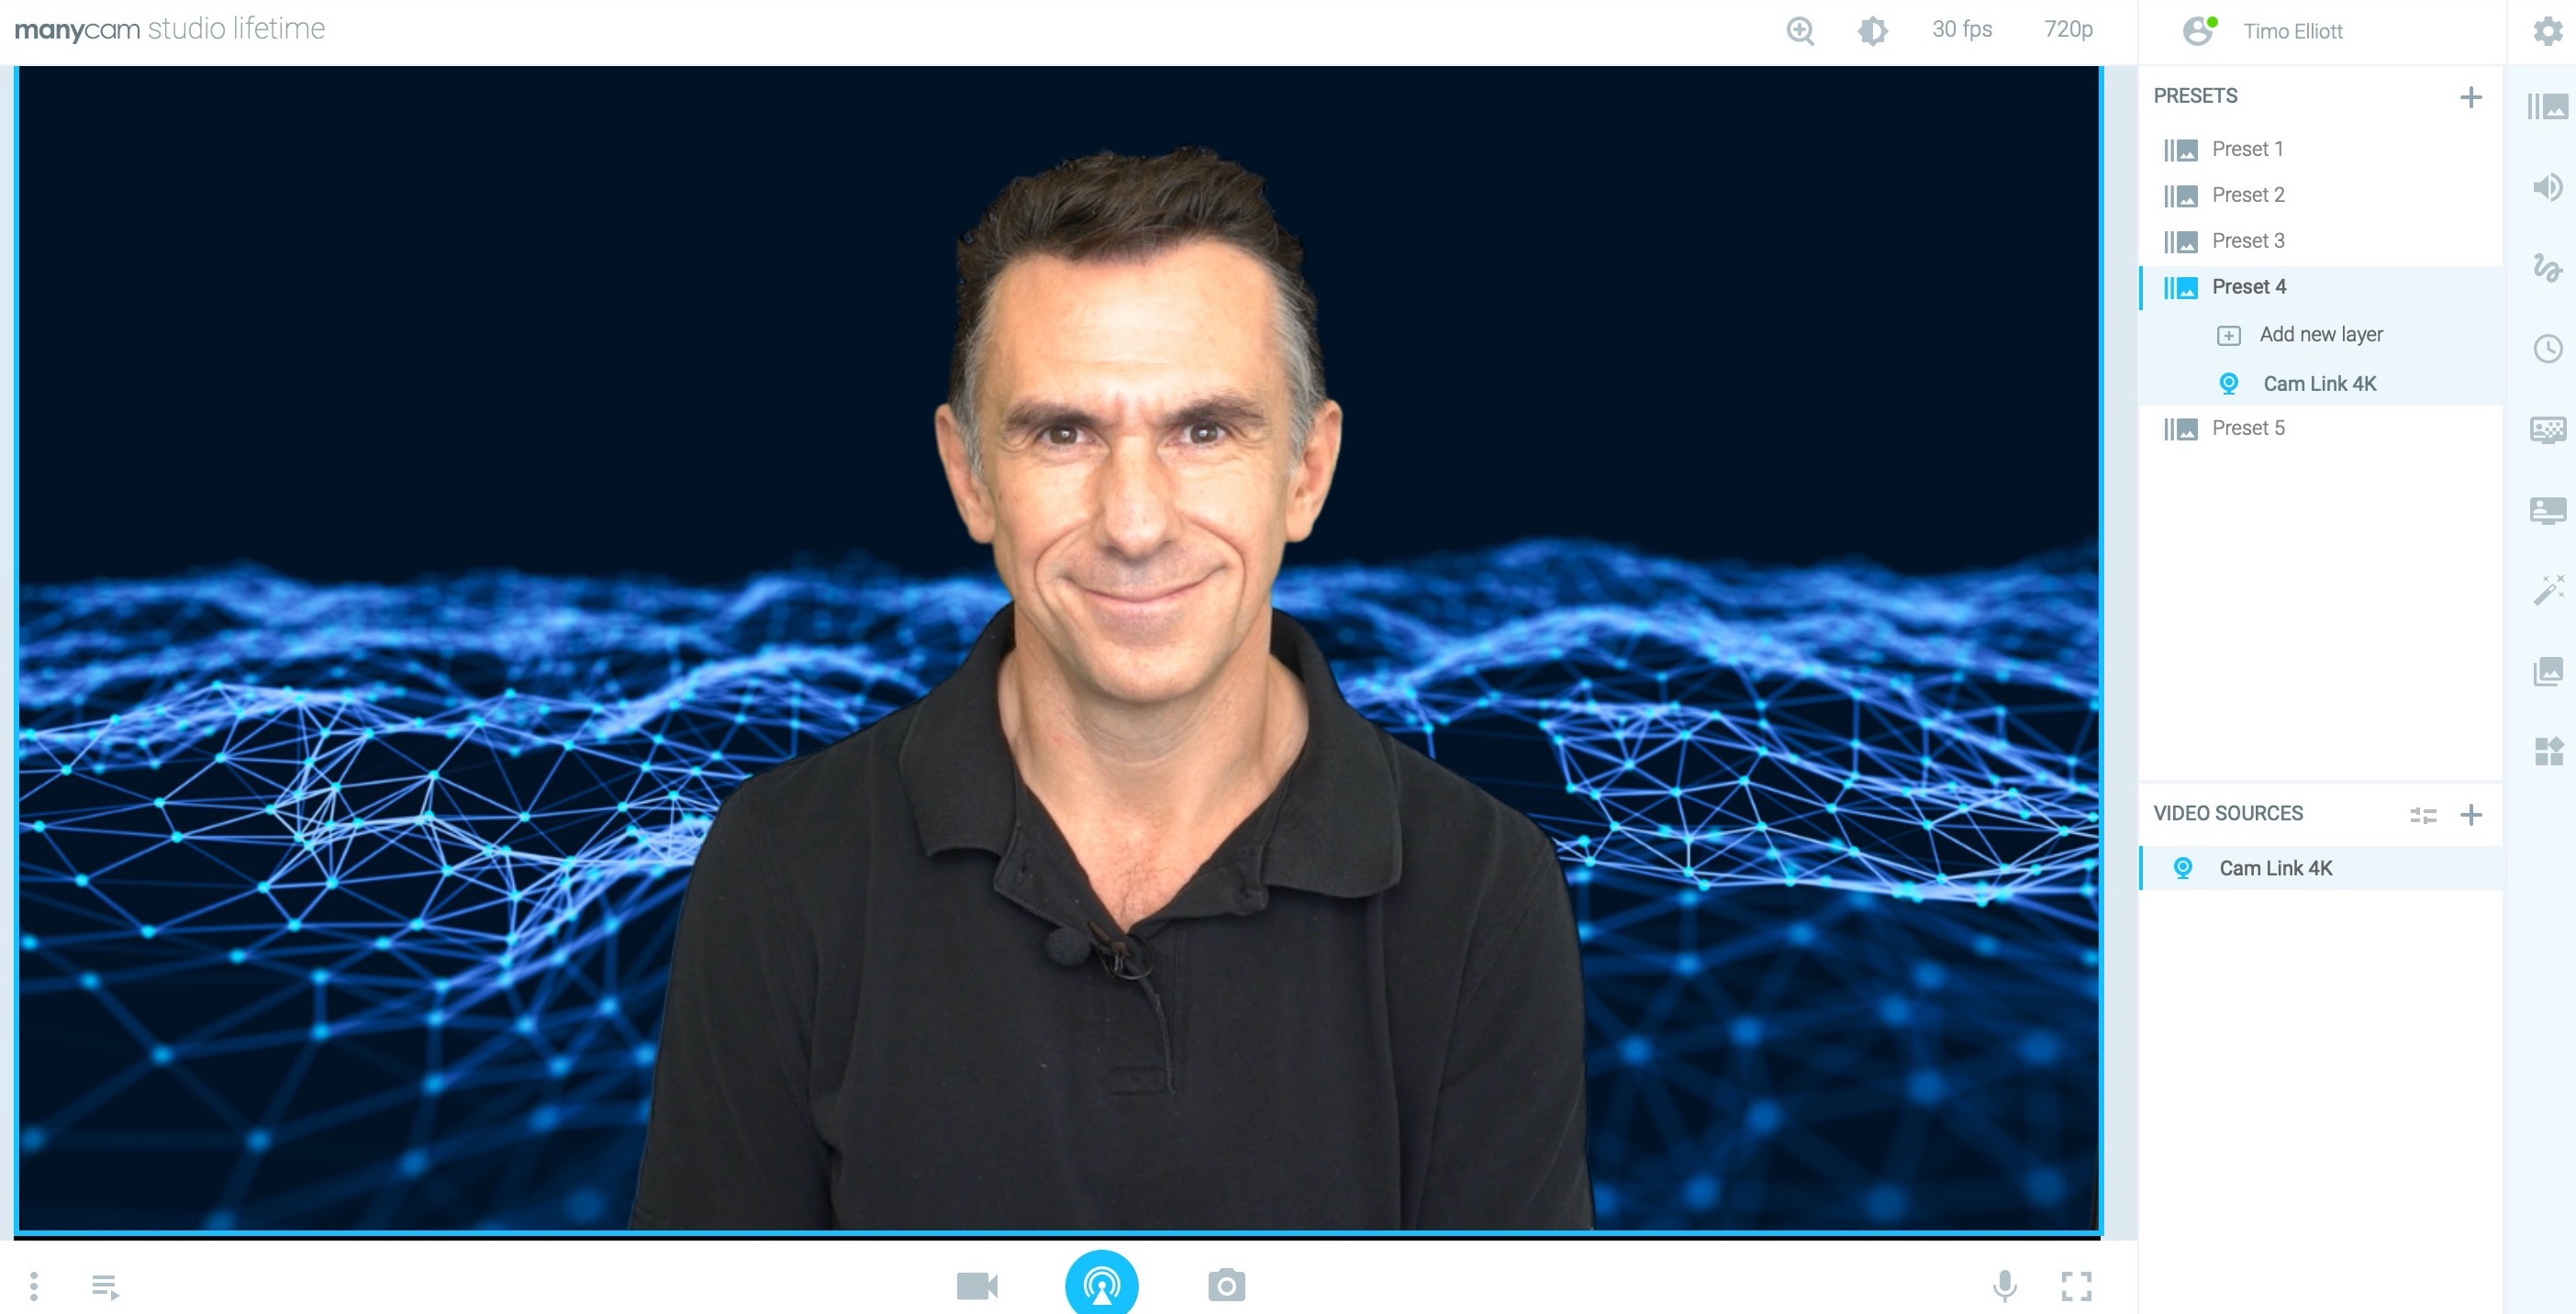
Here’s what the view looks like in ManyCam — you can see on the right-hand side that I’ve set up three layers: one for the slides, one for me & the green screen from the camera, and for style I’ve also added a “Best Run” SAP logo that always stays on top of the stream in the lower right-hand corner. At the bottom, you can see other preset views that I could switch to. This feed can then be accessed as a virtual webcam in any standard web conference tool.

I hope this was useful, good luck out there, stay safe, and any questions?!
[And let me know if you need a presenter on the topic of the business impacts of technology, illustrated with real-world examples, especially if it’s related to datata(analytics, AI etc)!]
Comments
14 responses to “Some Tips On Interactive Virtual Presentations”
Pretty much exactly what I do!
I use OBS and did this talk live at our corporate event in December last year, complete with video / motion clips and even sound effects 🙂
This was done from my dining room with a webcam.
https://youtu.be/pj8FZhjxOnU
hi, thanks for your tips, my problem, using manycam is that the powerpoint audio clip are heard very ditorted from listeners, I think because it puts all the systems sounds and send them to the webcam microphone. whicj is bad. is that correct? is there a workaround so that students can hear the powerpoin or shared videoclip sound properly?
thanks
Marcello
Marcello,
The ideal is to use the system sound directly. Here’s the note from ManyCam on how to do it — it’s easy on Windows, slightly more complicated on Mac, involving the installation of a third-party tool called Soundflower (I’ve used this, once it’s setup it’s easy to use). https://help.manycam.com/knowledge-base/capture-system-sounds/
Best of luck!
Timo
Thanks for sharing this 🙂
BTW, Manycam does (now) have a cropping function!
If I want to record a video in zoom, can I use a power point presentation as my backdrop (assume have to use a green screen also for this) and then have an image of me in the front talking and presenting? like in your videos above?
Yes! You need special software — e.g. ManyCam or OBS Studio, that lets you add several layers…
Thank you so much! My setup is in an 8m2 attic too but the roof slopes a lot so even more restrictions! Totally agree about standing up to present. Thanks again!
[…] above: Same old lecture at people is not going to cut it. He just posted a great step by step summary of how he does these beautiful video presentations as well as a some thoughts on how to switch an all day workshop into a virtual […]
You’re bringing quarantine presentations to the next level, Timo.
Now I need to find some green fabric in the garage.
Thanks for sharing!
[…] “It’s probably not a presentation downside, it’s an viewers downside. It’s simpler than ever to make noise, however more durable than ever to get listened to. A deluge of digital is coming down the pipeline: so how does any single occasion stand out? That is the problem that organizations must conquer. That stated, it ups the sport: at a bodily occasion, persons are roughly caught, irrespective of how boring. However in our on-line world, each different doable distraction (together with household co-workers) are simply an arm’s size away. All of the content material needs to be ‘with individuals’ not ‘at individuals’, so take into consideration co-creation of content material between the host and the attendees. It is a lot like how so-called unconferences work and it means giving up extra management. Once more, tech companies must prepare for a brand new world order in some ways,” stated Elliott, who affords his personal recommendations on digital shows here. […]
[…] “It’s not really a presentation problem, it’s an audience problem. It’s easier than ever to make noise, but harder than ever to get listened to. A deluge of digital is coming down the pipeline: so how does any single event stand out? This is the challenge that organizations will have to conquer. That said, it ups the game: at a physical event, people are more or less stuck, no matter how boring. But in cyberspace, every other possible distraction (including family co-workers) are just an arm’s length away. All the content has to be ‘with people’ not ‘at people’, so think about co-creation of content between the host and the attendees. This is a lot like how so-called unconferences work and it means giving up more control. Again, tech firms need to get ready for a new world order in many ways,” said Elliott, who offers his own tips on virtual presentations here. […]
[…] “It’s probably not a presentation drawback, it’s an viewers drawback. It’s simpler than ever to make noise, however more durable than ever to get listened to. A deluge of digital is coming down the pipeline: so how does any single occasion stand out? That is the problem that organizations should conquer. That stated, it ups the sport: at a bodily occasion, persons are roughly caught, regardless of how boring. However in our on-line world, each different potential distraction (together with household co-workers) are simply an arm’s size away. All of the content material needs to be ‘with folks’ not ‘at folks’, so take into consideration co-creation of content material between the host and the attendees. It is a lot like how so-called unconferences work and it means giving up extra management. Once more, tech corporations have to prepare for a brand new world order in some ways,” stated Elliott, who presents his personal recommendations on digital shows right here. […]
[…] “It’s not really a presentation problem, it’s an audience problem. It’s easier than ever to make noise, but harder than ever to get listened to. A deluge of digital is coming down the pipeline: so how does any single event stand out? This is the challenge that organizations will have to conquer. That said, it ups the game: at a physical event, people are more or less stuck, no matter how boring. But in cyberspace, every other possible distraction (including family co-workers) are just an arm’s length away. All the content has to be ‘with people’ not ‘at people’, so think about co-creation of content between the host and the attendees. This is a lot like how so-called unconferences work and it means giving up more control. Again, tech firms need to get ready for a new world order in many ways,” said Elliott, who offers his own tips on virtual presentations here. […]
[…] previously wrote a post about how to get a really professional look when using video conferencing, but here are some quick steps to get a better image out of even the most basic webcam built into […]